
搜索到
13
篇与
的结果
-
 mAP计算工具使用|快速计算mAP 计算mAP的工具:https://github.com/Cartucho/mAP1.使用步骤clone代码git clone https://github.com/Cartucho/mAPCreate the ground-truth files(将标签文件转为对应的格式,,工具参考2.1)format<class_name> <left> <top> <right> <bottom> [<difficult>]E.g. "image_1.txt"tvmonitor 2 10 173 238 book 439 157 556 241 book 437 246 518 351 difficult pottedplant 272 190 316 259Copy the ground-truth files into the folder input/ground-truth/Create the detection-results filesformat<class_name> <confidence> <left> <top> <right> <bottom>E.g. "image_1.txt"tvmonitor 0.471781 0 13 174 244 cup 0.414941 274 226 301 265 book 0.460851 429 219 528 247 chair 0.292345 0 199 88 436 book 0.269833 433 260 506 336Copy the detection-results files into the folder input/detection-results/Run the codepython main.py2.工具补充2.1 VOC_2_gt.py设置好xml_dir并执行即可得到对应的gt_txt文件import os import xmltodict import shutil from tqdm import tqdm # TODO:需要修改的内容 xml_dir = "/data/jupiter/project/dataset/帯広空港_per_frame/xml/" gt_dir = "./input/ground-truth/" shutil.rmtree(gt_dir) os.mkdir(gt_dir) """ 将voc xml 的数据转为对应的gt_str """ def voc_2_gt_str(xml_dict): objects = xml_dict["annotation"]["object"] obj_list = [] if isinstance(objects,list): # xml文件中包含多个object for obj in objects: obj_list.append(obj) else: # xml文件中包含1个object obj_list.append(objects) # 获取gt格式的数据信息 gt_str = "" for obj in obj_list: left = int(obj['bndbox']['xmin']) top = int(obj['bndbox']['ymin']) right = int(obj['bndbox']['xmax']) bottom = int(obj['bndbox']['ymax']) obj_name = obj['name'] gt_str += "%s %s %s %s %s\n" % (obj_name, left, top, right, bottom) return gt_str xml_list = os.listdir(xml_dir) pbar = tqdm(total=len(xml_list)) # 加入进度条支持 pbar.set_description("VOC2GT") # 设置前缀 for tmp_file in xml_list: xml_path = os.path.join(xml_dir,tmp_file) gt_txt_path = os.path.join(gt_dir,tmp_file.replace(".xml", ".txt")) # 读取xml文件+转为字典 with open(xml_path,'r',encoding="utf8") as f: xml_str = f.read() xml_dict = xmltodict.parse(xml_str) # 提取对应的数据 gt_str = voc_2_gt_str(xml_dict) # 写入对应的gt_txt文件 with open(gt_txt_path, "w") as f: f.write(gt_str) pbar.update(1) pbar.close()VOC2GT: 27%|██████████████████████████████████████████████████████████████▌ | 24013/89029 [03:25<09:54, 109.31it/s]2.2 YOLOv5_2_dr.py# YOLOv5_2_dr import os import xmltodict import shutil from tqdm import tqdm # TODO:需要修改的内容 yolov5_detect_txt_dir = "/data/jupiter/project/目标检测对比实验/yolov5/runs/detect/exp3/labels" cls_list = ['conveyor', 'refueller', 'aircraft', 'lounge', 'dining car', 'front of baggage car', 'tractor'] img_width = 1632 img_height = 1080 def txt_convert(txt_src,img_width,img_height,cls_list): txt_dst = "" for line in txt_src.split("\n"): if(len(line)==0):continue cls_id,dx,dy,dw,dh,conf = line.split(" ") cls_name = cls_list[int(cls_id)].replace(" ","") x_center = int(float(dx)*img_width) y_center = int(float(dy)*img_height) w = int(float(dw)*img_width) h = int(float(dh)*img_height) x1 = x_center - int(w/2) y1 = y_center - int(h/2) x2 = x1 + w y2 = y1 + h txt_dst += "{} {} {} {} {} {}\n".format(cls_name,conf,x1,y1,x2,y2) return txt_dst dr_dir = "./input/detection-results/" txt_list = os.listdir(yolov5_detect_txt_dir) pbar = tqdm(total=len(txt_list)) # 加入进度条支持 pbar.set_description("YOLOv5_2_dr") # 设置前缀 for file in txt_list: txt_path_src = os.path.join(yolov5_detect_txt_dir,file) txt_path_dst = os.path.join(dr_dir,"{:>05d}.txt".format(int(file.split("_")[1][:-4]))) # 读取原文件 with open(txt_path_src) as f: txt_src = f.read() # 转为目标格式 txt_dst = txt_convert(txt_src,img_width,img_height,cls_list) # 写入对应的dr_txt文件 with open(txt_path_dst,"w") as f: f.write(txt_dst) pbar.update(1) pbar.close()参考资料https://github.com/Cartucho/mAP.git目标检测中的mAP及代码实现
-
VOC2VID:将VOC格式的数据集转为视频进行查看|可视化视频标注结果 通常用于查看针对连续视频标注的结果,因博主有视频目标检测的需求所以写了该小工具# 可视化视频标注结果 import numpy as np import cv2 import xmltodict import os from tqdm import tqdm # 基本信息填充 xml_dir="./data_handle/xml/"# VOC xml文件所在文件夹 img_dir="./data_handle/img/"# VOC img文件所在文件夹 class_list = ['conveyor', 'refueller', 'aircraft', 'lounge', 'dining car', 'front of baggage car', 'tractor'] # class_list """ 将voc xml 的数据转为对应的bbox_list """ def voc_2_yolo_bbox_list(xml_dict): objects = xml_dict["annotation"]["object"] obj_list = [] if isinstance(objects,list): # xml文件中包含多个object for obj in objects: obj_list.append(obj) else: # xml文件中包含1个object obj_list.append(objects) bbox_list = [] for obj in obj_list: # 获取voc格式的数据信息 x1 = int(obj['bndbox']['xmin']) y1 = int(obj['bndbox']['ymin']) x2 = int(obj['bndbox']['xmax']) y2 = int(obj['bndbox']['ymax']) score = 1 cls_id = class_list.index(obj['name']) bbox_list.append([x1,y1,x2,y2,score,cls_id]) return bbox_list """ 生成color_list """ def random_color(color_num): color_list = [] for j in range(color_num): color_single = (int(np.random.randint(0,255)),int(np.random.randint(0,255)),int(np.random.randint(0,255))) color_list.append(tuple(color_single)) return color_list color_list = random_color(len(class_list)) """ 目标检测预测结果可视化函数 + img:进行目标检测的图片 + bbox_list:处理过的预测结果 + class_name_list:用于将cls_is转为cls_name + color_list:绘制不同的类别使用不同的颜色 + thresh:阈值 """ def vis_detections(img, bbox_list,class_name_list=class_list,color_list=color_list,thresh=0.5): for bbox in bbox_list: # 参数解析 x1,y1,x2,y2,score,cls_id = bbox[0],bbox[1],bbox[2], bbox[3],bbox[4],int(bbox[5]) cls_name = class_name_list[cls_id] color = color_list[cls_id] # 跳过低于阈值的框 if score<thresh:continue # 画框 cv2.rectangle(img, (int(x1),int(y1)), (int(x2),int(y2)),color_list[cls_id],2) # 画label label_text = '{:s} {:.3f}'.format(cls_name, score) cv2.putText(img, label_text, (x1-5, y1-5),cv2.FONT_HERSHEY_SIMPLEX, 0.8, color_list[cls_id], 2) return img img_list = os.listdir(img_dir) frame_rate = 30 # 帧率 frame_shape = cv2.imread(os.path.join(img_dir,img_list[0])).shape[:-1] # 图片大小/帧shape frame_shape = (frame_shape[1],frame_shape[0]) # 交换w和h videoWriter = cv2.VideoWriter('result.mp4', cv2.VideoWriter_fourcc(*'MJPG'), frame_rate, frame_shape) # 初始化视频帧writer # 加入进度条支持 pbar = tqdm(total=len(img_list)) pbar.set_description("VOC2VID") # 开始逐帧写入视频帧 frame_id = 1 for file in img_list: img_path = os.path.join(img_dir,file) # img地址 img = cv2.imread(img_path) # 读取img xml_path = os.path.join(xml_dir,file[:-3]+"xml") # xml地址 # 读取xml文件+转为字典+ 转为bbox_list with open(xml_path,'r',encoding="utf8") as f: xml_str = f.read() xml_dict = xmltodict.parse(xml_str) bbox_list = voc_2_yolo_bbox_list(xml_dict) # 绘制xml标注结果 img = vis_detections(img,bbox_list) frame_id += 1 # if frame_id%120 == 0: # break videoWriter.write(img) pbar.update(1) pbar.close() videoWriter.release()
-
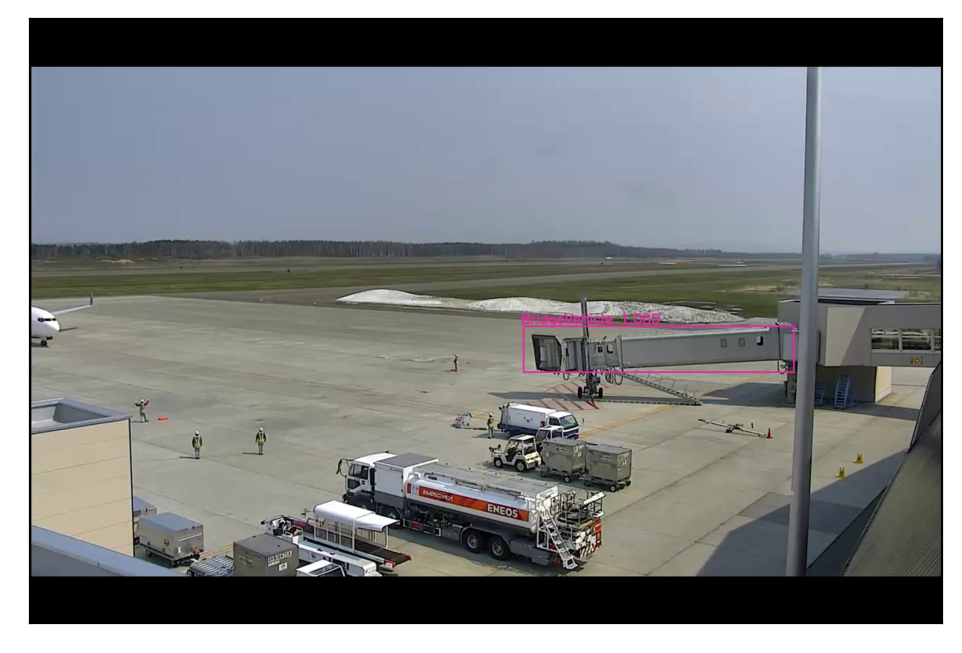
目标检测结果可视化 1.核心函数# 目标检测效果可视化 import numpy as np import cv2 # class_list class_list = ['Plane', 'BridgeVehicle', 'Person', 'LuggageVehicle', 'RefuelVehicle', 'FoodVehicle', 'LuggageVehicleHead', 'TractorVehicle', 'RubbishVehicle', 'FollowMe'] """ 生成color_list """ # 生成number个color def random_color(color_num): color_list = [] for j in range(color_num): color_single = (int(np.random.randint(0,255)),int(np.random.randint(0,255)),int(np.random.randint(0,255))) color_list.append(tuple(color_single)) return color_list color_list = random_color(len(class_list)) """ 目标检测预测结果可视化函数 + img:进行目标检测的图片 + bbox_list:处理过的预测结果 + class_name_list:用于将cls_is转为cls_name + color_list:绘制不同的类别使用不同的颜色 + thresh:阈值 """ def vis_detections(img, bbox_list,class_name_list=class_list,color_list=color_list,thresh=0.5): for bbox in bbox_list: # 参数解析 x1,y1,x2,y2,score,cls_id = bbox[0],bbox[1],bbox[2], bbox[3],bbox[4],int(bbox[5]) cls_name = class_name_list[cls_id] color = color_list[cls_id] # 跳过低于阈值的框 if score<thresh:continue # 画框 cv2.rectangle(img, (int(x1),int(y1)), (int(x2),int(y2)),color_list[cls_id],2) # 画label label_text = '{:s} {:.3f}'.format(cls_name, score) cv2.putText(img, label_text, (x1-5, y1-5),cv2.FONT_HERSHEY_SIMPLEX, 0.8, color_list[cls_id], 2) return img2.调用测试img = cv2.imread("./data_handle/img/00001.jpg.") bbox_list = [ [882,549,1365,631,1,1] ] img = vis_detections(img,bbox_list) img_show = cv2.cvtColor(img,cv2.COLOR_BGR2RGB) import matplotlib.pyplot as plt plt.figure(dpi=200) plt.xticks([]) plt.yticks([]) plt.imshow(img_show) plt.show()
-
YOLO2VOC:将YOLO格式的数据转为xml格式的数据 当我们使用训练好的模型进行辅助标记的时候会有将YOLO检测到的数据转为VOC格式的xml的需求import xmltodict from xml.dom import minidom import copy # 待填充数据 frame_id = 3 # 视频帧编号 class_list = ['conveyor', 'refueller', 'aircraft', 'lounge', 'dining car', 'front of baggage car', 'tractor'] #类别信息 bbox_list = [[5, 824, 747, 912, 809], [3, 882, 549, 1365, 631], [4, 536, 768, 1023, 988], [1, 846, 687, 983, 747], [2, 2, 418, 126, 588], [0, 402, 847, 696, 987], [5, 844, 688, 984, 750]] # 准备相关模板 xml_base =""" <annotation> <folder>img</folder> <filename></filename> <path></path> <size> <width>1632</width> <height>1080</height> <depth>3</depth> </size> </annotation> """ obj_base =""" <object> <name></name> <bndbox> <xmin></xmin> <ymin></ymin> <xmax></xmax> <ymax></ymax> </bndbox> </object> """ # 读取模板并填充基本信息 xml_dict = xmltodict.parse(xml_base) frame_id_format = "{:>05d}".format(frame_id) filename = frame_id_format+".jpg" path = "./img/"+filename xml_dict["annotation"]["filename"] = filename xml_dict["annotation"]["path"] = path # 填入obj数据 xml_dict["annotation"]["object"] = [] obj_template = xmltodict.parse(obj_base)["object"] for bbox in bbox_list: tmp_obj = copy.deepcopy(obj_template) cls_id,x1,y1,x2,y2 = bbox tmp_obj["name"] = class_list[cls_id] tmp_obj["bndbox"]["xmin"] = x1 tmp_obj["bndbox"]["ymin"] = y1 tmp_obj["bndbox"]["xmax"] = x2 tmp_obj["bndbox"]["ymax"] = y2 xml_dict["annotation"]["object"].append(tmp_obj) xmlstr = xmltodict.unparse(xml_dict) xml_pretty_str = minidom.parseString(xmlstr).toprettyxml() print(xml_pretty_str)
-
VOC格式数据集xml文件处理-类别增、删、改工具 1.删除xml中某一类别import xmltodict import os from xml.dom import minidom from tqdm import tqdm # filter class class_filter_list = ["person","baggage car"] xml_dir="./新建文件夹/"# VOC xml文件所在文件夹 # 加入进度条支持 pbar = tqdm(total=len(os.listdir(xml_dir))) pbar.set_description("VOC xml filter") # 设置前缀 # 逐一处理xml文件 for file in os.listdir(xml_dir): if not file.endswith(".xml"): pbar.update(1) continue # 过滤掉非xml文件 xml_path = os.path.join(xml_dir,file) # 拼接xml地址 # 读取xml文件+转为字典 with open(xml_path,'r',encoding="utf8") as f: xml_str = f.read() xml_dic = xmltodict.parse(xml_str) # 删除掉待过滤的类别 tmp_obj_list = xml_dic["annotation"]["object"] tmp_obj_list_fiter = [] for tmp_obj in tmp_obj_list: if not tmp_obj["name"] in class_filter_list: tmp_obj_list_fiter.append(tmp_obj) xml_dic["annotation"]["object"] = tmp_obj_list_fiter xmlstr = xmltodict.unparse(xml_dic) xml_pretty_str = minidom.parseString(xmlstr).toprettyxml() with open(xml_path,"w",encoding="utf8") as f: f.write(xml_pretty_str) pbar.update(1) pbar.close()2.指定帧区间添加特定bbox# 在固定位置添加指定的候选框 import xmltodict import os from xml.dom import minidom from tqdm import tqdm import copy xml_dir="./data_handle/xml/"# 待处理xml文件夹 # 待添加bbox xml = """ <object> <name>LuggageVehicle</name> <pose>Unspecified</pose> <truncated>0</truncated> <difficult>0</difficult> <bndbox> <xmin>212</xmin> <ymin>71</ymin> <xmax>284</xmax> <ymax>110</ymax> </bndbox> </object> """ xml_dict = xmltodict.parse(xml) obj = xml_dict["object"] cls_add = obj["name"] bndbox = obj["bndbox"] bbox_add = [int(bndbox["xmin"]),int(bndbox["ymin"]),int(bndbox["xmax"]),int(bndbox["ymax"])] # 起止帧id frame_begin = 84543 frame_end = 84919 # 加入进度条支持 pbar = tqdm(total=len(os.listdir(xml_dir))) pbar.set_description("VOC xml add class") # 设置前缀 # 逐一处理xml文件 for file in os.listdir(xml_dir): if not file.endswith(".xml"): pbar.update(1) continue # 过滤掉非xml文件 if int(file[:-4])<frame_begin or int(file[:-4])>frame_end: pbar.update(1) continue xml_path = os.path.join(xml_dir,file) # 拼接地址 # 读取xml文件+转为字典 with open(xml_path,'r',encoding="utf8") as f: xml_str = f.read() xml_dic = xmltodict.parse(xml_str) # 添加类别 tmp_obj_list = xml_dic["annotation"]["object"] tmp_obj = copy.deepcopy(tmp_obj_list[0]) tmp_obj["name"] = cls_add tmp_obj["bndbox"]["xmin"]=bbox_add[0] tmp_obj["bndbox"]["ymin"]=bbox_add[1] tmp_obj["bndbox"]["xmax"]=bbox_add[2] tmp_obj["bndbox"]["ymax"]=bbox_add[3] tmp_obj_list.append(tmp_obj) xml_dic["annotation"]["object"] = tmp_obj_list xmlstr = xmltodict.unparse(xml_dic) xml_pretty_str = minidom.parseString(xmlstr).toprettyxml() with open(xml_path,"w",encoding="utf8") as f: f.write(xml_pretty_str) pbar.update(1) pbar.close()3.指定帧区间删除特定的bbox""" IOU计算 + input + box1:[box1_x1,box1_y1,box1_x2,box1_y2] + box2:[box2_x1,box2_y1,box2_x2,box2_y2] + output + iou值 """ def cal_iou(box1,box2): # 判断是否能相交 if abs(box2[2]+box2[0]-box1[2]-box1[0])>box2[2]-box2[0]+box1[2]-box1[0]: return 0 if abs(box2[3]+box2[1]-box1[3]-box1[1])>box2[3]-box2[1]+box1[3]-box1[1]: return 0 # 求相交区域左上角的坐标和右下角的坐标 box_intersect_x1 = max(box1[0], box2[0]) box_intersect_y1 = max(box1[1], box2[1]) box_intersect_x2 = min(box1[2], box2[2]) box_intersect_y2 = min(box1[3], box2[3]) # 求二者相交的面积 area_intersect = (box_intersect_y2 - box_intersect_y1) * (box_intersect_x2 - box_intersect_x1) # 求box1,box2的面积 area_box1 = (box1[2] - box1[0]) * (box1[3] - box1[1]) area_box2 = (box2[2] - box2[0]) * (box2[3] - box2[1]) # 求二者相并的面积 area_union = area_box1 + area_box2 - area_intersect # 计算iou(交并比) iou = area_intersect / area_union return iou# 删除指定的bbox import xmltodict import os from xml.dom import minidom from tqdm import tqdm xml_dir="./data_handle/xml/"# VOC xml文件所在文件夹 # 匹配待删除的bbox xml = """ <object> <name>Person</name> <bndbox> <xmin>901</xmin> <ymin>6</ymin> <xmax>920</xmax> <ymax>31</ymax> </bndbox> </object> """ xml_dict = xmltodict.parse(xml) obj = xml_dict["object"] cls_filter = obj["name"] bndbox = obj["bndbox"] bbox_filter = [int(bndbox["xmin"]),int(bndbox["ymin"]),int(bndbox["xmax"]),int(bndbox["ymax"])] iou_filter = 0.6 # 起止帧id frame_begin = 85000 frame_end = 85427 # 加入进度条支持 pbar = tqdm(total=len(os.listdir(xml_dir))) pbar.set_description("VOC xml filter") # 设置前缀 # 逐一处理xml文件 for file in os.listdir(xml_dir): if not file.endswith(".xml"): pbar.update(1) continue # 过滤掉非xml文件 if int(file[:-4])<frame_begin or int(file[:-4])>frame_end: pbar.update(1) continue xml_path = os.path.join(xml_dir,file) # 拼接xml地址 # 读取xml文件+转为字典 with open(xml_path,'r',encoding="utf8") as f: xml_str = f.read() xml_dic = xmltodict.parse(xml_str) # 删除掉待过滤的类别 tmp_obj_list = xml_dic["annotation"]["object"] tmp_obj_list_fiter = [] for tmp_obj in tmp_obj_list: tmp_bndbox = tmp_obj["bndbox"] tmp_obj_bbox = [int(tmp_bndbox["xmin"]),int(tmp_bndbox["ymin"]),int(tmp_bndbox["xmax"]),int(tmp_bndbox["ymax"])] if tmp_obj["name"]==cls_filter and cal_iou(bbox_filter,tmp_obj_bbox)>iou_filter: print(cal_iou(bbox_filter,tmp_obj_bbox)) pass else: tmp_obj_list_fiter.append(tmp_obj) xml_dic["annotation"]["object"] = tmp_obj_list_fiter xmlstr = xmltodict.unparse(xml_dic) xml_pretty_str = minidom.parseString(xmlstr).toprettyxml() with open(xml_path,"w",encoding="utf8") as f: f.write(xml_pretty_str) pbar.update(1) pbar.close()4.指定帧区间修改指定bbox的类别""" IOU计算 + input + box1:[box1_x1,box1_y1,box1_x2,box1_y2] + box2:[box2_x1,box2_y1,box2_x2,box2_y2] + output + iou值 """ def cal_iou(box1,box2): # 判断是否能相交 if abs(box2[2]+box2[0]-box1[2]-box1[0])>box2[2]-box2[0]+box1[2]-box1[0]: return 0 if abs(box2[3]+box2[1]-box1[3]-box1[1])>box2[3]-box2[1]+box1[3]-box1[1]: return 0 # 求相交区域左上角的坐标和右下角的坐标 box_intersect_x1 = max(box1[0], box2[0]) box_intersect_y1 = max(box1[1], box2[1]) box_intersect_x2 = min(box1[2], box2[2]) box_intersect_y2 = min(box1[3], box2[3]) # 求二者相交的面积 area_intersect = (box_intersect_y2 - box_intersect_y1) * (box_intersect_x2 - box_intersect_x1) # 求box1,box2的面积 area_box1 = (box1[2] - box1[0]) * (box1[3] - box1[1]) area_box2 = (box2[2] - box2[0]) * (box2[3] - box2[1]) # 求二者相并的面积 area_union = area_box1 + area_box2 - area_intersect # 计算iou(交并比) iou = area_intersect / area_union return iou # 修改指定框的类别 import xmltodict import os from xml.dom import minidom from tqdm import tqdm xml_dir="./data_handle/xml/"# VOC xml文件所在文件夹 # 匹配待修改的bbox xml = """ <object> <name>RefuelVehicle</name> <pose>Unspecified</pose> <truncated>0</truncated> <difficult>0</difficult> <bndbox> <xmin>106</xmin> <ymin>389</ymin> <xmax>237</xmax> <ymax>542</ymax> </bndbox> </object> """ xml_dict = xmltodict.parse(xml) obj = xml_dict["object"] cls_filter_src = obj["name"] bndbox = obj["bndbox"] bbox_filter = [int(bndbox["xmin"]),int(bndbox["ymin"]),int(bndbox["xmax"]),int(bndbox["ymax"])] cls_filter_dst = "LuggageVehicle" iou_filter = 0.99 # 起止帧id frame_begin = 59680 frame_end = 60000 # 加入进度条支持 pbar = tqdm(total=len(os.listdir(xml_dir))) pbar.set_description("VOC xml filter") # 设置前缀 # 逐一处理xml文件 for file in os.listdir(xml_dir): if not file.endswith(".xml"): pbar.update(1) continue # 过滤掉非xml文件 if int(file[:-4])<frame_begin or int(file[:-4])>frame_end: pbar.update(1) continue xml_path = os.path.join(xml_dir,file) # 拼接原始地址 # 读取xml文件+转为字典 with open(xml_path,'r',encoding="utf8") as f: xml_str = f.read() xml_dic = xmltodict.parse(xml_str) # 删除掉待过滤的类别 tmp_obj_list = xml_dic["annotation"]["object"] tmp_obj_list_fiter = [] for tmp_obj in tmp_obj_list: tmp_bndbox = tmp_obj["bndbox"] tmp_obj_bbox = [int(tmp_bndbox["xmin"]),int(tmp_bndbox["ymin"]),int(tmp_bndbox["xmax"]),int(tmp_bndbox["ymax"])] if tmp_obj["name"]==cls_filter_src and cal_iou(bbox_filter,tmp_obj_bbox)>iou_filter: tmp_obj["name"]=cls_filter_dst tmp_obj_list_fiter.append(tmp_obj) else: tmp_obj_list_fiter.append(tmp_obj) xml_dic["annotation"]["object"] = tmp_obj_list_fiter xmlstr = xmltodict.unparse(xml_dic) xml_pretty_str = minidom.parseString(xmlstr).toprettyxml() with open(xml_path,"w",encoding="utf8") as f: f.write(xml_pretty_str) pbar.update(1) pbar.close()
-
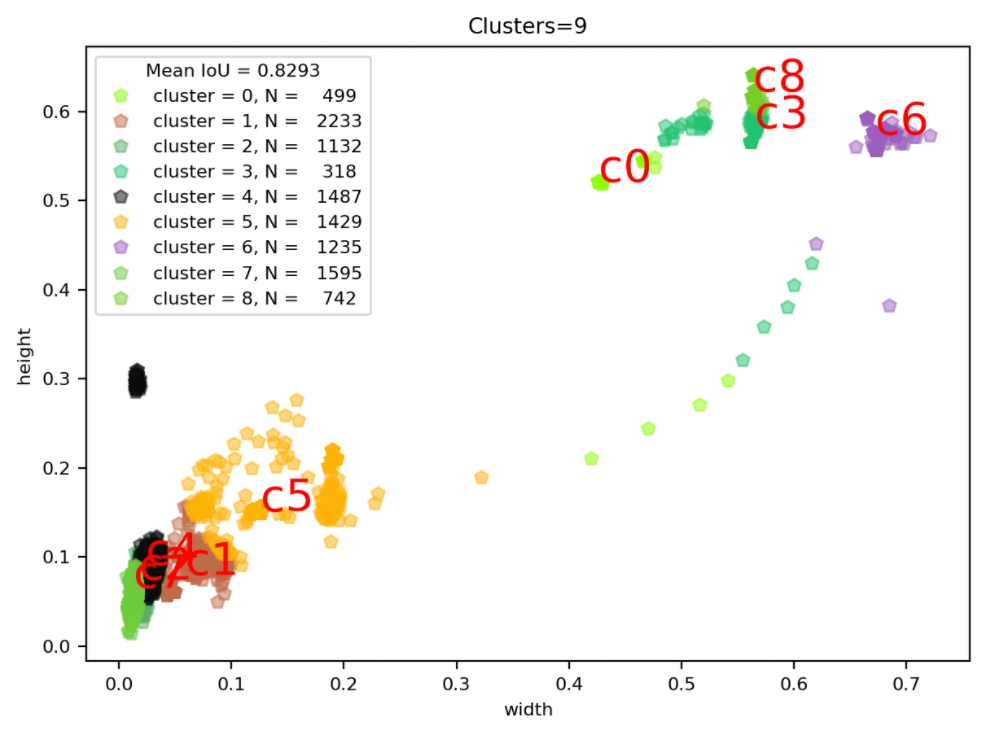
VOC数据集的Anchor聚类--Kmeans算法实现 1.K-means算法具体介绍参考:Kmeans算法简介k-means聚类的算法运行过程:(1)选择k个初始聚类中心 (2)计算每个对象与这k个中心各自的距离,按照最小距离原则分配到最邻近聚类 (3)使用每个聚类中的样本均值作为新的聚类中心 (4)重复步骤(2)和(3)直到聚类中心不再变化 (5)结束,得到k个聚类2.算法实现2.1数据加载函数封装# STEP1:加载数据集,获取所有box的width、height import os from progressbar import * import xmltodict import numpy as np def load_dataset(data_root): xml_dir= os.path.join(data_root,"Annotations") #xml文件路径(Annotations) width_height_list = [] #用于存储统计结果 #进度条功能 widgets = ['box width_height 统计: ',Percentage(), ' ', Bar('#'),' ', Timer(),' ', ETA()] pbar = ProgressBar(widgets=widgets, maxval=len(os.listdir(xml_dir))).start() count = 0 for xml_file in os.listdir(xml_dir): # 拼接xml文件的path xml_file_path = os.path.join(xml_dir,xml_file) # 读取xml文件到字符串 with open(xml_file_path) as f: xml_str = f.read() # xml字符串转为字典 xml_dic = xmltodict.parse(xml_str) # 获取图片的width、height img_width = float(xml_dic["annotation"]["size"]["width"]) img_height = float(xml_dic["annotation"]["size"]["height"]) # 获取xml文件中的所有objects obj_list = [] objects = xml_dic["annotation"]["object"] if isinstance(objects,list): # xml文件中包含多个object for obj in objects: obj_list.append(obj) else: # xml文件中包含1个object obj_list.append(objects) #print(obj_list) # width_height布统计 for obj in obj_list: #box 的height\width归一化 box_width = (float(obj['bndbox']["xmax"]) - float(obj['bndbox']["xmin"]))/img_width box_height = (float(obj['bndbox']["ymax"]) - float(obj['bndbox']["ymin"]))/img_height width_height_list.append([box_width,box_height]) #更新进度条 count += 1 pbar.update(count) #释放进度条 pbar.finish()调用效果#输出统计结果信息 data_root = "/data/jupiter/project/dataset/209_VOC_new" width_height_list = load_dataset(data_root) width_height_np = np.array(width_height_list) print("clustering feature data is ready. shape = (N object, width and height) = {}".format(width_height_np.shape))box width_height 统计: 100% |###############| Elapsed Time: 0:00:35 Time: 0:00:35 clustering feature data is ready. shape = (N object, width and height) = (10670, 2)2.2 将未聚类前的统计结果绘图表示# 将未聚类前的统计结果绘图表示 import matplotlib.pyplot as plt plt.figure(figsize=(10,10)) plt.scatter(width_height_np[:,0],width_height_np[:,1],alpha=0.3) plt.title("Clusters",fontsize=20) plt.xlabel("normalized width",fontsize=20) plt.ylabel("normalized height",fontsize=20) plt.show()调用效果2.3 实现距离评估函数(这里用的是iou)这里iou的计算公式为:$$ \begin{array}{rl} IoU &= \frac{\textrm{intersection} }{ \textrm{union} - \textrm{intersection} }\\ \textrm{intersection} &= Min(w_1,w_2) Min(h_1,h_2)\\ \textrm{union} & = w_1 h_1 + w_2 h_2 \end{array} $$图示代码实现import numpy as np # 数据间距离评估函数 def iou(box, clusters): """ 计算一个ground truth边界盒和k个先验框(Anchor)的交并比(IOU)值。 参数box: 元组或者数据,代表ground truth的长宽。 参数clusters: 形如(k,2)的numpy数组,其中k是聚类Anchor框的个数 返回:ground truth和每个Anchor框的交并比。 """ x = np.minimum(clusters[:, 0], box[0]) y = np.minimum(clusters[:, 1], box[1]) if np.count_nonzero(x == 0) > 0 or np.count_nonzero(y == 0) > 0: raise ValueError("Box has no area") intersection = x * y box_area = box[0] * box[1] cluster_area = clusters[:, 0] * clusters[:, 1] iou_ = intersection / (box_area + cluster_area - intersection) return iou_2.4实现kmeans聚类函数# 实现kmeans聚类函数 def kmeans(boxes, k): """ 利用IOU值进行K-means聚类 参数boxes: 形状为(r, 2)的ground truth框,其中r是ground truth的个数 参数k: Anchor的个数 返回值:形状为(k, 2)的k个Anchor框 """ # 即是上面提到的r rows = boxes.shape[0] # 距离数组,计算每个ground truth和k个Anchor的距离 distances = np.empty((rows, k)) # 上一次每个ground truth"距离"最近的Anchor索引 last_clusters = np.zeros((rows,)) # 设置随机数种子 np.random.seed() # 初始化聚类中心,k个簇,从r个ground truth随机选k个 clusters = boxes[np.random.choice(rows, k, replace=False)] # 开始聚类 while True: # 计算每个ground truth和k个Anchor的距离,用1-IOU(box,anchor)来计算 for row in range(rows): distances[row] = 1 - iou(boxes[row], clusters) # 对每个ground truth,选取距离最小的那个Anchor,并存下索引 nearest_clusters = np.argmin(distances, axis=1) # 如果当前每个ground truth"距离"最近的Anchor索引和上一次一样,聚类结束 if (last_clusters == nearest_clusters).all(): break # 更新簇中心为簇里面所有的ground truth框的均值 for cluster in range(k): clusters[cluster] = np.median(boxes[nearest_clusters == cluster], axis=0) # 更新每个ground truth"距离"最近的Anchor索引 last_clusters = nearest_clusters return clusters,nearest_clusters2.4 调用测试CLUSTERS = 9 #聚类数量,anchor数量 INPUTDIM = 416 #输入网络大小 clusters_center_list,nearest_clusters = kmeans(width_height_np, k=CLUSTERS) clusters_center_list_handle = np.array(clusters_center_list)*INPUTDIM # 得到最终填入YOLOv3 的cfg文件中的anchor print('Boxes:') print(clusters_center_list_handle.astype(np.int32)) Boxes: [[ 9 37] [235 239] [ 4 30] [ 24 33] [ 5 21] [ 52 63] [ 5 26] [ 7 28] [ 6 33]]2.5聚类结果绘制与效果评估(mean_iou)查看数据聚类结果import seaborn as sns current_palette = list(sns.xkcd_rgb.values()) def plot_cluster_result(plt,clusters,nearest_clusters,mean_iou,width_height_np,k): for icluster in np.unique(nearest_clusters): pick = nearest_clusters==icluster c = current_palette[icluster] plt.rc('font', size=8) plt.plot(width_height_np[pick,0],width_height_np[pick,1],"p", color=c, alpha=0.5,label="cluster = {}, N = {:6.0f}".format(icluster,np.sum(pick))) plt.text(clusters[icluster,0], clusters[icluster,1], "c{}".format(icluster), fontsize=20,color="red") plt.title("Clusters=%d" %k) plt.xlabel("width") plt.ylabel("height") plt.legend(title="Mean IoU = {:5.4f}".format(mean_iou)) # achor结果评估 def avg_iou(boxes, clusters): """ 计算一个ground truth和k个Anchor的交并比的均值。 """ return np.mean([np.max(iou(boxes[i], clusters)) for i in range(boxes.shape[0])]) figsize = (7,5) plt.figure(figsize=figsize) mean_iou = avg_iou(width_height_np, out) plot_cluster_result(plt,clusters_center_list,nearest_clusters,mean_iou,width_height_np,k=CLUSTERS)运行效果查看聚类中心分布w = width_height_np[:, 0].tolist() h = width_height_np[:, 1].tolist() centroid_w=clusters_center_list[:,0].tolist() centroid_h=clusters_center_list[:,1].tolist() plt.figure(dpi=200) plt.title("kmeans") plt.scatter(w, h, s=10, color='b') plt.scatter(centroid_w,centroid_h,s=10,color='r') plt.show()运行效果3.汇总简略版#coding=utf-8 import xml.etree.ElementTree as ET import numpy as np import glob def iou(box, clusters): """ 计算一个ground truth边界盒和k个先验框(Anchor)的交并比(IOU)值。 参数box: 元组或者数据,代表ground truth的长宽。 参数clusters: 形如(k,2)的numpy数组,其中k是聚类Anchor框的个数 返回:ground truth和每个Anchor框的交并比。 """ x = np.minimum(clusters[:, 0], box[0]) y = np.minimum(clusters[:, 1], box[1]) if np.count_nonzero(x == 0) > 0 or np.count_nonzero(y == 0) > 0: raise ValueError("Box has no area") intersection = x * y box_area = box[0] * box[1] cluster_area = clusters[:, 0] * clusters[:, 1] iou_ = intersection / (box_area + cluster_area - intersection) return iou_ def avg_iou(boxes, clusters): """ 计算一个ground truth和k个Anchor的交并比的均值。 """ return np.mean([np.max(iou(boxes[i], clusters)) for i in range(boxes.shape[0])]) def kmeans(boxes, k): """ 利用IOU值进行K-means聚类 参数boxes: 形状为(r, 2)的ground truth框,其中r是ground truth的个数 参数k: Anchor的个数 参数dist: 距离函数 返回值:形状为(k, 2)的k个Anchor框 """ # 即是上面提到的r rows = boxes.shape[0] # 距离数组,计算每个ground truth和k个Anchor的距离 distances = np.empty((rows, k)) # 上一次每个ground truth"距离"最近的Anchor索引 last_clusters = np.zeros((rows,)) # 设置随机数种子 np.random.seed() # 初始化聚类中心,k个簇,从r个ground truth随机选k个 clusters = boxes[np.random.choice(rows, k, replace=False)] # 开始聚类 while True: # 计算每个ground truth和k个Anchor的距离,用1-IOU(box,anchor)来计算 for row in range(rows): distances[row] = 1 - iou(boxes[row], clusters) # 对每个ground truth,选取距离最小的那个Anchor,并存下索引 nearest_clusters = np.argmin(distances, axis=1) # 如果当前每个ground truth"距离"最近的Anchor索引和上一次一样,聚类结束 if (last_clusters == nearest_clusters).all(): break # 更新簇中心为簇里面所有的ground truth框的均值 for cluster in range(k): clusters[cluster] = np.median(boxes[nearest_clusters == cluster], axis=0) # 更新每个ground truth"距离"最近的Anchor索引 last_clusters = nearest_clusters return clusters # 加载自己的数据集,只需要所有labelimg标注出来的xml文件即可 def load_dataset(path): dataset = [] for xml_file in glob.glob("{}/*xml".format(path)): tree = ET.parse(xml_file) # 图片高度 height = int(tree.findtext("./size/height")) # 图片宽度 width = int(tree.findtext("./size/width")) for obj in tree.iter("object"): # 偏移量 xmin = int(obj.findtext("bndbox/xmin")) / width ymin = int(obj.findtext("bndbox/ymin")) / height xmax = int(obj.findtext("bndbox/xmax")) / width ymax = int(obj.findtext("bndbox/ymax")) / height xmin = np.float64(xmin) ymin = np.float64(ymin) xmax = np.float64(xmax) ymax = np.float64(ymax) if xmax == xmin or ymax == ymin: print(xml_file) # 将Anchor的长宽放入dateset,运行kmeans获得Anchor dataset.append([xmax - xmin, ymax - ymin]) return np.array(dataset) ANNOTATIONS_PATH = "/data/jupiter/project/dataset/209_VOC_new/Annotations" #xml文件所在文件夹 CLUSTERS = 9 #聚类数量,anchor数量 INPUTDIM = 416 #输入网络大小 data = load_dataset(ANNOTATIONS_PATH) out = kmeans(data, k=CLUSTERS) print('Boxes:') out_handle = np.array(out)*INPUTDIM print(out_handle.astype(np.int32)) print("Accuracy: {:.2f}%".format(avg_iou(data, out) * 100)) final_anchors = np.around(out[:, 0] / out[:, 1], decimals=2).tolist() print("Before Sort Ratios:\n {}".format(final_anchors)) print("After Sort Ratios:\n {}".format(sorted(final_anchors)))Boxes: [[ 8 34] [234 256] [279 239] [ 52 63] [ 6 28] [ 5 26] [ 24 33] [ 10 37] [177 216]] Accuracy: 82.93% Before Sort Ratios: [0.24, 0.92, 1.17, 0.83, 0.23, 0.19, 0.74, 0.28, 0.82] After Sort Ratios: [0.19, 0.23, 0.24, 0.28, 0.74, 0.82, 0.83, 0.92, 1.17]参考资料YOLOv3使用自己数据集——Kmeans聚类计算anchor boxes目标检测算法之YOLO系列算法的Anchor聚类
-
VOC数据集中的图片宽度和高度取整 1.针对问题在数据标注时由于设置问题导致生成的最终的XML文件中的图片的width和height变成了小数,导致在运行某些代码时候会发生异常。样例文件如下所示<?xml version="1.0" ?> <annotation> <folder>/pool/label/209-20180708-08310907/JPEGImages</folder> <filename>/pool/label/209-20180708-08310907/JPEGImages/209-20180708-08310907_frame00731.jpg</filename> <source> <database>Unknown</database> </source> <size> <width>1920.0</width> # 问题所在 <height>1080.0</height> # 问题所在 <depth>3</depth> </size> <segmented>0</segmented> <object> <name>RefuelVehicle</name> <pose>Unspecified</pose> <truncated>0</truncated> <difficult>0</difficult> <bndbox> <xmin>664</xmin> <ymin>368</ymin> <xmax>794</xmax> <ymax>464</ymax> </bndbox> </object> ······ </annotation>2.代码实现# 导包 import xmltodict import os from progressbar import * import numpy as np import time import matplotlib.pyplot as plt import xmltodict from xml.dom import minidom data_root = "/data/jupiter/project/dataset/VOC_zd" xml_dir= os.path.join(data_root,"Annotations") #xml文件路径(Annotations) width_height_list = [] #用于存储统计结果 #进度条功能 widgets = ['box width_height 校准: ',Percentage(), ' ', Bar('#'),' ', Timer(),' ', ETA()] pbar = ProgressBar(widgets=widgets, maxval=len(os.listdir(xml_dir))).start() count = 0 for xml_file in os.listdir(xml_dir): # 拼接xml文件的path xml_file_path = os.path.join(xml_dir,xml_file) # 读取xml文件到字符串 with open(xml_file_path) as f: xml_str = f.read() # xml字符串转为字典 xml_dic = xmltodict.parse(xml_str) # 获取图片的width、height img_width = xml_dic["annotation"]["size"]["width"] img_height = xml_dic["annotation"]["size"]["height"] if img_width.endswith(".0"): xml_dic["annotation"]["size"]["width"] = img_width[:-2] xml_dic["annotation"]["size"]["height"] = img_height[:-2] xmlstr = xmltodict.unparse(xml_dic) xml = minidom.parseString(xmlstr) xml_pretty_str = xml.toprettyxml() with open(xml_file_path,"w") as f: f.write(xml_pretty_str) # 更新进度条 count += 1 pbar.update(count) #释放进度条 pbar.finish()
-
深度学习常用数据集[转载] 深度学习常用数据集[转载]1、迁移学习(传统神经网络)1、猫狗数据集:链接:https://pan.baidu.com/s/1TqmdkJBY49ftg19tRK2Ngg 提取码: htxf2、目标检测1、VOC2007+2012训练集链接: https://pan.baidu.com/s/1u4YUyWJqs5bD38A6Hvs-og 提取码: xzde3、实例分割1、shape数据集(圆形、三角形、正方形):链接: https://pan.baidu.com/s/14dBd1Lbjw0FCnwKryf9taQ 提取码: 94574、语义分割(旧版)1、斑马线数据集:链接:https://pan.baidu.com/s/1uzwqLaCXcWe06xEXk1ROWw 提取码:pp6w2、VOC数据集:链接:https://pan.baidu.com/s/1Urh9W7XPNMF8yR67SDjAAQ 提取码: cvy25、语义分割(新版)1、VOC拓展数据集及其验证集链接: https://pan.baidu.com/s/1BrR7AUM1XJvPWjKMIy2uEw 提取码: vszf6、人脸识别人脸识别数据集包含在对应权值的百度网盘里。1、retinaface链接: https://pan.baidu.com/s/1t7-BNsZzHj2isCekc_PVtw 提取码: 2qrs2、retinaface-pytorch链接: https://pan.baidu.com/s/1q2E6uWs0R5GU_PFs9_vglg 提取码: z7es参考资料1.神经网络学习小记录44——训练资源汇总贴:https://blog.csdn.net/weixin_44791964/article/details/105123842
-
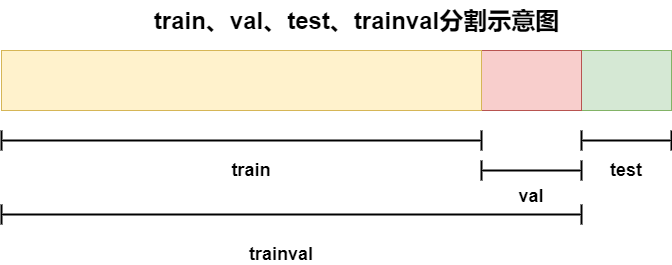
VOC数据集分为train、val、test、trainval VOC数据集分为train、val、test、trainval分割示意图代码实现import os import random xml_dir='./labels_voc/' #xml文件路径(Annotations) txt_save_dir = './ImageSets/Main' # txt文件 save path if not os.path.exists(txt_save_path): os.makedirs(txt_save_path) # 设置数据分割比例 trainval_percent = 0.9 train_percent = 0.8 # 获取所有的xml文件名 total_xml = os.listdir(xml_dir) # xml文件计数 num = len(total_xml) # 根据xml文件计数结果生成索引list并根据索引list分割为train、val、test、trainval xml_index_list = range(num) trainval_num = int(num * trainval_percent) train_num = int(trainval_num * train_percent) trainval_index_list = random.sample(xml_index_list, trainval_num) train_index_list = random.sample(trainval_index_list, train_num) # 根据分割完的索引文件将对应的文件名分别写入对应文件 ftrainval = open(txt_save_dir + '/trainval.txt', 'w') ftest = open(txt_save_dir + '/test.txt', 'w') ftrain = open(txt_save_dir + '/train.txt', 'w') fval = open(txt_save_dir + '/val.txt', 'w') for i in xml_index_list: file_name = total_xml[i][:-4] + '\n' if i in trainval_index_list: ftrainval.write(file_name) if i in train_index_list: ftrain.write(file_name) else: fval.write(file_name) else: ftest.write(file_name) ftrainval.close() ftrain.close() fval.close() ftest.close()结果ImageSets/ └── Main ├── test.txt ├── train.txt ├── trainval.txt └── val.txt参考资料制作VOC数据集时生成trainval.txt,train.txt,val.txt代码:https://blog.csdn.net/weixin_41868104/article/details/89886697
-
VOC数据集转YOLO数据集 VOC数据集转YOLO数据集VOC数据集样例<annotation> <folder>VOC2007</folder> <filename>009947.jpg</filename> <source> <database>The VOC2007 Database</database> <annotation>PASCAL VOC2007</annotation> <image>flickr</image> <flickrid>317223454</flickrid> </source> <owner> <flickrid>vaio_2002</flickrid> <name>Jonathan</name> </owner> <size> <width>332</width> <height>500</height> <depth>3</depth> </size> <segmented>1</segmented> <object> <name>boat</name> <pose>Left</pose> <truncated>0</truncated> <difficult>0</difficult> <bndbox> <xmin>115</xmin> <ymin>92</ymin> <xmax>250</xmax> <ymax>321</ymax> </bndbox> </object> <object> <name>person</name> <pose>Unspecified</pose> <truncated>1</truncated> <difficult>1</difficult> <bndbox> <xmin>165</xmin> <ymin>288</ymin> <xmax>186</xmax> <ymax>312</ymax> </bndbox> </object> </annotation>对应YOLO数据集样例格式说明:每行对应一个box,每个box分别有五个参数label indexcenter_xcenter_ywidthheight10 0.5496987951807228 0.413 0.4066265060240964 0.458 5 0.5286144578313253 0.6 0.06325301204819277 0.048代码实现import xmltodict import os from progressbar import * xml_dir='./labels_voc' #原xml路径 txt_dir='./labels' #转换后txt文件存放路径 # 所有待检测的labels class_names = ['aeroplane', 'cat', 'car', 'dog', 'chair', 'person', 'horse', 'bird', 'tvmonitor', 'bus', 'boat', 'diningtable', 'bicycle', 'bottle', 'sofa', 'pottedplant', 'motorbike', 'cow', 'train', 'sheep'] # 将voc xml中的object转化为对应的一条yolo数据 def get_yolo_data(obj,img_width,img_height): # 获取voc格式的数据信息 name = obj['name'] xmin = float(obj['bndbox']['xmin']) xmax = float(obj['bndbox']['xmax']) ymin = float(obj['bndbox']['ymin']) ymax = float(obj['bndbox']['ymax']) # 计算yolo格式的数据信息 class_idx = class_names.index(name) x_center = (xmin + xmax) / 2 / img_width y_center = (ymin + ymax) / 2 / img_height box_width = (xmax - xmin) / img_width box_height = (ymax - ymin) / img_height yolo_data = "{} {} {} {} {}\n".format(class_idx,x_center,y_center,box_width,box_height) return yolo_data # 逐一处理xml文件,转换为YOLO所需的格式 #进度条支持 count = 0 #计数器 widgets = ['VOC2YOLO: ',Percentage(), ' ', Bar('#'),' ', Timer(),' ', ETA()] pbar = ProgressBar(widgets=widgets, maxval=len(os.listdir(xml_dir))).start() for xml_file in os.listdir(xml_dir): xml_file_path = os.path.join(xml_dir,xml_file) txt_file_path = os.path.join(txt_dir,xml_file[:-4]+".txt") yolo_data = "" with open(xml_file_path) as f: xml_str = f.read() # 转为字典 xml_dic = xmltodict.parse(xml_str) # 获取图片的width、height img_width = float(xml_dic["annotation"]["size"]["width"]) img_height = float(xml_dic["annotation"]["size"]["height"]) # 获取xml文件中的object objects = xml_dic["annotation"]["object"] if isinstance(objects,list): # xml文件中包含多个object for obj in objects: yolo_data += get_yolo_data(obj,img_width,img_height) else: # xml文件中包含1个object obj = objects yolo_data += get_yolo_data(obj,img_width,img_height) with open(txt_file_path,'w') as f: f.write(yolo_data) #更新进度条 count += 1 pbar.update(count) pbar.finish()实现结果原始数据labels_voc ├── 000005.xml ├── 000007.xml ├── 000009.xml ├── 000012.xml ├── 000016.xml ├── 000017.xml ├── 000019.xml ├── 000020.xml ├── 000021.xml生成数据labels ├── 000005.txt ├── 000007.txt ├── 000009.txt ├── 000012.txt ├── 000016.txt ├── 000017.txt ├── 000019.txt ├── 000020.txt ├── 000021.txt参考资料PASCAL VOC 数据集转化为yolo数据集格式:https://blog.csdn.net/guo_python/article/details/107984940
-
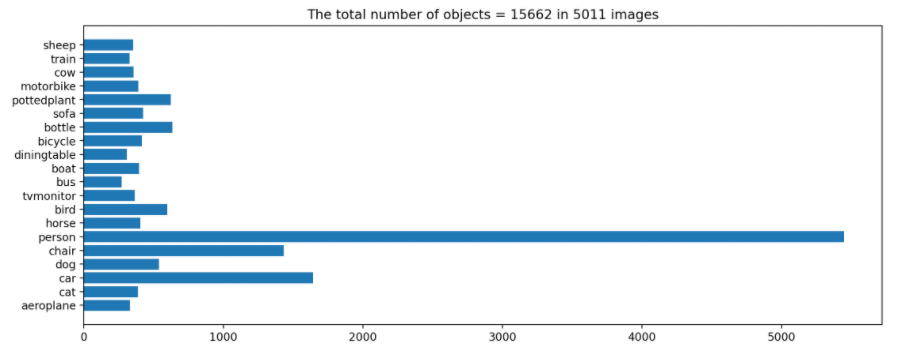
VOC数据集类别统计 1.数据统计核心代码import xmltodict import os from tqdm import tqdm xml_dir = input(prompt="请输入xml文件夹地址:") #xml文件路径(Annotations) if not os.path.exists(xml_dir): print("[发生错误]:",xml_dir,"不存在") else: statistical_results = {} #进度条功能 pbar = tqdm(total=len(os.listdir(xml_dir))) pbar.set_description("VOC数据集类别统计:") # 设置前缀 for xml_file in os.listdir(xml_dir): # 拼接xml文件的path xml_file_path = os.path.join(xml_dir,xml_file) # 读取xml文件到字符串 with open(xml_file_path) as f: xml_str = f.read() # xml字符串转为字典 try: xml_dic = xmltodict.parse(xml_str) except Exception as e: print("[发生错误]:",xml_file_path,"解析失败") # 获取xml文件中的所有objects obj_list = xml_dic["annotation"]["object"] if not isinstance(obj_list,list): # xml文件中包含多个object obj_list = [obj_list] # labels分布统计 for obj in obj_list: if not obj['name'] in statistical_results.keys(): statistical_results[obj['name']] = 1 else: statistical_results[obj['name']] += 1 #更新进度条 pbar.update(1) #释放进度条 pbar.close() #输出统计结果 cls_list = list(statistical_results.keys()) print("=================================================") print("[统计报告]:") print("class list:",cls_list) print("类别总数:",len(cls_list)) print("类别分布情况:",statistical_results) print("=================================================")请输入xml文件夹地址:csf [发生错误]: csf 不存在请输入xml文件夹地址:C:\Users\itrb\Desktop\AirportApronDatasetLabel\label-finished\105-normal\Annotations VOC数据集类别统计:: 100%|████████████████████████████████████████████████████████| 1943/1943 [00:01<00:00, 1416.14it/s] ?it/s] ================================================= [统计报告]: class list: ['BridgeVehicle', 'Person', 'FollowMe', 'Plane', 'LuggageTruck', 'RefuelingTruck', 'FoodTruck', 'Tractor'] 类别总数: 8 类别分布情况: {'BridgeVehicle': 1943, 'Person': 2739, 'FollowMe': 4, 'Plane': 1789, 'LuggageTruck': 83, 'RefuelingTruck': 401, 'FoodTruck': 378, 'Tractor': 748} =================================================2.统计结果可视化2.1 根据统计结果绘制条形图# 绘制条形图 import matplotlib.pyplot as plt import numpy as np # 初始化画布 fig = plt.figure(figsize=(13,5),dpi=200) # 添加一个子图 ax = plt.subplot(1,1,1) # 绘制条形图 y_pos = np.arange(len(statistical_results)) ax.barh(y_pos,list(statistical_results.values())) # 设置y轴的ticklabels ax.set_yticks(y_pos) ax.set_yticklabels(list(statistical_results.keys())) # 设置图片的标题 ax.set_title("The total number of objects = {} in {} images".format( np.sum(list(statistical_results.values())),len(os.listdir(xml_dir)) )) plt.show()2.2 根据统计结果绘制折线图# 绘制折线图 import matplotlib.pyplot as plt import numpy as np # 初始化画布 fig = plt.figure(figsize=(13,5),dpi=200) # 添加一个子图x ax = plt.subplot(1,1,1) # 绘制折线图 x_pos = np.arange(len(statistical_results)) ax.plot(x_pos,list(statistical_results.values())) # 设置x轴的ticklabels ax.set_xticks(x_pos) ax.set_xticklabels(list(statistical_results.keys()),rotation = 45) # 设置图片的标题 ax.set_title("The total number of objects = {} in {} images".format( np.sum(list(statistical_results.values())),len(os.listdir(xml_dir)) )) plt.show()
-
统计VOC数据集中的所有标签(class_name_list) 1. PASCAL VOC数据格式<?xml version='1.0' encoding='utf-8'?> <annotation verified="no"> <folder>JPEGImages</folder> <filename>2018_06_05_09_06_55_065</filename> <path>F:\receive\VOC2007\JPEGImages\2018_06_05_09_06_55_065.jpg</path> <source> <database>Unknown</database> </source> <size> <width>2048</width> <height>1536</height> <depth>3</depth> </size> <segmented>0</segmented> <object> <name>1</name> <pose>Unspecified</pose> <truncated>0</truncated> <difficult>0</difficult> <bndbox> <xmin>530</xmin> <ymin>752</ymin> <xmax>1498</xmax> <ymax>1326</ymax> </bndbox> </object> </annotation>2.获取voc数据集标签所有的类别数即下的所有的的import xmltodict import os # VOC xml文件所在文件夹 annotation_dir="./labels_voc/" label_list = list() # 逐一处理xml文件 for file in os.listdir(annotation_dir): annotation_path = os.path.join(annotation_dir,file) # 读取xml文件 with open(annotation_path,'r') as f: xml_str = f.read() #转为字典 xml_dic = xmltodict.parse(xml_str) # 获取label并去重加入到label_list objects = xml_dic["annotation"]["object"] if isinstance(objects,list): # xml文件中包含多个object for obj in objects: label = obj['name'] if label not in label_list: label_list.append(label) else:# xml文件中只包含1个object obj = objects label = object_['name'] if label not in label_list: label_list.append(label) print(label_list)['aeroplane', 'cat', 'car', 'dog', 'chair', 'person', 'horse', 'bird', 'tvmonitor', 'bus', 'boat', 'diningtable', 'bicycle', 'bottle', 'sofa', 'pottedplant', 'motorbike', 'cow', 'train', 'sheep']
-
各类比赛数据集 各类比赛数据集【注意】所有数据仅限于科研所用,请勿用于商业用途!【Kaggle比赛】1.Kaggle-猫狗大战链接:https://pan.baidu.com/s/1cnnZXytaaCQjtsAxYE2s1w 密码:2mpc2.Kaggle-LUNA 2016肺部CT图像链接:https://pan.baidu.com/s/1S6VohLttXAr0dyx4qYx1Dw 密码:hy1b3.Kaggle-DSB2018链接:https://pan.baidu.com/s/10jbEZ6v6_mwoios08RlCSA 密码:74jr4.Kaggle-DSB2017链接:https://pan.baidu.com/s/1Io7IbusxfTe-SkfrvRNjOA 密码:vazw【天池大赛】1.天池大赛-肺部结节诊断链接:https://pan.baidu.com/s/1NDYJcXGqXf4uGgNkYVAG3Q 密码:84e52.Fashion-AI 服饰关键点定位链接:https://pan.baidu.com/s/1ZXzHCdbfTuegjSv8IFewOQ 密码:lhx53.Fashion-AI 服饰属性标签识别链接:https://pan.baidu.com/s/1DprZywohaqIioTvcNKzLFA 密码:0dom4.全球数据智能大赛(2019)——肺部CT多病种智能诊断链接:https://pan.baidu.com/s/1lZpJrJuER6NPnlcE2SQmWw 密码:0ng9【AI全球挑战赛】1.AI挑战赛-场景分类链接:https://pan.baidu.com/s/1rBqy7rUXrcLgeX45IRrHUQ 密码:7kn12.AI挑战赛-图像中文描述链接:https://pan.baidu.com/s/1m-yFj6ST2KJlx7D77de6DQ 密码:cprk【ICDAR比赛】1.ICDAR 2015自然场景文字识别数据链接:https://pan.baidu.com/s/1q03Lkat8Xw92iKJ8lhsqYw 密码:surk2.ICDAR 2017自然场景文字识别数据链接:https://pan.baidu.com/s/1UusfROUT4btNnoXF9yjdNw 密码:ndsa3.ICDAR 2019扫描小票数据(SROIE)链接:https://pan.baidu.com/s/1-2bYU6ufWOVNuxqzGuq2pQ 密码:uubm 4.ICDAR 2019商家招牌文本检测识别数据(ReCTS)链接:https://pan.baidu.com/s/1aJyJzOgSPVLZ6hoRilG8pw 密码:hcdp 5.ICDAR 2019自然场景文字识别数据(LSVT)链接:https://pan.baidu.com/s/1oJ2pPClwgXTKPIidElWi0Q 密码:x6ct 【其他类】1.RIDER LUNG CT 肺癌CT图像链接:https://pan.baidu.com/s/1n500txInMzoU1TUbqQQWUw 密码:ddpa2.RIDER Breast MRI数据链接:https://pan.baidu.com/s/1aEZjiR8_uvJLDvjOxTtG8Q 密码:s60s3.2018百度西交大大数据竞赛-商家招牌的分类与检测链接:https://pan.baidu.com/s/1jkNIaWPzEOKEx363iDrmCA 密码:ylyj4.Fundus Image Registration(FIRE) 眼底图像数据链接:https://pan.baidu.com/s/1sgDmo5rTe-HjsmFDhtKh1Q 密码:w7jm5.Digital Retinal Images for Vessel Extraction(DRIVE)眼底血管图像数据集链接:https://pan.baidu.com/s/1UpQtbhgtVdlqc0QGbESx3A 密码:4l7v参考资料各类比赛数据集:https://blog.csdn.net/u013063099/article/details/79467531