搜索到
86
篇与
的结果
-
 设计模式学习笔记2:单例模式 1.介绍单例模式的定义就是确保某一个类只有一个实例,并且提供一个全局访问点。这种类型的设计模式属于创建型模式。单例模式具有典型的三个特点:只有一个实例。自我实例化。提供全局访问点。应用实例:1、一个班级只有一个班主任。2、Windows 是多进程多线程的,在操作一个文件的时候,就不可避免地出现多个进程或线程同时操作一个文件的现象,所以所有文件的处理必须通过唯一的实例来进行。3、一些设备管理器常常设计为单例模式,比如一个电脑有两台打印机,在输出的时候就要处理不能两台打印机打印同一个文件。优点:1、在内存里只有一个实例,减少了内存的开销,尤其是频繁的创建和销毁实例(比如管理学院首页页面缓存)。2、避免对资源的多重占用(比如写文件操作)。缺点:没有接口,不能继承,与单一职责原则冲突,一个类应该只关心内部逻辑,而不关心外面怎么样来实例化。使用场景:1、要求生产唯一序列号。2、WEB 中的计数器,不用每次刷新都在数据库里加一次,用单例先缓存起来。3、创建的一个对象需要消耗的资源过多,比如 I/O 与数据库的连接等。2.几种实现方式2.1 懒汉式,线程不安全是否 Lazy 初始化:是是否多线程安全:否描述:这种方式是最基本的实现方式,这种实现最大的问题就是不支持多线程。因为没有加锁 synchronized,所以严格意义上它并不算单例模式。这种方式 lazy loading 很明显,不要求线程安全,在多线程不能正常工作。// 懒汉式单例 public class LazyMan { // 1.私有化构造函数 private LazyMan(){} // 2.先定义单例对象但不实例化 private static LazyMan lazyMan; // 3.当发起调用的时候判断对象是否实例化,如果未实例化,则实例化再返回,否则直接返回 public static LazyMan getInstance(){ if (lazyMan==null){ lazyMan = new LazyMan(); } return lazyMan; } }2.2 懒汉式,线程安全是否 Lazy 初始化:是是否多线程安全:是描述:这种方式具备很好的 lazy loading,能够在多线程中很好的工作,但是,效率很低,99% 情况下不需要同步。优点:第一次调用才初始化,避免内存浪费。缺点:必须加锁 synchronized 才能保证单例,但加锁会影响效率。// 懒汉式单例 public class LazyMan { // 1.私有化构造函数 private LazyMan(){} // 2.先定义单例对象但不实例化 private static LazyMan lazyMan; // 3.当发起调用的时候判断对象是否实例化,如果未实例化,则实例化再返回,否则直接返回 public static synchronized LazyMan getInstance(){ if (lazyMan==null){ lazyMan = new LazyMan(); } return lazyMan; } }2.3 饿汉式是否 Lazy 初始化:否是否多线程安全:是描述:这种方式比较常用,但容易产生垃圾对象。优点:没有加锁,执行效率会提高。缺点:类加载时就初始化,浪费内存。// 饿汉式单例模式 public class Hungry { // 1.私有化构造函数 private Hungry(){} // 2.事先创建好对象 private final static Hungry HUNGRY = new Hungry(); // 3.当需要调用的单例对象的时候通过暴露的公有的方法进行调用 public static Hungry getInstance(){ return HUNGRY; } }2.4 双检锁/双重校验锁(DCL,即 double-checked locking)/DCL懒汉式单例是否 Lazy 初始化:是是否多线程安全:是实现难度:较复杂描述:这种方式采用双锁机制,安全且在多线程情况下能保持高性能。// 懒汉式单例 public class LazyMan { // 1.私有化构造函数 private LazyMan(){} // 2.先定义单例对象但不实例化 private volatile static LazyMan lazyMan; // 3.当发起调用的时候判断对象是否实例化,如果未实例化,则实例化再返回,否则直接返回 public static LazyMan getInstance(){ // 双重检测锁模式的懒汉式单例 DCL懒汉式 if (lazyMan==null){ synchronized (LazyMan.class){ if (lazyMan==null){ lazyMan = new LazyMan(); } } } return lazyMan; } }为什么要加volatilelazyMan = new LazyMan(); // 不是一个原子性操作创建对象的过程不是一个原子操作,分为以下3步:1.分配内存空间2.执行构造方法,初始化对象3.把这个对象指向这个空间在执行的过程中可能会发生指令重排的现象,即我们真实想要的执行顺序是1->2->3。但是可能真实的执行顺序是1->3->2。则当线程A以1->3->2的顺序执行到3时,线程B也调用了返回对象实例的方法,则给线程B可能拿到未创建完成的对象进行调用从而导致出错。2.5 登记式/静态内部类是否 Lazy 初始化:是是否多线程安全:是描述:这种方式能达到双检锁方式一样的功效,但实现更简单。对静态域使用延迟初始化,应使用这种方式而不是双检锁方式。这种方式只适用于静态域的情况,双检锁方式可在实例域需要延迟初始化时使用。public class Singleton { private static class SingletonHolder { private static final Singleton INSTANCE = new Singleton(); } private Singleton (){} public static final Singleton getInstance() { return SingletonHolder.INSTANCE; } }2.6 枚举描述:这种实现方式还没有被广泛采用,但这是实现单例模式的最佳方法。它更简洁,自动支持序列化机制,绝对防止多次实例化。这种方式是 Effective Java 作者 Josh Bloch 提倡的方式,它不仅能避免多线程同步问题,而且还自动支持序列化机制,防止反序列化重新创建新的对象,绝对防止多次实例化。public enum Singleton { INSTANCE; public void whateverMethod() { } }3.反射下的单例模式3.1 V1:在单例类已经实例化了对象的条件下使用反射破坏单例3.1.1 示例package single; import java.lang.reflect.Constructor; // 懒汉式单例 public class LazyMan { // 1.私有化构造函数 private LazyMan(){} // 2.先定义单例对象但不实例化 private volatile static LazyMan lazyMan; // 3.当发起调用的时候判断对象是否实例化,如果未实例化,则实例化再返回,否则直接返回 public static LazyMan getInstance(){ // 双重检测锁模式的懒汉式单例 DCL懒汉式 if (lazyMan==null){ synchronized (LazyMan.class){ if (lazyMan==null){ lazyMan = new LazyMan(); } } } return lazyMan; } public static void main(String[] args) throws Exception { LazyMan instance1 = LazyMan.getInstance(); // 获取空参构造器 Constructor<LazyMan> declareConstructor = LazyMan.class.getDeclaredConstructor(null); // 将空参构造器的Accessible设置为true declareConstructor.setAccessible(true); // 调用空参构造器实例化对象 LazyMan instance2 = declareConstructor.newInstance(); System.out.println(instance1); System.out.println(instance2); } } single.LazyMan@1b6d3586 single.LazyMan@4554617c3.1.2 防止措施通过在构造函数中加入一个同步代码块进行一次是否已经生成了该单例类对象的判断package single; import java.lang.reflect.Constructor; // 懒汉式单例 public class LazyMan { // 1.私有化构造函数 private LazyMan(){ synchronized (LazyMan.class){ if(lazyMan!=null){ throw new RuntimeException("不要试图使用反射破坏单例模式"); } } } // 2.先定义单例对象但不实例化 private volatile static LazyMan lazyMan; // 3.当发起调用的时候判断对象是否实例化,如果未实例化,则实例化再返回,否则直接返回 public static LazyMan getInstance(){ // 双重检测锁模式的懒汉式单例 DCL懒汉式 if (lazyMan==null){ synchronized (LazyMan.class){ if (lazyMan==null){ lazyMan = new LazyMan(); } } } return lazyMan; } public static void main(String[] args) throws Exception { LazyMan instance1 = LazyMan.getInstance(); // 获取空参构造器 Constructor<LazyMan> declareConstructor = LazyMan.class.getDeclaredConstructor(null); // 将空参构造器的Accessible设置为true declareConstructor.setAccessible(true); // 调用空参构造器实例化对象 LazyMan instance2 = declareConstructor.newInstance(); System.out.println(instance1); System.out.println(instance2); } }Exception in thread "main" java.lang.reflect.InvocationTargetException at sun.reflect.NativeConstructorAccessorImpl.newInstance0(Native Method) at sun.reflect.NativeConstructorAccessorImpl.newInstance(NativeConstructorAccessorImpl.java:62) at sun.reflect.DelegatingConstructorAccessorImpl.newInstance(DelegatingConstructorAccessorImpl.java:45) at java.lang.reflect.Constructor.newInstance(Constructor.java:423) at single.LazyMan.main(LazyMan.java:38) Caused by: java.lang.RuntimeException: 不要试图使用反射破坏单例模式 at single.LazyMan.<init>(LazyMan.java:11) ... 5 more3.2 V2:V1解决方案破解3.2.1 示例package single; import java.lang.reflect.Constructor; // 懒汉式单例 public class LazyMan { // 1.私有化构造函数 private LazyMan(){ synchronized (LazyMan.class){ if(lazyMan!=null){ throw new RuntimeException("不要试图使用反射破坏单例模式"); } } } // 2.先定义单例对象但不实例化 private volatile static LazyMan lazyMan; // 3.当发起调用的时候判断对象是否实例化,如果未实例化,则实例化再返回,否则直接返回 public static LazyMan getInstance(){ // 双重检测锁模式的懒汉式单例 DCL懒汉式 if (lazyMan==null){ synchronized (LazyMan.class){ if (lazyMan==null){ lazyMan = new LazyMan(); } } } return lazyMan; } public static void main(String[] args) throws Exception { // 获取空参构造器 Constructor<LazyMan> declareConstructor = LazyMan.class.getDeclaredConstructor(null); // 将空参构造器的Accessible设置为true declareConstructor.setAccessible(true); // 调用空参构造器实例化对象 LazyMan instance1 = declareConstructor.newInstance(); LazyMan instance2 = declareConstructor.newInstance(); System.out.println(instance1); System.out.println(instance2); } }3.2.2 防止措施--"红绿灯策略'',设置标志位package single; import java.lang.reflect.Constructor; // 懒汉式单例 public class LazyMan { private static boolean flag = false; // 1.私有化构造函数 private LazyMan(){ synchronized (LazyMan.class){ if(flag == false){ flag = true; }else{ throw new RuntimeException("不要试图使用反射破坏单例模式"); } } } // 2.先定义单例对象但不实例化 private volatile static LazyMan lazyMan; // 3.当发起调用的时候判断对象是否实例化,如果未实例化,则实例化再返回,否则直接返回 public static LazyMan getInstance(){ // 双重检测锁模式的懒汉式单例 DCL懒汉式 if (lazyMan==null){ synchronized (LazyMan.class){ if (lazyMan==null){ lazyMan = new LazyMan(); } } } return lazyMan; } public static void main(String[] args) throws Exception { // 获取空参构造器 Constructor<LazyMan> declareConstructor = LazyMan.class.getDeclaredConstructor(null); // 将空参构造器的Accessible设置为true declareConstructor.setAccessible(true); // 调用空参构造器实例化对象 LazyMan instance1 = declareConstructor.newInstance(); LazyMan instance2 = declareConstructor.newInstance(); System.out.println(instance1); System.out.println(instance2); } }3.3 V3:V2解决方案破解3.3.1 示例对字节码进行反编译获取到标志位,然后使用反射破解"红路灯"标志位package single; import java.lang.reflect.Constructor; import java.lang.reflect.Field; // 懒汉式单例 public class LazyMan { private static boolean flag = false; // 1.私有化构造函数 private LazyMan(){ synchronized (LazyMan.class){ if(flag == false){ flag = true; }else{ throw new RuntimeException("不要试图使用反射破坏单例模式"); } } } // 2.先定义单例对象但不实例化 private volatile static LazyMan lazyMan; // 3.当发起调用的时候判断对象是否实例化,如果未实例化,则实例化再返回,否则直接返回 public static LazyMan getInstance(){ // 双重检测锁模式的懒汉式单例 DCL懒汉式 if (lazyMan==null){ synchronized (LazyMan.class){ if (lazyMan==null){ lazyMan = new LazyMan(); } } } return lazyMan; } public static void main(String[] args) throws Exception { // 获取空参构造器 Constructor<LazyMan> declareConstructor = LazyMan.class.getDeclaredConstructor(null); // 将空参构造器的Accessible设置为true declareConstructor.setAccessible(true); // 调用空参构造器实例化对象 LazyMan instance1 = declareConstructor.newInstance(); // 获取"红绿灯标志位" Field flag = LazyMan.class.getDeclaredField("flag"); // 重置为"绿灯" flag.set(instance1,false); LazyMan instance2 = declareConstructor.newInstance(); System.out.println(instance1); System.out.println(instance2); } }single.LazyMan@4554617c single.LazyMan@74a144823.3.2 防止措施-使用枚举Enum实现单例模式import java.lang.reflect.Constructor; import java.lang.reflect.InvocationTargetException; enum EnumSingle { INSTANCE; public EnumSingle getInstance(){ return INSTANCE; } } public class Test{ public static void main(String[] args) throws NoSuchMethodException, InvocationTargetException, InstantiationException, IllegalAccessException { EnumSingle instance1 = EnumSingle.INSTANCE; Constructor<EnumSingle> declaredConstructor = EnumSingle.class.getDeclaredConstructor(String.class,int.class); declaredConstructor.setAccessible(true); EnumSingle instance2 = declaredConstructor.newInstance(); System.out.println(instance1); System.out.println(instance2); } }Exception in thread "main" java.lang.IllegalArgumentException: Cannot reflectively create enum objects at java.lang.reflect.Constructor.newInstance(Constructor.java:417) at single.Test.main(EnumSingle.java:20)参考资料【狂神说Java】单例模式-23种设计模式系列单例模式Java中的双重检查锁(double checked locking) Java设计模式(一)之单例模式
 -
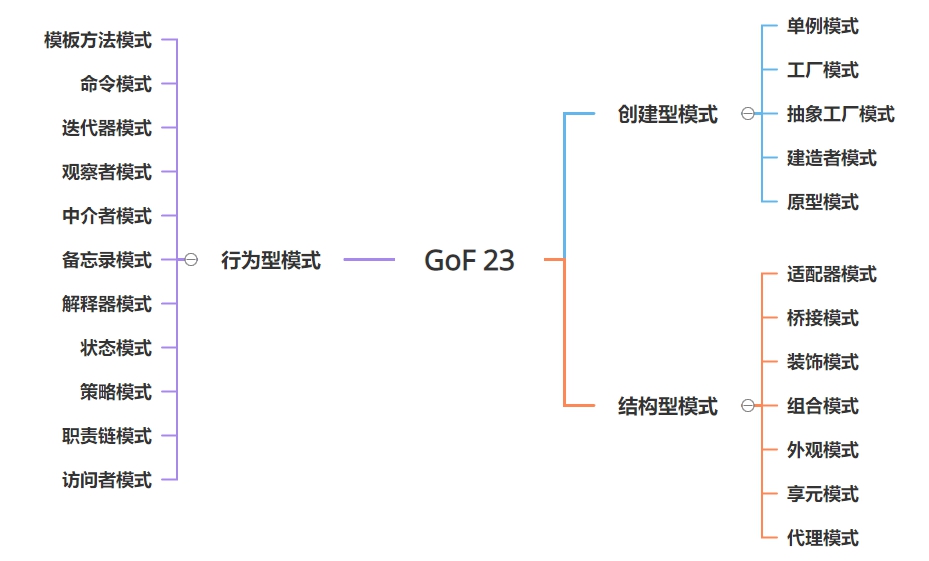
设计模式学习笔记1:设计模式概述 1.什么是设计模式设计模式的概念最早是由 克⾥斯托佛·亚历⼭⼤ 在其著作 《建筑模式语⾔》 中⾸次提出的。 该书介绍了城市设计的 “语⾔”,提供了253个描述城镇、邻⾥、住宅、花园、房间及⻄部构造的模式, ⽽此类“语⾔” 的基本单元就是模式。后来, 埃⾥希·伽玛 、 约翰·弗利赛德斯 、 拉尔夫·约翰逊 和 理查德·赫尔姆 这四位大佬即GoF(Gang of Four,四人组/四人帮)接受了模式的概念。 1995 年, 他们出版了 《设计模式: 可复⽤⾯向对象软件的基础》⼀书,将设计模式的概念应⽤到程序开发领域中。该书 共收录了23种设计模式,从此树立了软件设计模式领域的里程碑,人称GoF设计模式。简单来说,设计模式(Design Pattern)是前辈们对代码开发经验的总结,是解决特定问题的一系列套路。它不是语法规定,而是一套用来提高代码可复用性、可维护性、可读性、稳健性以及安全性的解决方案。2.学习设计模式的意义设计模式的本质是面向对象设计原则的实际运用,是对类的封装性、继承性和多态性以及类的关联关系和组合关系的充分理解。正确使用设计模式具有以下优点:可以提高程序员的思维能力、编程能力和设计能力。使程序设计更加标准化、代码编制更加工程化,使软件开发效率大大提高,从而缩短软件的开发周期。使设计的代码可重用性高、可读性强、可靠性高、灵活性好、可维护性强。3.设计模式的基本要素4.GoF 23创建型模式:单例模式、工厂模式、抽象工厂模式、建造者模式、原型模式。结构型模式:适配器模式,桥接模式,装饰模式,组合模式,外观模式,享元模式,代理模式行为型模式:模板方法模式,命令模式,迭代器模式,观察者模式,中介者模式,备忘录模式,解释器模式,状态模式,策略模式,职责链模式,访问者模式。5.OOP七大原则开闭原则:对扩展开放,对修改关闭里氏替换原则:继承必须确保超类所拥有的性质在子类中仍然成立依赖倒置原则:要面向接口编程,不要面向实现编程。单一职责原则:控制类的粒度大小、将对象解耦、提高其内聚性。接口隔离原则:要为各个类建立它们需要的专用接口。迪米特法则:只与你的直接朋友交谈,不跟"陌生人"说话。合成复用原则:尽量先使用组合或者聚合等关联关系来实现,其次才考虑使用继承关系来实现。参考资料【狂神说Java】通俗易懂的23种设计模式教学(停更)设计模式简介
-
AliyunDNSHelper:阿里云dns解析助手-python实现 1.准备工作首先得有一个阿里云的域名https://www.aliyun.com/minisite/goods安装阿里云SDK和其他第三方库pip install aliyun-python-sdk-core-v3 pip install aliyun-python-sdk-domain pip install aliyun-python-sdk-alidns pip install requests获取accessKeyId和accessSecret可以在阿里云控制台个人中心直接获取,但是一般建议使用RAM角色来进行权限控制,这样这个accessKey和accessSecret就只能操作域名,不能操作其他的资源,相对会比较安全。关于RAM快速入门:https://help.aliyun.com/document_detail/28637.html2.代码实现2.1 ali-dns-helper.py`from aliyunsdkcore.client import AcsClient from aliyunsdkcore.acs_exception.exceptions import ClientException from aliyunsdkcore.acs_exception.exceptions import ServerException from aliyunsdkalidns.request.v20150109.DescribeSubDomainRecordsRequest import DescribeSubDomainRecordsRequest from aliyunsdkalidns.request.v20150109.DescribeDomainRecordsRequest import DescribeDomainRecordsRequest import requests from urllib.request import urlopen import json class AliyunDNSHelper: def __init__(self,accessKeyId = "LTAI4GHqgJgbzPfNnkwyGqks",accessSecret = "CzXkUS8BWcjJ7qEbKrqg6qxUOdnW6M",domain = "4v7p.top"): """ 阿里云DNS助手初始化 需要传入自己的accessKeyId、accessSecret、domain """ self.client = AcsClient(accessKeyId, accessSecret, 'cn-hangzhou') self.domain = domain def update(self,RecordId, RR, Type, Value): """ 修改域名解析记录方法 参数列表: + RecordId:调用查询方法时候查到对应的记录会返回 + RR:记录名即子域名 + Type:记录类型包括CNAME、A、AAAA等 + Value:记录值 """ from aliyunsdkalidns.request.v20150109.UpdateDomainRecordRequest import UpdateDomainRecordRequest request = UpdateDomainRecordRequest() request.set_accept_format('json') request.set_RecordId(RecordId) request.set_RR(RR) request.set_Type(Type) request.set_Value(Value) response = self.client.do_action_with_exception(request) def add(self,DomainName, RR, Type, Value): """ 添加新的域名解析记录方法 参数列表: + DomainName:待修改的主域名 + RR:记录名即子域名 + Type:记录类型包括CNAME、A、AAAA等 + Value:记录值 """ from aliyunsdkalidns.request.v20150109.AddDomainRecordRequest import AddDomainRecordRequest request = AddDomainRecordRequest() request.set_accept_format('json') request.set_DomainName(DomainName) request.set_RR(RR) # https://blog.zeruns.tech request.set_Type(Type) request.set_Value(Value) response = self.client.do_action_with_exception(request) def select(self,subDomian): """ 查询子域域名解析记录 参数列表: + subDomian:子域名 """ request = DescribeSubDomainRecordsRequest() request.set_accept_format('json') request.set_DomainName(self.domain) request.set_SubDomain(subDomian + '.' + self.domain) response = self.client.do_action_with_exception(request) # 获取域名解析记录列表 domain_list = json.loads(response) # 将返回的JSON数据转化为Python能识别的 if domain_list["TotalCount"]==0: return None return domain_list["DomainRecords"]["Record"][0] def action(self,subDomian,Value,Type="A"): """ 执行用户关于DNS操作的的行为 参数列表: + action_type操作类型,包括add,update + subDomian:记录名即子域名 + Type:记录类型包括CNAME、A、AAAA等 + Value:记录值 """ print("待处理的记录为 %s:%s-->Domain:%s" % (Type,Value,subDomian + '.' + self.domain)) subDomian_record = self.select(subDomian) if subDomian_record: RecordId,RecordValue = subDomian_record["RecordId"],subDomian_record["Value"] if Value==RecordValue: print("该域名解析记录已存在,跳过") else: self.update(RecordId, subDomian, Type, Value) print("修改域名解析成功") else: self.add(self.domain, subDomian, Type, Value) print("新建域名解析成功") dnsHelper = AliyunDNSHelper(accessKeyId = "LTAI4GHqgJgbzPfNnkwyGqks",accessSecret = "CzXkUS8BWcjJ7qEbKrqg6qxUOdnW6M",domain = "4v7p.top") sub_domain = input("SubDomian:") value = input("value:") sub_domain_type = input("Type:") dnsHelper.action(sub_domain,value,sub_domain_type)2.2 ali-ddns-ipv6.py:实现ipv6 DDNS功能(ipv4同理)2.2.1 获取本机公网ipv6地址方法1:通过http接口获取(推荐)def getIPv6Address(): text = requests.get('https://v6.ident.me').text return text getIPv6Address()'2001:da8:a012:2da:2f0:d2ff:fed0:d0d2'方法2:python执行shell命令--其中的shell命令需要根据实际情况进行修改def get_local_ipv6(): """ 获取本机ipv6地址,其中的shell命令需要根据实际情况进行修改 """ import os; cmd_get_ipv6 = "ifconfig enp1s0 | awk '{if(NR==3){print $3}}'" # 获取本机ipv6的shell命令,需要根据实际情况进行修改 ipv6 = os.popen(cmd_get_ipv6).readlines()[0] if "/" in ipv6: ipv6 = ipv6.split("/")[0] return ipv6 get_local_ipv6()'2001:da8:a012:2da:2f0:d2ff:fed0:d0d2'2.2.2 配合time.sleep完成DDNS功能from aliyunsdkcore.client import AcsClient from aliyunsdkcore.acs_exception.exceptions import ClientException from aliyunsdkcore.acs_exception.exceptions import ServerException from aliyunsdkalidns.request.v20150109.DescribeSubDomainRecordsRequest import DescribeSubDomainRecordsRequest from aliyunsdkalidns.request.v20150109.DescribeDomainRecordsRequest import DescribeDomainRecordsRequest import requests from urllib.request import urlopen import json import time class AliyunDNSHelper: def __init__(self,accessKeyId = "LTAI4GHqgJgbzPfNnkwyGqks",accessSecret = "CzXkUS8BWcjJ7qEbKrqg6qxUOdnW6M",domain = "4v7p.top"): """ 阿里云DNS助手初始化 需要传入自己的accessKeyId、accessSecret、domain """ self.client = AcsClient(accessKeyId, accessSecret, 'cn-hangzhou') self.domain = domain def update(self,RecordId, RR, Type, Value): """ 修改域名解析记录方法 参数列表: + RecordId:调用查询方法时候查到对应的记录会返回 + RR:记录名即子域名 + Type:记录类型包括CNAME、A、AAAA等 + Value:记录值 """ from aliyunsdkalidns.request.v20150109.UpdateDomainRecordRequest import UpdateDomainRecordRequest request = UpdateDomainRecordRequest() request.set_accept_format('json') request.set_RecordId(RecordId) request.set_RR(RR) request.set_Type(Type) request.set_Value(Value) response = self.client.do_action_with_exception(request) def add(self,DomainName, RR, Type, Value): """ 添加新的域名解析记录方法 参数列表: + DomainName:待修改的主域名 + RR:记录名即子域名 + Type:记录类型包括CNAME、A、AAAA等 + Value:记录值 """ from aliyunsdkalidns.request.v20150109.AddDomainRecordRequest import AddDomainRecordRequest request = AddDomainRecordRequest() request.set_accept_format('json') request.set_DomainName(DomainName) request.set_RR(RR) # https://blog.zeruns.tech request.set_Type(Type) request.set_Value(Value) response = self.client.do_action_with_exception(request) def select(self,subDomian): """ 查询子域域名解析记录 参数列表: + subDomian:子域名 """ request = DescribeSubDomainRecordsRequest() request.set_accept_format('json') request.set_DomainName(self.domain) request.set_SubDomain(subDomian + '.' + self.domain) response = self.client.do_action_with_exception(request) # 获取域名解析记录列表 domain_list = json.loads(response) # 将返回的JSON数据转化为Python能识别的 if domain_list["TotalCount"]==0: return None return domain_list["DomainRecords"]["Record"][0] def action(self,subDomian,Value,Type="A"): """ 执行用户关于DNS操作的的行为 参数列表: + action_type操作类型,包括add,update + subDomian:记录名即子域名 + Type:记录类型包括CNAME、A、AAAA等 + Value:记录值 """ print("待处理的记录为 %s:%s-->Domain:%s" % (Type,Value,subDomian + '.' + self.domain)) subDomian_record = self.select(subDomian) if subDomian_record: RecordId,RecordValue = subDomian_record["RecordId"],subDomian_record["Value"] if Value==RecordValue: print("该域名解析记录已存在,跳过") else: self.update(RecordId, subDomian, Type, Value) print("修改域名解析成功") else: self.add(self.domain, subDomian, Type, Value) print("新建域名解析成功") def getIPv6Address(): text = requests.get('https://v6.ident.me').text # 接口失效后需要及时进行修改 return text dnsHelper = AliyunDNSHelper(accessKeyId = "LTAI4GHqgJgbzPfNnkwyGqks",accessSecret = "CzXkUS8BWcjJ7qEbKrqg6qxUOdnW6M",domain = "4v7p.top") sub_domain = "d2550-ipv6" sub_domain_type = "AAAA" while True: print("当前时间:",time.strftime("%Y-%m-%d %H:%M:%S", time.localtime())) value = getIPv6Address() dnsHelper.action(sub_domain,value,sub_domain_type) time.sleep(2*3600) # 每隔2个小时执行1次然后配合screen命令或者去掉无限循环使用定时任务进行执行即可完成ipv6的DDNS的功能参考资料Python实现阿里云域名DDNS支持ipv4和ipv6python 3.7.3 shell_python3执行shell命令的几种方式Python 获取本机公网IPv6地址Python 日期和时间
-
通过SoftEther搭建dns隧道绕过校园网认证进行免费上网 原理介绍工作原理正常情况下,当我们连上酒店或者其他需要验证才可以使用的网络后,虽然上不了网,但是我们的计算机却分配到了IP地址(不分配IP地址web认证就实现不了),此时若我们进行一些上网的操作,那么计算机的数据包将从TCP443端口上发出,校园网、酒店等网关就会拦截从这个端口上发出的数据包。同理从其它端口上发出的数据包也会遭到拦截。但是有一个神奇的端口,从这个端口发出的数据包不会遭到网关拦截,它就是UDP53端口(UDP53端口上运行的协议是DNS协议(域名解析协议))。常见的内网环境中 , 防火墙可能会限制只允许 udp 53 端口出站,这样我们可以利用 DNS 查询流量来封装 TCP 流量 , 达到绕过防火墙的目的。DNS隧道。从名字上来看就是利用DNS查询过程建立起隧道,传输数据。相关软件下载地址SoftEther下载中心https://www.softether-download.com/cn.aspx搭建步骤准备工作一台带宽还可以的云服务器确保服务器ssh连接正常关闭服务器防火墙(云服务器有的需要在安全组里进行二次放行)问题注意:关闭服务器的udp53端口默认运行的程序查看是否关闭$ sudo netstat -ltnup | grep 53 tcp 0 0 127.0.0.53:53 0.0.0.0:* LISTEN 291/systemd-resolve udp 0 0 127.0.0.53:53 0.0.0.0:* 291/systemd-resolve关闭sudo systemctl stop systemd-resolved sudo systemctl disable systemd-resolved配置1:服务器端完成(ubuntu16.04)下载并运行服务# 下载软件 wget https://github.com/SoftEtherVPN/SoftEtherVPN_Stable/releases/download/v4.38-9760-rtm/softether-vpnserver-v4.38-9760-rtm-2021.08.17-linux-x64-64bit.tar.gz # 解压 tar xzvf softether-vpnserver-v4.38-9760-rtm-2021.08.17-linux-x64-64bit.tar.gz # 编译 cd vpnserver make # 运行 ./vpnserver start初始化工作(除了输入1次1之外,其余均按回车) ./vpncmd vpncmd command - SoftEther VPN Command Line Management Utility SoftEther VPN Command Line Management Utility (vpncmd command) Version 4.38 Build 9760 (English) Compiled 2021/08/17 22:32:49 by buildsan at crosswin Copyright (c) SoftEther VPN Project. All Rights Reserved. By using vpncmd program, the following can be achieved. 1. Management of VPN Server or VPN Bridge 2. Management of VPN Client 3. Use of VPN Tools (certificate creation and Network Traffic Speed Test Tool) Select 1, 2 or 3: 1 Specify the host name or IP address of the computer that the destination VPN Server or VPN Bridge is operating on. By specifying according to the format 'host name:port number', you can also specify the port number. (When the port number is unspecified, 443 is used.) If nothing is input and the Enter key is pressed, the connection will be made to the port number 8888 of localhost (this computer). Hostname of IP Address of Destination: If connecting to the server by Virtual Hub Admin Mode, please input the Virtual Hub name. If connecting by server admin mode, please press Enter without inputting anything. Specify Virtual Hub Name: Connection has been established with VPN Server "localhost" (port 443). You have administrator privileges for the entire VPN Server. VPN Server>配置2:客户端完成(win10)下载SoftEther VPN Server Manager并安装添加新的连接设置(主机名写服务器的IP或者域名)-第一次连接会让你设置新密码继续完成配置添加用户开启虚拟NAT和虚拟DHCP开启DNS 53端口监听连接测试下载客户端并安装添加新连接连接设置名随便填主机名填服务IP端口号填53连接测试,获取到IP则代表搭建无误参考资料1.SoftEther下载中心
-
通过dns2tcp搭建tcp隧道绕过校园网认证进行免费上网 原理介绍dns2tcp工作原理正常情况下,当我们连上酒店或者其他需要验证才可以使用的网络后,虽然上不了网,但是我们的计算机却分配到了IP地址(不分配IP地址web认证就实现不了),此时若我们进行一些上网的操作,那么计算机的数据包将从TCP443端口上发出,校园网、酒店等网关就会拦截从这个端口上发出的数据包。同理从其它端口上发出的数据包也会遭到拦截。但是有一个神奇的端口,从这个端口发出的数据包不会遭到网关拦截,它就是UDP53端口(UDP53端口上运行的协议是DNS协议(域名解析协议))。常见的内网环境中 , 防火墙可能会限制只允许 udp 53 端口出站,这样我们可以利用 DNS 查询流量来封装 TCP 流量 , 达到绕过防火墙的目的。DNS隧道。从名字上来看就是利用DNS查询过程建立起隧道,传输数据。dns2tcp工具介绍dns2tcp 是一个使用C语言开发的利用DNS隧道转发TCP连接的工具。客户端会在本地监听一个端口,并指定:要使用服务端上面的哪个资源(如ssh、socket、http)我们只需把数据扔进本地的该端口,dns2tcpc将使用DNS隧道传送到服务端。随后,服务端根据客户端指定要使用的资源,将数据转发到其本机的相应端口中去。这里的相应端口,可通过配置文件(/etc/dns2tcpd.conf)配置。准备工作判断DNS解析的53端口是否开放连接校园网,测速在未认证状态下是否可以正常dns解析$ nslookup www.baidu.com Server: 127.0.0.53 Address: 127.0.0.53#53 Non-authoritative answer: www.baidu.com canonical name = www.a.shifen.com. Name: www.a.shifen.com Address: 110.242.68.3 Name: www.a.shifen.com Address: 110.242.68.4可以看到,nslookup解析域名正常,代表DNS解析的53端口正常开放,从这个端口发出的数据包不会遭到网关拦截 ,也就是UDP53端口。云服务器与域名具有公网ip的云服务1台域名一个搭建步骤(ubuntu16.04为例)设置域名解析登录你的域名服务器商如:DNSpod在域名下面添加一个A记录,A记录的名字可以任意,如ns1.vvvtimes.com,A记录的值为你VPS服务器的IP地址。最后,再添加一个NS记录,这个NS的名字可以任意,比如tcp.vvvtimes.com,NS记录的值为你上面添加的A记录的名字,即ns1.vvvtimes.com。服务器端安装DNS2TCPsudo apt update sudo apt install dns2tcp编辑DNS2TCP配置文件在 /etc 建立一个名为 dns2tcpd.conf 的文件, 然后输入以下配置:listen = 0.0.0.0 port = 53 user = nobody chroot = /tmp domain = tcp.vvvtimes.com(上面配置NS记录的域名) key = fuckoff (密码,可选) resources = ssh:127.0.0.1:22,socks:127.0.0.1:1082,http:127.0.0.1:3128 启动 DNS2TCP(建议使用screen启动)dns2tcpd -f /etc/dns2tcpd.conf -F -d 2 注意:腾讯云服务器不给实际网卡分配公网IP,所以要监听0.0.0.0客户端安装DNS2TCPsudo apt update sudo apt install dns2tcp启动 DNS2TCP(建议使用screen启动)dns2tcpc -c -k fuckoff -r ssh -z tcp.vvvtimes.com 1.2.3.4 -l 2222 -d 2 -k 后接密码,与服务器端的配置保持一致即可 -r 后接服务名称, 这里我们用ssh -z 后接NS记录的网址, ip, 注意IP地址最好写上, 可以不写 -l 后接本地端口 -d 开启 Debug测试ssh连接测试ssh root@127.0.0.1 -p 2222可以直接登陆你的server ssh。设置ssh隧道(偶尔会提示reset peer或许要多试几次):ssh -CfNg root@127.0.0.1 -p 2222 -D 7002查看端口是否开放$ lsof -i:2222 COMMAND PID USER FD TYPE DEVICE SIZE/OFF NODE NAME dns2tcpc 28938 bonelee 4u IPv4 11154775 0t0 TCP localhost:2222 (LISTEN) dns2tcpc 28938 bonelee 5u IPv4 11157735 0t0 TCP localhost:2222->localhost:46296 (ESTABLISHED) ssh 28953 bonelee 3u IPv4 11157734 0t0 TCP localhost:46296->localhost:2222 (ESTABLISHED) $ lsof -i:7002 COMMAND PID USER FD TYPE DEVICE SIZE/OFF NODE NAME ssh 28953 bonelee 4u IPv4 11160083 0t0 TCP *:afs3-prserver (LISTEN) ssh 28953 bonelee 5u IPv6 11160084 0t0 TCP *:afs3-prserver (LISTEN)浏览器里直接socks5代理127.0.0.1 7002端口即可上网了!上谷歌也是可以的。。。不过速度就不咋地。。。参考资料通过dns2tcp绕过校园网认证进行免费上网[DNS隧道之DNS2TCP实现——dns2tcpc必须带server IP才可以,此外ssh可以穿过墙的,设置代理上网]使用DNS2TCP搭建DNS隧道,绕过网络认证,实现免验证上网
-
linux iperf 局域网测速 linux iperf 局域网测速iperf 百科描述Iperf 是一个网络性能测试工具。Iperf可以测试最大TCP和UDP带宽性能,具有多种参数和UDP特性,可以根据需要调整,可以报告带宽、延迟抖动和数据包丢失iperf使用1.服务端启动服务,作为server:sudo apt-get install iperf iperf -s -i 2 # 每两秒间隔输出测试结果2.客户端启动服务,作为client:sudo apt-get install iperf iperf -c <server_IP> -t 10iperf 结果分析每两秒输出的结果 Transfer是数据量,Bandwidth是这些数据量的传输时的速度Server listening on TCP port 5001 TCP window size: 128 KByte (default) ------------------------------------------------------------ [ 4] local 192.168.0.120 port 5001 connected with 192.168.0.233 port 56144 [ ID] Interval Transfer Bandwidth [ 4] 0.0- 2.0 sec 22.3 MBytes 93.7 Mbits/sec [ 4] 2.0- 4.0 sec 22.4 MBytes 94.1 Mbits/sec [ 4] 4.0- 6.0 sec 22.4 MBytes 94.2 Mbits/sec [ 4] 6.0- 8.0 sec 22.4 MBytes 94.1 Mbits/sec [ 4] 8.0-10.0 sec 22.4 MBytes 94.1 Mbits/sec [ 4] 0.0-10.0 sec 113 MBytes 94.1 Mbits/sec参考资料1.arm linux iperf 局域网测速:https://blog.csdn.net/shenhuxi_yu/article/details/111612609
-
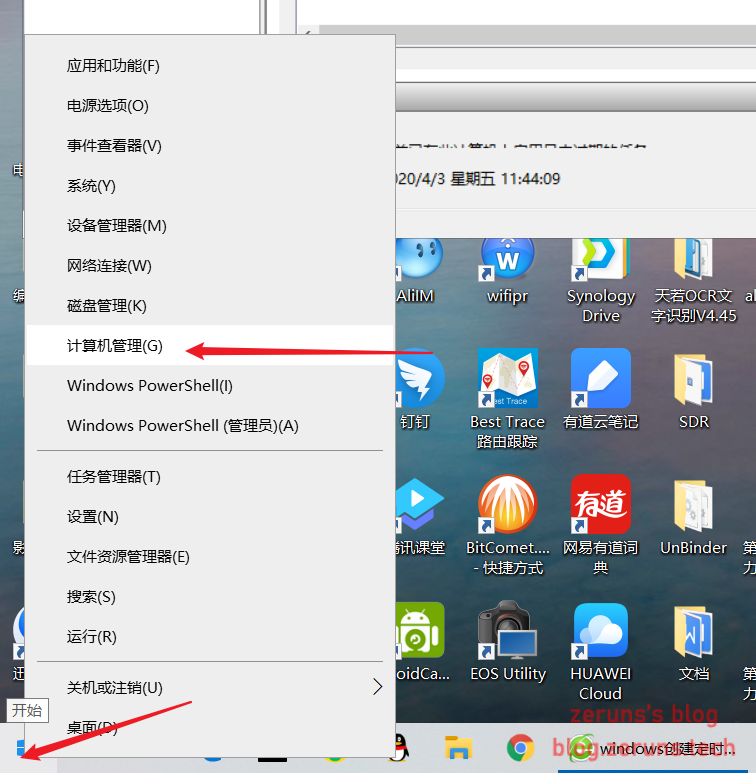
python实现阿里云域名ipv4和ipv6 ddns 1.前言首先得有一个阿里云的域名:https://www.aliyun.com/minisite/goods?userCode=jdjc69nf然后你的IP必须是公网IP,不然解析了也没用。本文章讲怎样通过阿里云的SDK来添加修改域名解析,检查本机IP与解析的IP是否一致,不一致自动修改解析,达到动态解析的目的,主要用于家庭宽带这些动态IP的地方。2.安装阿里云SDK和其他第三方库pip install aliyun-python-sdk-core-v3 pip install aliyun-python-sdk-domain pip install aliyun-python-sdk-alidns pip install requests3.获取accessKeyId和accessSecret可以在阿里云控制台个人中心直接获取,但是一般建议使用RAM角色来进行权限控制,这样这个accessKey和accessSecret就只能操作域名,不能操作其他的资源,相对会比较安全。关于RAM快速入门:https://help.aliyun.com/document_detail/28637.html?source=5176.11533457&userCode=jdjc69nf4.源码下载-官方4.1 下载地址gitee:https://gitee.com/zeruns/aliddns_Pythongithub:https://github.com/zeruns/-Python-aliddns_ipv4-ipv6将aliddns.py文件下载下来。然后用notepad++或其他编辑器打开,按照注释提示修改并保存。然后运行一下看看有没有问题:打开cmd输入python 脚本目录4.2源码备份from aliyunsdkcore.client import AcsClient from aliyunsdkcore.acs_exception.exceptions import ClientException from aliyunsdkcore.acs_exception.exceptions import ServerException from aliyunsdkalidns.request.v20150109.DescribeSubDomainRecordsRequest import DescribeSubDomainRecordsRequest from aliyunsdkalidns.request.v20150109.DescribeDomainRecordsRequest import DescribeDomainRecordsRequest import requests from urllib.request import urlopen import json ipv4_flag = 1 # 是否开启ipv4 ddns解析,1为开启,0为关闭 ipv6_flag = 1 # 是否开启ipv6 ddns解析,1为开启,0为关闭 accessKeyId = "accessKeyId" # 将accessKeyId改成自己的accessKeyId accessSecret = "accessSecret" # 将accessSecret改成自己的accessSecret domain = "4v7p.top" # 你的主域名 name_ipv4 = "ipv4.test" # 要进行ipv4 ddns解析的子域名 name_ipv6 = "ipv6.test" # 要进行ipv6 ddns解析的子域名 client = AcsClient(accessKeyId, accessSecret, 'cn-hangzhou') def update(RecordId, RR, Type, Value): # 修改域名解析记录 from aliyunsdkalidns.request.v20150109.UpdateDomainRecordRequest import UpdateDomainRecordRequest request = UpdateDomainRecordRequest() request.set_accept_format('json') request.set_RecordId(RecordId) request.set_RR(RR) request.set_Type(Type) request.set_Value(Value) response = client.do_action_with_exception(request) def add(DomainName, RR, Type, Value): # 添加新的域名解析记录 from aliyunsdkalidns.request.v20150109.AddDomainRecordRequest import AddDomainRecordRequest request = AddDomainRecordRequest() request.set_accept_format('json') request.set_DomainName(DomainName) request.set_RR(RR) # https://blog.zeruns.tech request.set_Type(Type) request.set_Value(Value) response = client.do_action_with_exception(request) if ipv4_flag == 1: request = DescribeSubDomainRecordsRequest() request.set_accept_format('json') request.set_DomainName(domain) request.set_SubDomain(name_ipv4 + '.' + domain) response = client.do_action_with_exception(request) # 获取域名解析记录列表 domain_list = json.loads(response) # 将返回的JSON数据转化为Python能识别的 ip = urlopen('https://api-ipv4.ip.sb/ip').read() # 使用IP.SB的接口获取ipv4地址 ipv4 = str(ip, encoding='utf-8') print("获取到IPv4地址:%s" % ipv4) if domain_list['TotalCount'] == 0: add(domain, name_ipv4, "A", ipv4) print("新建域名解析成功") elif domain_list['TotalCount'] == 1: if domain_list['DomainRecords']['Record'][0]['Value'].strip() != ipv4.strip(): update(domain_list['DomainRecords']['Record'][0]['RecordId'], name_ipv4, "A", ipv4) print("修改域名解析成功") else: # https://blog.zeruns.tech print("IPv4地址没变") elif domain_list['TotalCount'] > 1: from aliyunsdkalidns.request.v20150109.DeleteSubDomainRecordsRequest import DeleteSubDomainRecordsRequest request = DeleteSubDomainRecordsRequest() request.set_accept_format('json') request.set_DomainName(domain) # https://blog.zeruns.tech request.set_RR(name_ipv4) response = client.do_action_with_exception(request) add(domain, name_ipv4, "A", ipv4) print("修改域名解析成功") print("本程序版权属于zeruns,博客:https://blog.zeruns.tech") if ipv6_flag == 1: request = DescribeSubDomainRecordsRequest() request.set_accept_format('json') request.set_DomainName(domain) request.set_SubDomain(name_ipv6 + '.' + domain) response = client.do_action_with_exception(request) # 获取域名解析记录列表 domain_list = json.loads(response) # 将返回的JSON数据转化为Python能识别的 ip = urlopen('https://api-ipv6.ip.sb/ip').read() # 使用IP.SB的接口获取ipv6地址 ipv6 = str(ip, encoding='utf-8') print("获取到IPv6地址:%s" % ipv6) if domain_list['TotalCount'] == 0: add(domain, name_ipv6, "AAAA", ipv6) print("新建域名解析成功") elif domain_list['TotalCount'] == 1: if domain_list['DomainRecords']['Record'][0]['Value'].strip() != ipv6.strip(): update(domain_list['DomainRecords']['Record'][0]['RecordId'], name_ipv6, "AAAA", ipv6) print("修改域名解析成功") else: # https://blog.zeruns.tech print("IPv6地址没变") elif domain_list['TotalCount'] > 1: from aliyunsdkalidns.request.v20150109.DeleteSubDomainRecordsRequest import DeleteSubDomainRecordsRequest request = DeleteSubDomainRecordsRequest() request.set_accept_format('json') request.set_DomainName(domain) request.set_RR(name_ipv6) # https://blog.zeruns.tech response = client.do_action_with_exception(request) add(domain, name_ipv6, "AAAA", ipv6) print("修改域名解析成功")6.设置定时任务6.1 Linux操作使用crontab -e写入定时任务即可。例如:6.2 windows操作右键点击电脑左下角,再点击计算机管理点击任务计划程序,再点击创建任务,输入要设置的任务名称。新建触发器,执行间隔可以自己设置,持续时间改成无限期。新建操作,这一步很重要,配置错误就会导致脚本文件执行不成功!!!最后确认就行。参考资料Python实现阿里云域名DDNS支持ipv4和ipv6:https://developer.aliyun.com/article/755182
-
CentOS7设置上网代理 CentOS设置上网代理1、网页上网网页上网设置代理很简单,在firefox浏览器下 Edit-->>Preferences-->>Advanced-->>Network在Connection下点击Settings,里面的manual proxy configuration里设置IP和PORT即可,2、系统环境代理设置设置全局代理修改 /etc/profile 文件,添加下面内容:http_proxy=http://username:password@yourproxy:8080/ https_proxy=https://username:password@yourproxy:8080/ export http_proxy export https_proxy如果没有密码限制,则以上内容可以修改为以下内容:http_proxy=http://yourproxy:8080/ https_proxy=https://yourproxy:8080/ export http_proxy export https_proxy针对某个用户设置代理只修改 ~/.bash_profile 文件,文件内容与上面的 /etc/profile 相同http_proxy=http://username:password@yourproxy:8080/ https_proxy=https://username:password@yourproxy:8080/ export http_proxy export https_proxy如果没有密码限制,则以上内容可以修改为以下内容:http_proxy=http://yourproxy:8080/ https_proxy=https://yourproxy:8080/ export http_proxy export https_proxy3、设置yum 的代理对于 yum 的代理,还要另外设置 /etc/yum.conf 文件vi /etc/yum.conf 添加以下代码:http_proxy=http://username:password@yourproxy:8080/ #若无密码限制,则为以下方式 http_proxy=http://yourproxy:8080/4、wget代理设置编辑文件为:/etc/wgetrcvi /etc/wgetrc添加下面两行:http_proxy=http://username:password@yourproxy:8080/ https_proxy=https://username:password@yourproxy:8080/ #若无密码限制,则为以下方式 http_proxy=http://yourproxy:8080/ https_proxy=https://yourproxy:8080/参考资料CentOS设置网络代理:https://blog.csdn.net/u013063153/article/details/78120945CentOS设置上网代理:https://blog.csdn.net/bohenzong1654/article/details/100964835?utm_medium=distribute.pc_relevant.none-task-blog-searchFromBaidu-1.control&depth_1-utm_source=distribute.pc_relevant.none-task-blog-searchFromBaidu-1.control
-
linux 路由表设置 之 route 指令详解 linux 路由表设置 之 route 指令详解3 种路由类型主机路由主机路由是路由选择表中指向单个IP地址或主机名的路由记录。主机路由的Flags字段为H。例如,在下面的示例中,本地主机通过IP地址192.168.1.1的路由器到达IP地址为10.0.0.10的主机。Destination Gateway Genmask Flags Metric Ref Use Iface ----------- ------- ------- ----- ------ --- --- ----- 10.0.0.10 192.168.1.1 255.255.255.255 UH 0 0 0 eth0网络路由网络路由是代表主机可以到达的网络。网络路由的Flags字段为N。例如,在下面的示例中,本地主机将发送到网络192.19.12的数据包转发到IP地址为192.168.1.1的路由器。Destination Gateway Genmask Flags Metric Ref Use Iface ----------- ------- ------- ----- ----- --- --- ----- 192.19.12 192.168.1.1 255.255.255.0 UN 0 0 0 eth0默认路由当主机不能在路由表中查找到目标主机的IP地址或网络路由时,数据包就被发送到默认路由(默认网关)上。默认路由的Flags字段为G。例如,在下面的示例中,默认路由是IP地址为192.168.1.1的路由器。Destination Gateway Genmask Flags Metric Ref Use Iface ----------- ------- ------- ----- ------ --- --- ----- default 192.168.1.1 0.0.0.0 UG 0 0 0 eth0route 命令格式设置和查看路由表都可以用 route 命令,设置内核路由表的命令格式是:# route [add|del] [-net|-host] target [netmask Nm] [gw Gw] [[dev] If]其中:add : 添加一条路由规则del : 删除一条路由规则-net : 目的地址是一个网络-host : 目的地址是一个主机target : 目的网络或主机netmask : 目的地址的网络掩码gw : 路由数据包通过的网关dev : 为路由指定的网络接口route 命令使用查看路由表route命令查看 Linux 内核路由表# route Destination Gateway Genmask Flags Metric Ref Use Iface 192.168.0.0 * 255.255.255.0 U 0 0 0 eth0 169.254.0.0 * 255.255.0.0 U 0 0 0 eth0 default 192.168.0.1 0.0.0.0 UG 0 0 0 eth0 # route 目标 网关 子网掩码 标志 跃点 引用 使用 接口 192.168.0.0 * 255.255.255.0 U 0 0 0 eth0 169.254.0.0 * 255.255.0.0 U 0 0 0 eth0 default 192.168.0.1 0.0.0.0 UG 0 0 0 eth0 route 命令的输出项说明字段含义Destination(目标)目标网段或者主机Gateway(网关)网关地址,”*” 表示目标是本主机所属的网络,不需要路由Genmask(子网掩码)网络掩码Flags(标志)标记。一些可能的标记如下: U — 路由是活动的 H — 目标是一个主机 G — 路由指向网关 R — 恢复动态路由产生的表项 D — 由路由的后台程序动态地安装 M — 由路由的后台程序修改 ! — 拒绝路由Metric(跃点)路由距离,到达指定网络所需的中转数(linux 内核中没有使用)Ref(引用)路由项引用次数(linux 内核中没有使用)Use(使用)此路由项被路由软件查找的次数Iface(接口)该路由表项对应的输出接口修改路由表添加路由添加到主机的路由# route add -host 192.168.1.2 dev eth0 # route add -host 10.20.30.148 gw 10.20.30.40 #添加到10.20.30.148的路由记录添加到网络的路由# route add -net 10.20.30.40 netmask 255.255.255.248 eth0 #添加10.20.30.40的网络 # route add -net 10.20.30.48 netmask 255.255.255.248 gw 10.20.30.41 #添加10.20.30.48的网络 # route add -net 192.168.1.0/24 eth1添加默认路由(网关)# route add default gw 192.168.1.1删除路由删除到主机的路由# route del -host 192.168.1.2 dev eth0:0 # route del -host 10.20.30.148 gw 10.20.30.40删除到网络的路由# route del -net 10.20.30.40 netmask 255.255.255.248 eth0 # route del -net 10.20.30.48 netmask 255.255.255.248 gw 10.20.30.41 # route del -net 192.168.1.0/24 eth1删除默认网关# route del default gw 192.168.1.1屏蔽路由# route add -net 224.0.0.0 netmask 240.0.0.0 reject查看结果Destination Gateway Genmask Flags Metric Ref Use Iface 224.0.0.0 - 240.0.0.0 ! 0 - 0 -说明:增加一条屏蔽的路由,目的地址为 224.x.x.x 将被拒绝参考资料linux 路由表设置 之 route 指令详解:https://blog.csdn.net/chenlycly/article/details/52141854
-
Python3实现局域网存活主机扫描(多线程) Python3实现局域网存活主机扫描import os import time import platform import threading def get_os(): ''''' get os 类型 ''' os = platform.system() if os == "Windows": return "n" else: return "c" def ping_ip(ip_str): cmd = ["ping", "-{op}".format(op=get_os()), "1", ip_str] output = os.popen(" ".join(cmd)).readlines() flag = False for line in list(output): if not line: continue if str(line).upper().find("TTL") >=0: flag = True break if flag: print("ip: %s is ok ***"%ip_str) def find_ip(ip_prefix): ''''' 给出当前的127.0.0 ,然后扫描整个段所有地址 ''' for i in range(1,256): ip = '%s.%s'%(ip_prefix,i) t = threading.Thread(target=ping_ip, args=(ip,)) # 注意传入的参数一定是一个元组! t.start() if __name__ == "__main__": print("start time %s"%time.ctime()) ip_prefix = "10.1.130" find_ip(ip_prefix) print("end time %s"%time.ctime())
-
ubuntu 16.04 pptp搭建服务端和客户端及异常处理 服务端1. 安装pptpsudo apt-get install pptpd2. 修改pptpd.conf中的配置信息sudo vim /etc/pptpd.conf在末尾增加下面两行,或者打开的内容里面找到这两行,取消掉注释localip 192.168.0.1 remoteip 192.168.0.234-238,192.168.0.245分别为创建pptp时的主机ip和连接pptp的其他主机使用的ip段,可以自行修改。注意,这里的ip并不是指外网ip或者当前局域网ip,而是指创建(虚拟专用网络)会分配的ip地址。一般这个可以不用修改。3. 修改chap-secrets配置连接pptp 所需要的账号和密码,修改配置文件/etc/ppp/chap-secretssudo vim /etc/ppp/chap-secrets在末尾添加以下内容#用户名 pptpd 密码 * neo pptpd 123456 *末尾的表示可以使用任意IP连入,如果你要设置指定IP才能连接,可以将替换成对应的IP。支持添加多个账号。4. 设置ms-dns配置使用的dns,修改配置文件sudo vim /etc/ppp/pptpd-options在末尾增加下面两行,或者打开的内容里面找到这两行,取消掉注释# 这是谷歌的DNS 可以根据实际填写 ms-dns 8.8.8.8 ms-dns 8.8.4.45. 开启转发修改配置文件sudo vim /etc/sysctl.conf在末尾增加下面内容,或者打开的内容里面找到这一行,取消掉注释net.ipv4.ip_forward=1保存之后执行sudo sysctl -p6. 配置iptables若未安装iptables 执行脚本安装sudo apt-get install iptablestips:若之前安装pptp失败的。执行以下脚本;如果是第一次安装可忽略以下内容(目的为了清除iptables里旧的规则)sudo iptables -F sudo iptables -X sudo iptables -t nat -F sudo iptables -t nat -X然后,允许GRE协议以及1723端口、47端口:sudo iptables -A INPUT -p gre -j ACCEPT sudo iptables -A INPUT -p tcp --dport 1723 -j ACCEPT sudo iptables -A INPUT -p tcp --dport 47 -j ACCEPT7.下一步,开启NAT转发:sudo iptables -t nat -A POSTROUTING -s 192.168.0.0/24 -o eno33 -j MASQUERADE注意,上面的eno33是连接网络的网卡的名称,不同机器这个可能是不一样的。可以在终端输入ifconfig来查看。例如neo@ubuntu:~$ ifconfig ens33 Link encap:Ethernet HWaddr 00:0c:29:37:79:85 inet addr:xxx.xxx.xxx.xxx Bcast:xxx.xxx.xxx.xxx Mask:255.255.255.0 inet6 addr: xxxx::20c:29ff:fe37:xxxx/64 Scope:Link UP BROADCAST RUNNING MULTICAST MTU:1500 Metric:1 RX packets:293 errors:0 dropped:0 overruns:0 frame:0 TX packets:211 errors:0 dropped:0 overruns:0 carrier:0 collisions:0 txqueuelen:1000 RX bytes:26801 (26.8 KB) TX bytes:41763 (41.7 KB)8 重启pptp服务sudo service pptpd restartubuntu客户端1. 安装pptp客户端sudo apt-get install pptp-linux2. 初始化一个连接通道:mypptp使用服务端设置的账号密码neo/6yhn^YHNsudo pptpsetup --create mypptp --server xxx.xxx.xxx.xxx --username neo --password 6yhn^YHN --encrypt --startxxx.xxx.xxx.xxx是pptp mypptp服务端的ip地址 根据实际情况填写(以下示例)root@ubuntu:~# sudo pptpsetup --create mypptp --server 172.31.1.112 --username neo --password 6yhn^YHN --encrypt --start Using interface ppp0 Connect: ppp0 <--> /dev/pts/2 CHAP authentication succeeded MPPE 128-bit stateless compression enabled local IP address 192.168.0.234 remote IP address 192.168.0.13. 查看连接是否成功root@ubuntu:~# ip addr show 1: lo: <LOOPBACK,UP,LOWER_UP> mtu 65536 qdisc noqueue state UNKNOWN group default qlen 1 link/loopback 00:00:00:00:00:00 brd 00:00:00:00:00:00 inet 127.0.0.1/8 scope host lo valid_lft forever preferred_lft forever inet6 ::1/128 scope host valid_lft forever preferred_lft forever 2: ens33: <BROADCAST,MULTICAST,UP,LOWER_UP> mtu 1500 qdisc pfifo_fast state UP group default qlen 1000 link/ether 00:0c:29:xx:86:5f brd ff:ff:ff:ff:ff:ff inet .31.1.113/24 brd xxx.31.1.2xxx5 scope global ens33 valid_lft forever preferred_lft forever inet6 fxx0::20c:29ff:fxx3e:8xxf/64 scope link valid_lft forever preferred_lft forever 8: ppp0: <POINTOPOINT,MULTICAST,NOARP,UP,LOWER_UP> mtu 1496 qdisc pfifo_fast state UNKNOWN group default qlen 3 link/ppp inet 192.168.0.234 peer 192.168.0.1/32 scope global ppp0 valid_lft forever preferred_lft forever也可以在pptp 服务端查看neo@ubuntu:~$ route -n Kernel IP routing table Destination Gateway Genmask Flags Metric Ref Use Iface 0.0.0.0 xxx.xxx.1.1 0.0.0.0 UG 0 0 0 ens33 xxx.xxx.1.0 0.0.0.0 255.255.255.0 U 0 0 0 ens33 192.168.0.234 0.0.0.0 255.255.255.255 UH 0 0 0 ppp04. 断开重启pptp客户端断开连接poff mypptp重接mypptppon mypptp5. 处理错误LCP: timeout sending Config-Requests执行:sudo modprobe nf_conntrack_pptp异常处理1.PPTP连接后无法打开网页,但QQ等软件又能使用的原因和解决方案PPTP连接后,能正常PING通局域网IP,DNS的IP,也能PING通百度这些网站的IP,但是网站偏偏打不开。直接PING域名,发现DNS也能解析域名,证明不是DNS出现的问题。在CMD里输入netsh interface ipv4 show subinterfaces发现PPTP连接“鹏泰机房”的MTU值是1400。而其它的连接都是1500。会不会是MTU没有自动协商造成了网络拥堵。参照下面这篇文章的方法PPTP拨入成功后在CMD里输入netsh interface ipv4 set subinterface "鹏泰机房" mtu=1400 store=persistent把pptp连接MTU固定修改为1400后。如飞的页面又能打开了。2.如果还是有些网页打不开服务器端执行iptables -I FORWARD -p tcp --syn -i ppp0 -j TCPMSS --set-mss 1356 或iptables -A FORWARD -p tcp --syn -s 192.168.0.0/24 -j TCPMSS --set-mss 1356参考资料ubuntu 16.04 pptp搭建服务端和客户端:https://blog.csdn.net/yanghao937170/article/details/105953256分析PPTP连接后无法打开网页,但QQ等软件又能使用的原因和解决方案:https://zhuanlan.zhihu.com/p/250068405PPTP MTU值设置导致主机无法上网问题解决:http://www.361way.com/pptp-mtu-mss/5173.html